Hodl Hodl Beginner Guide: Buy and Sell Bitcoin Step by Step
Create a HodlHodl account
- Visit the official HodlHodl website.
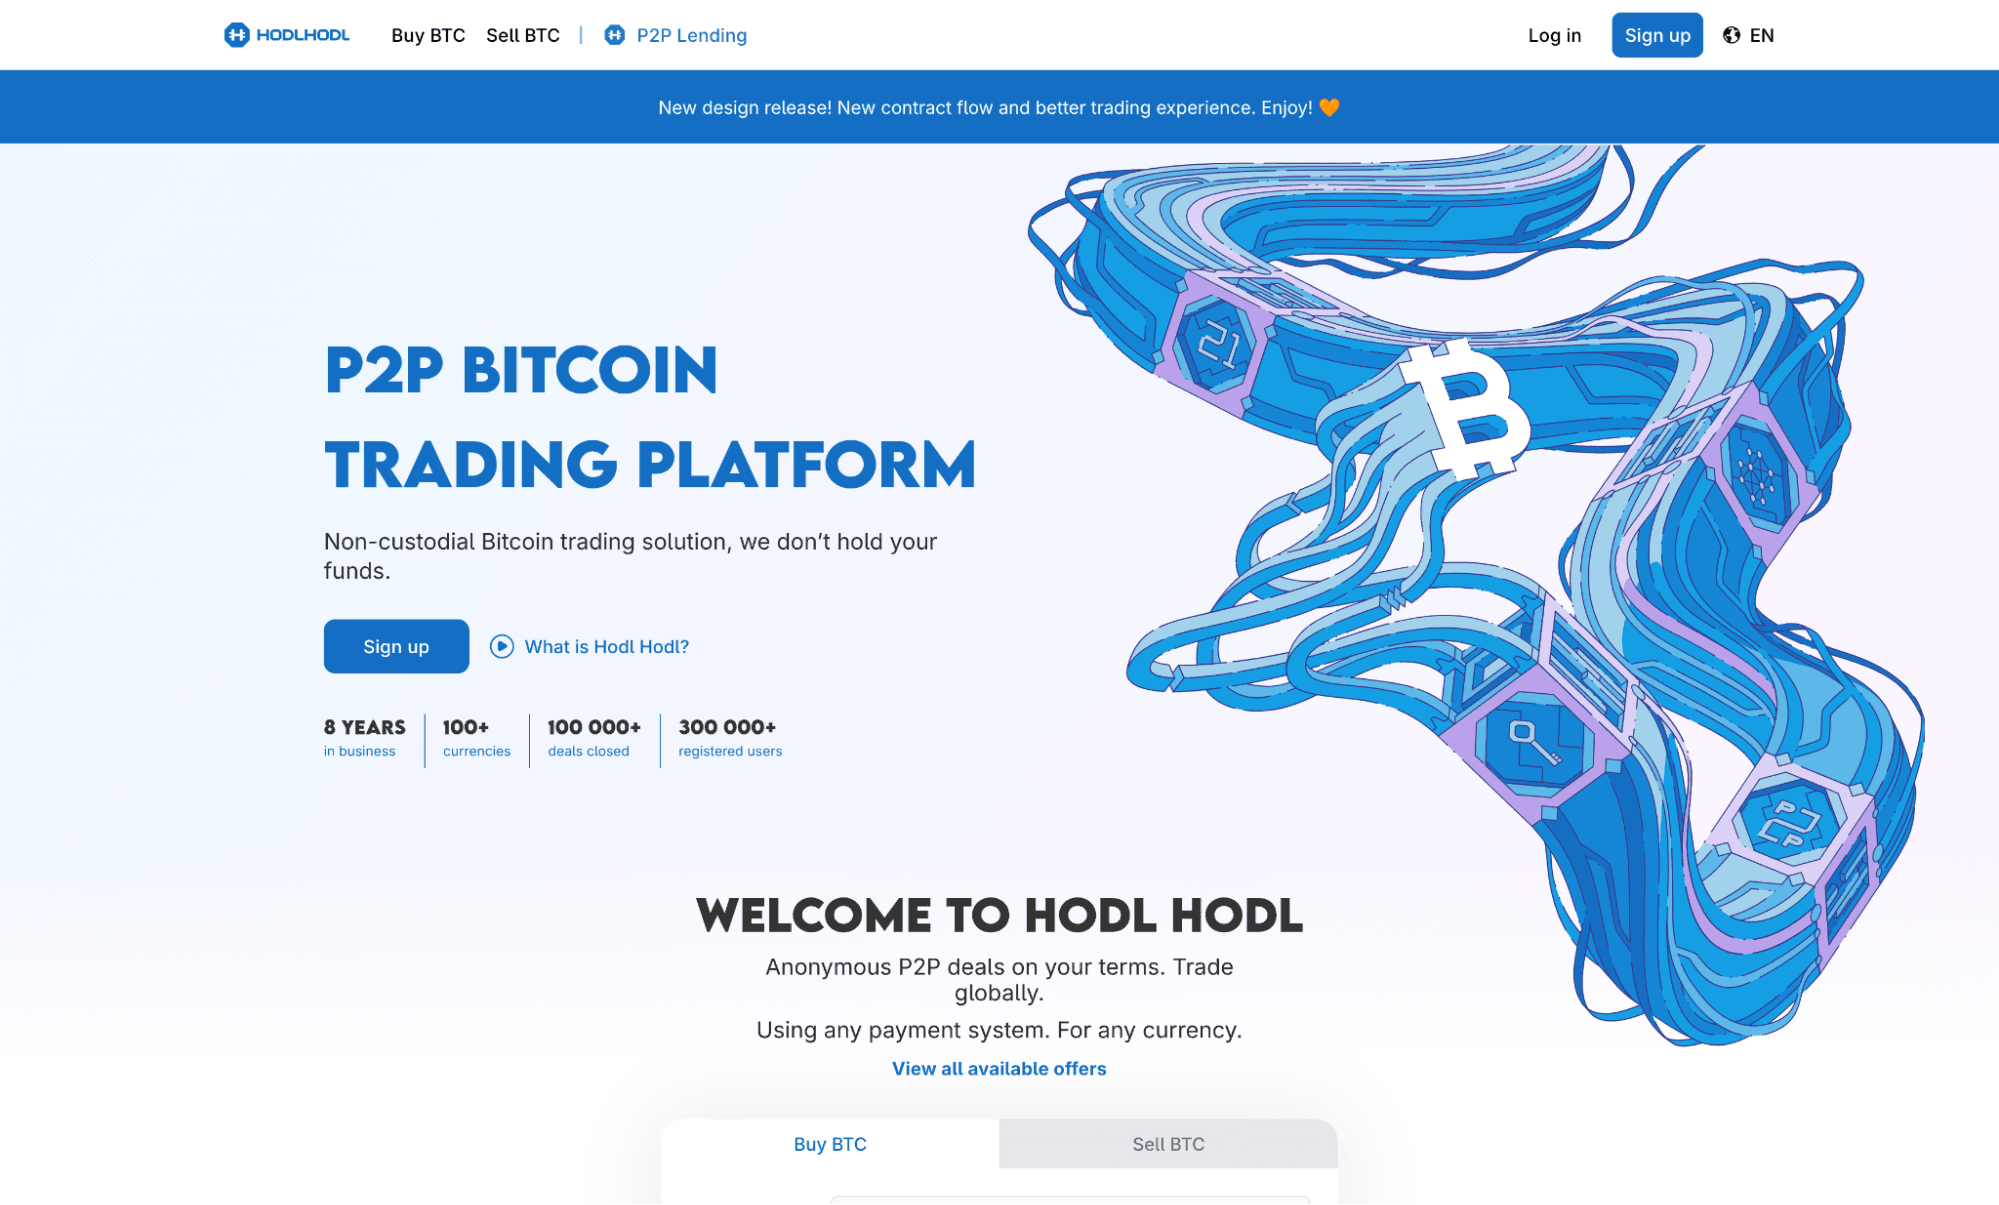
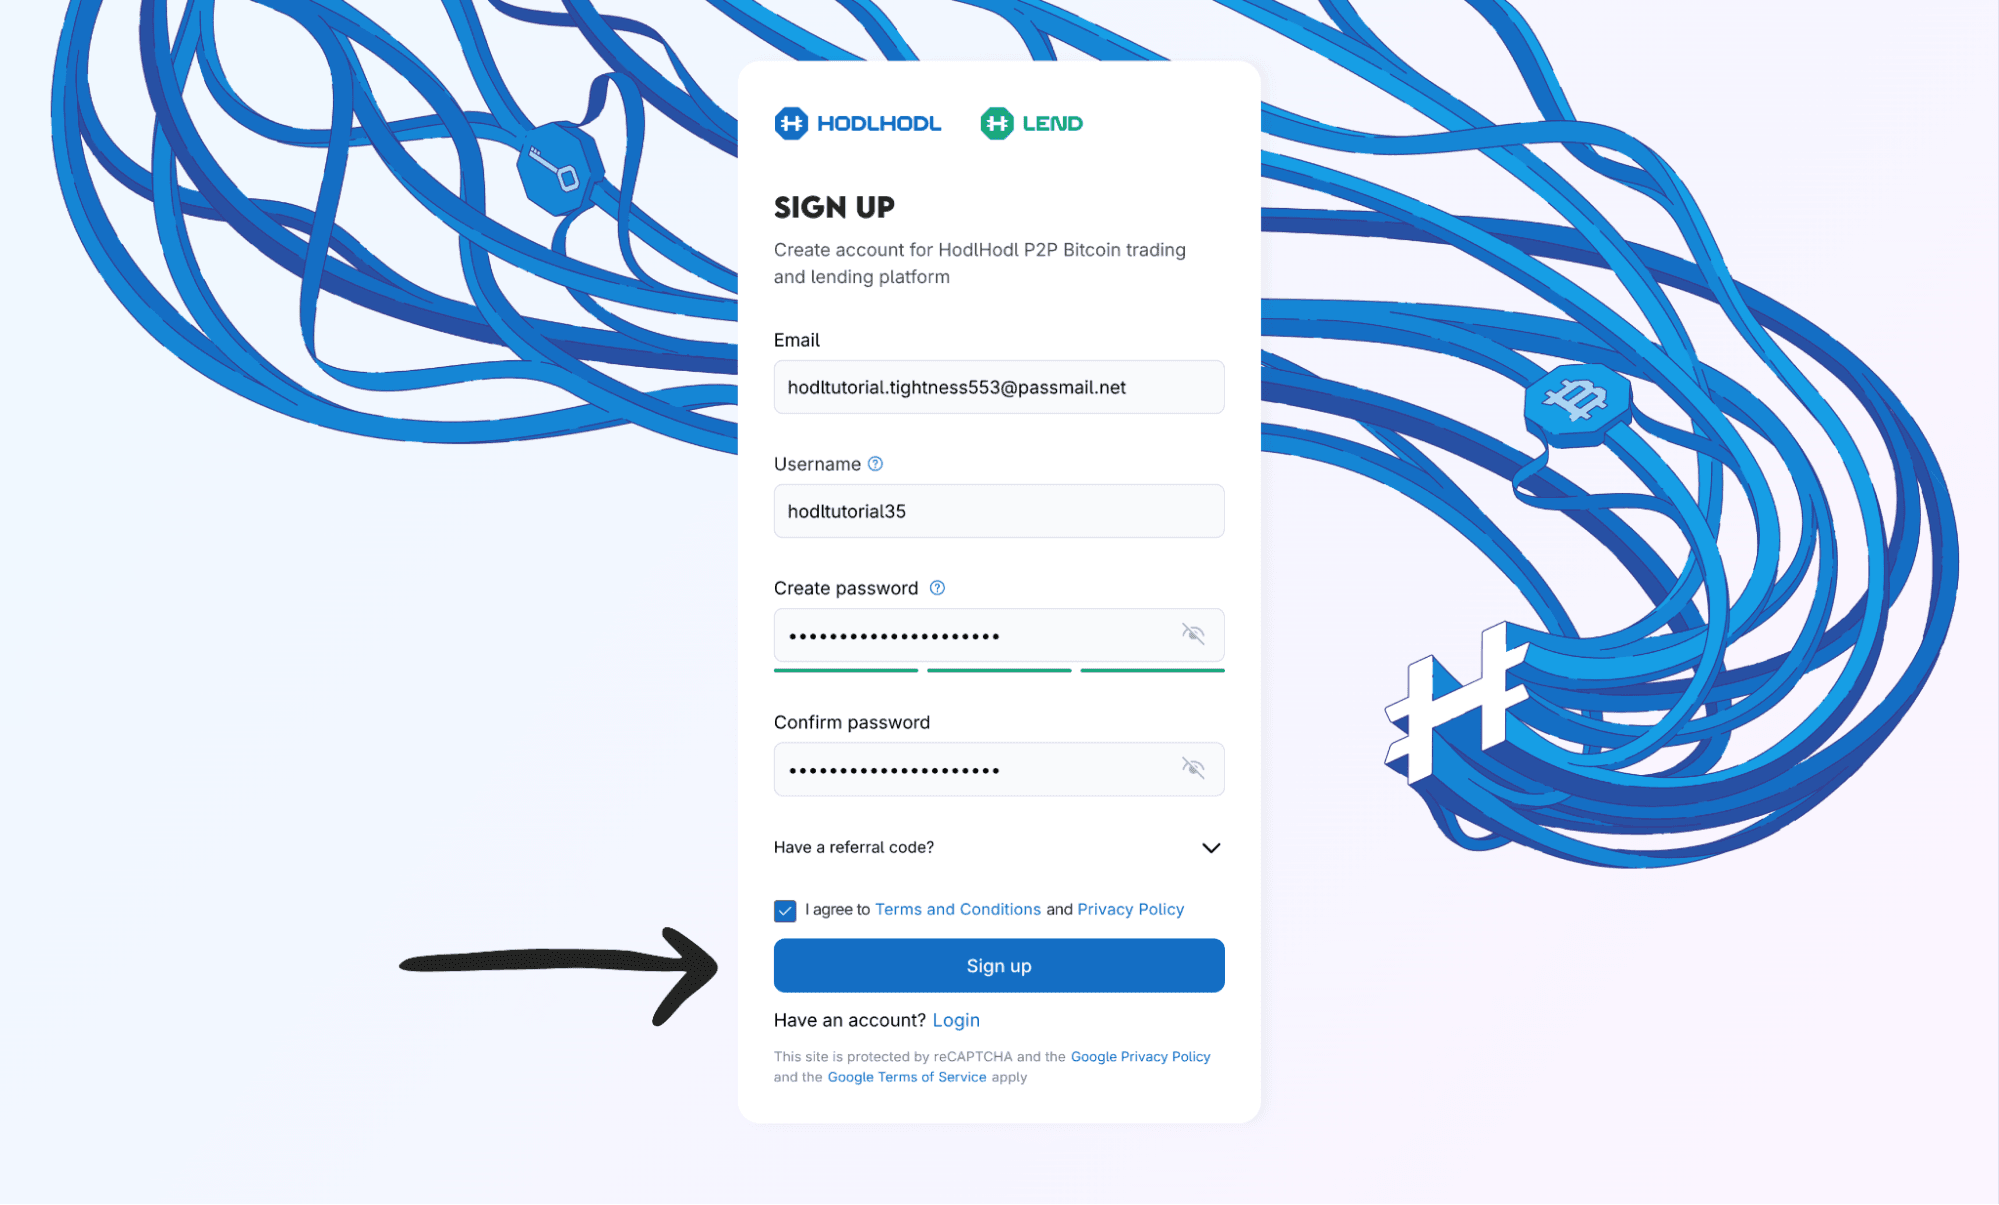
- Click on the "Sign up" button:
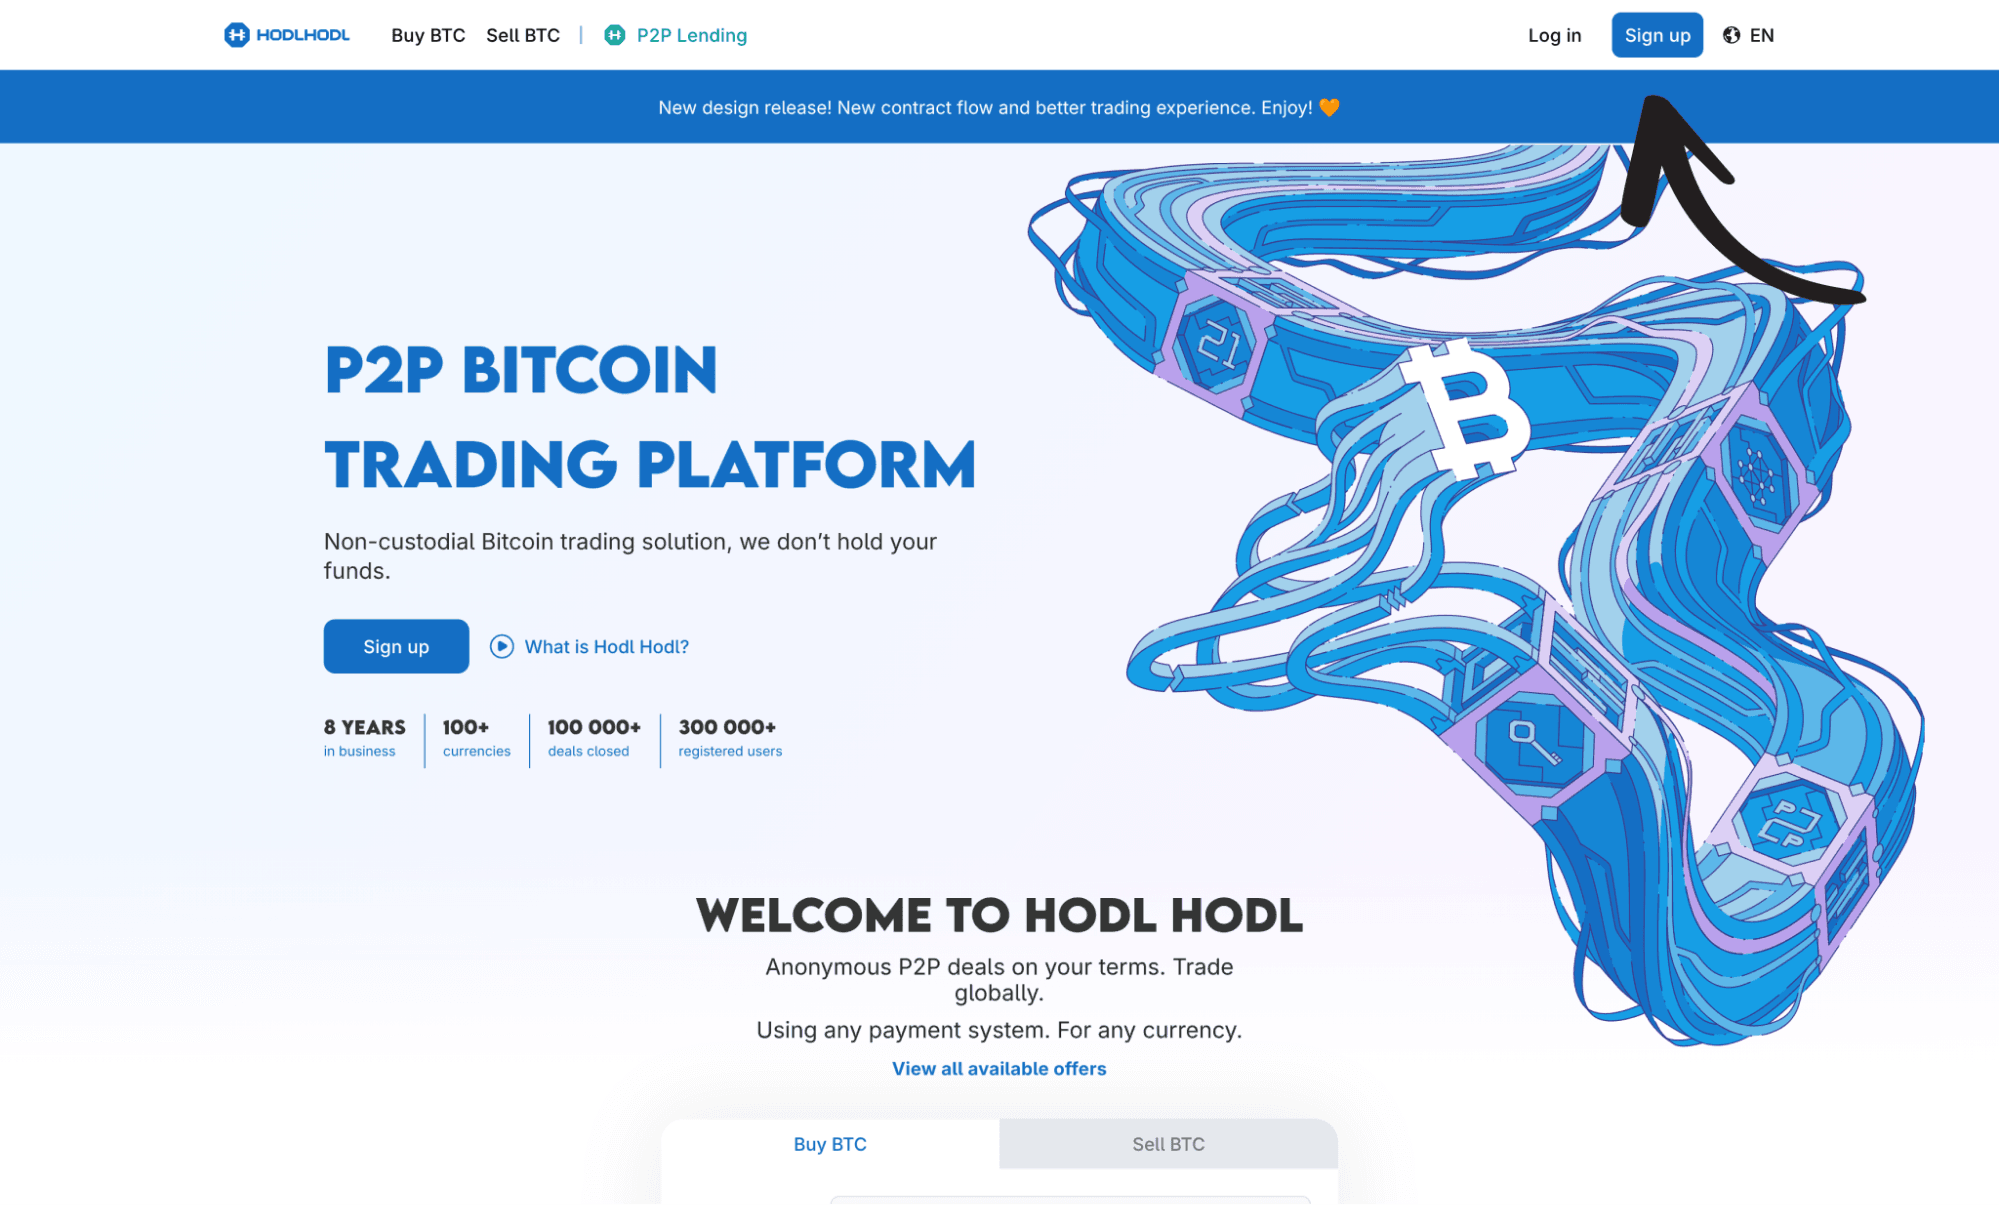
- Enter an email address and username. If you wish to keep your account anonymous, make sure to use an email address & username that does not reveal your name. Then, set a strong password.
-
We recommend using password managers, for creating and storing your passwords.
-
Then, click on the “Sign up” button.
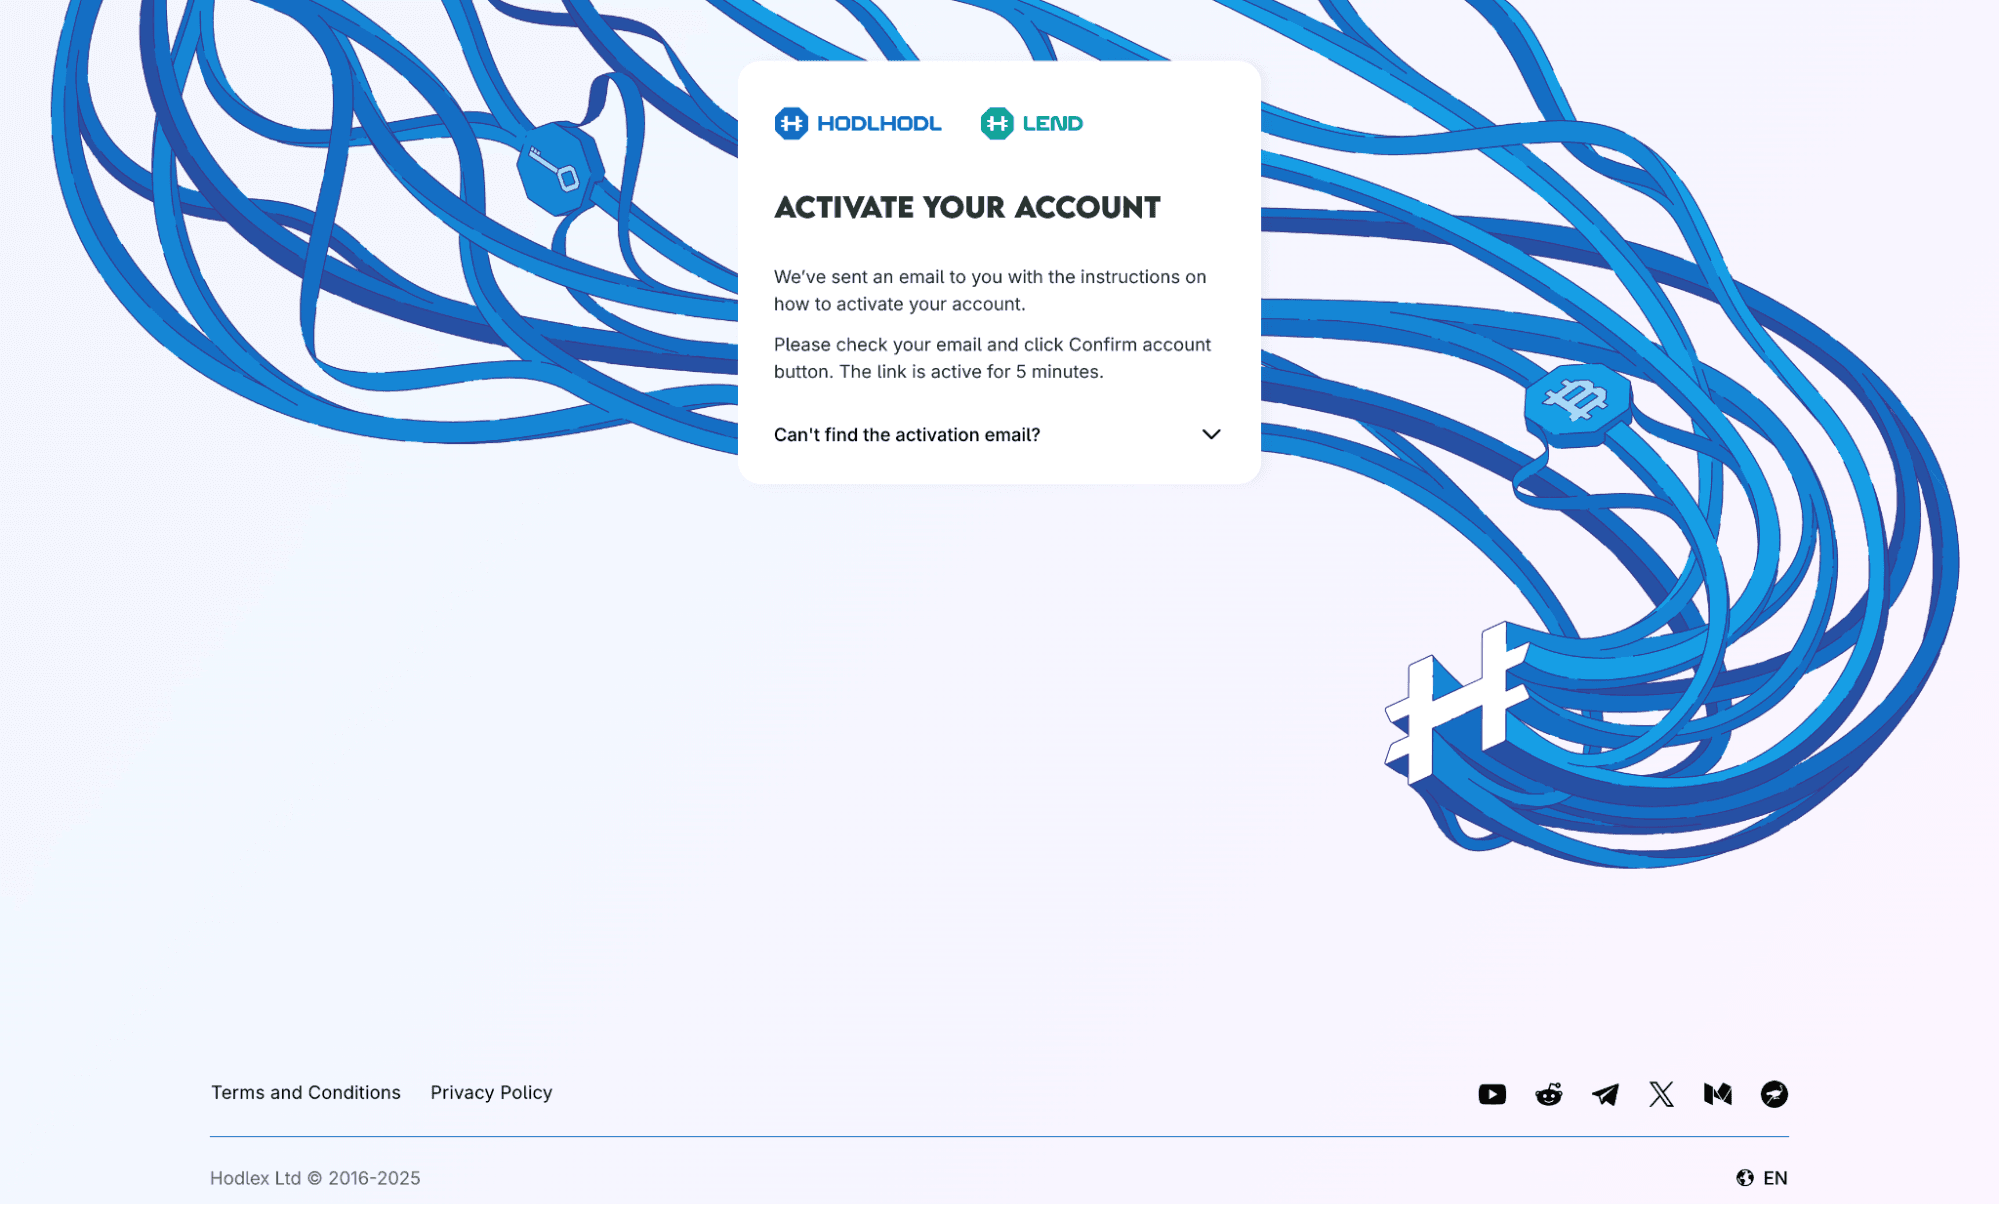
- Go to your mailbox
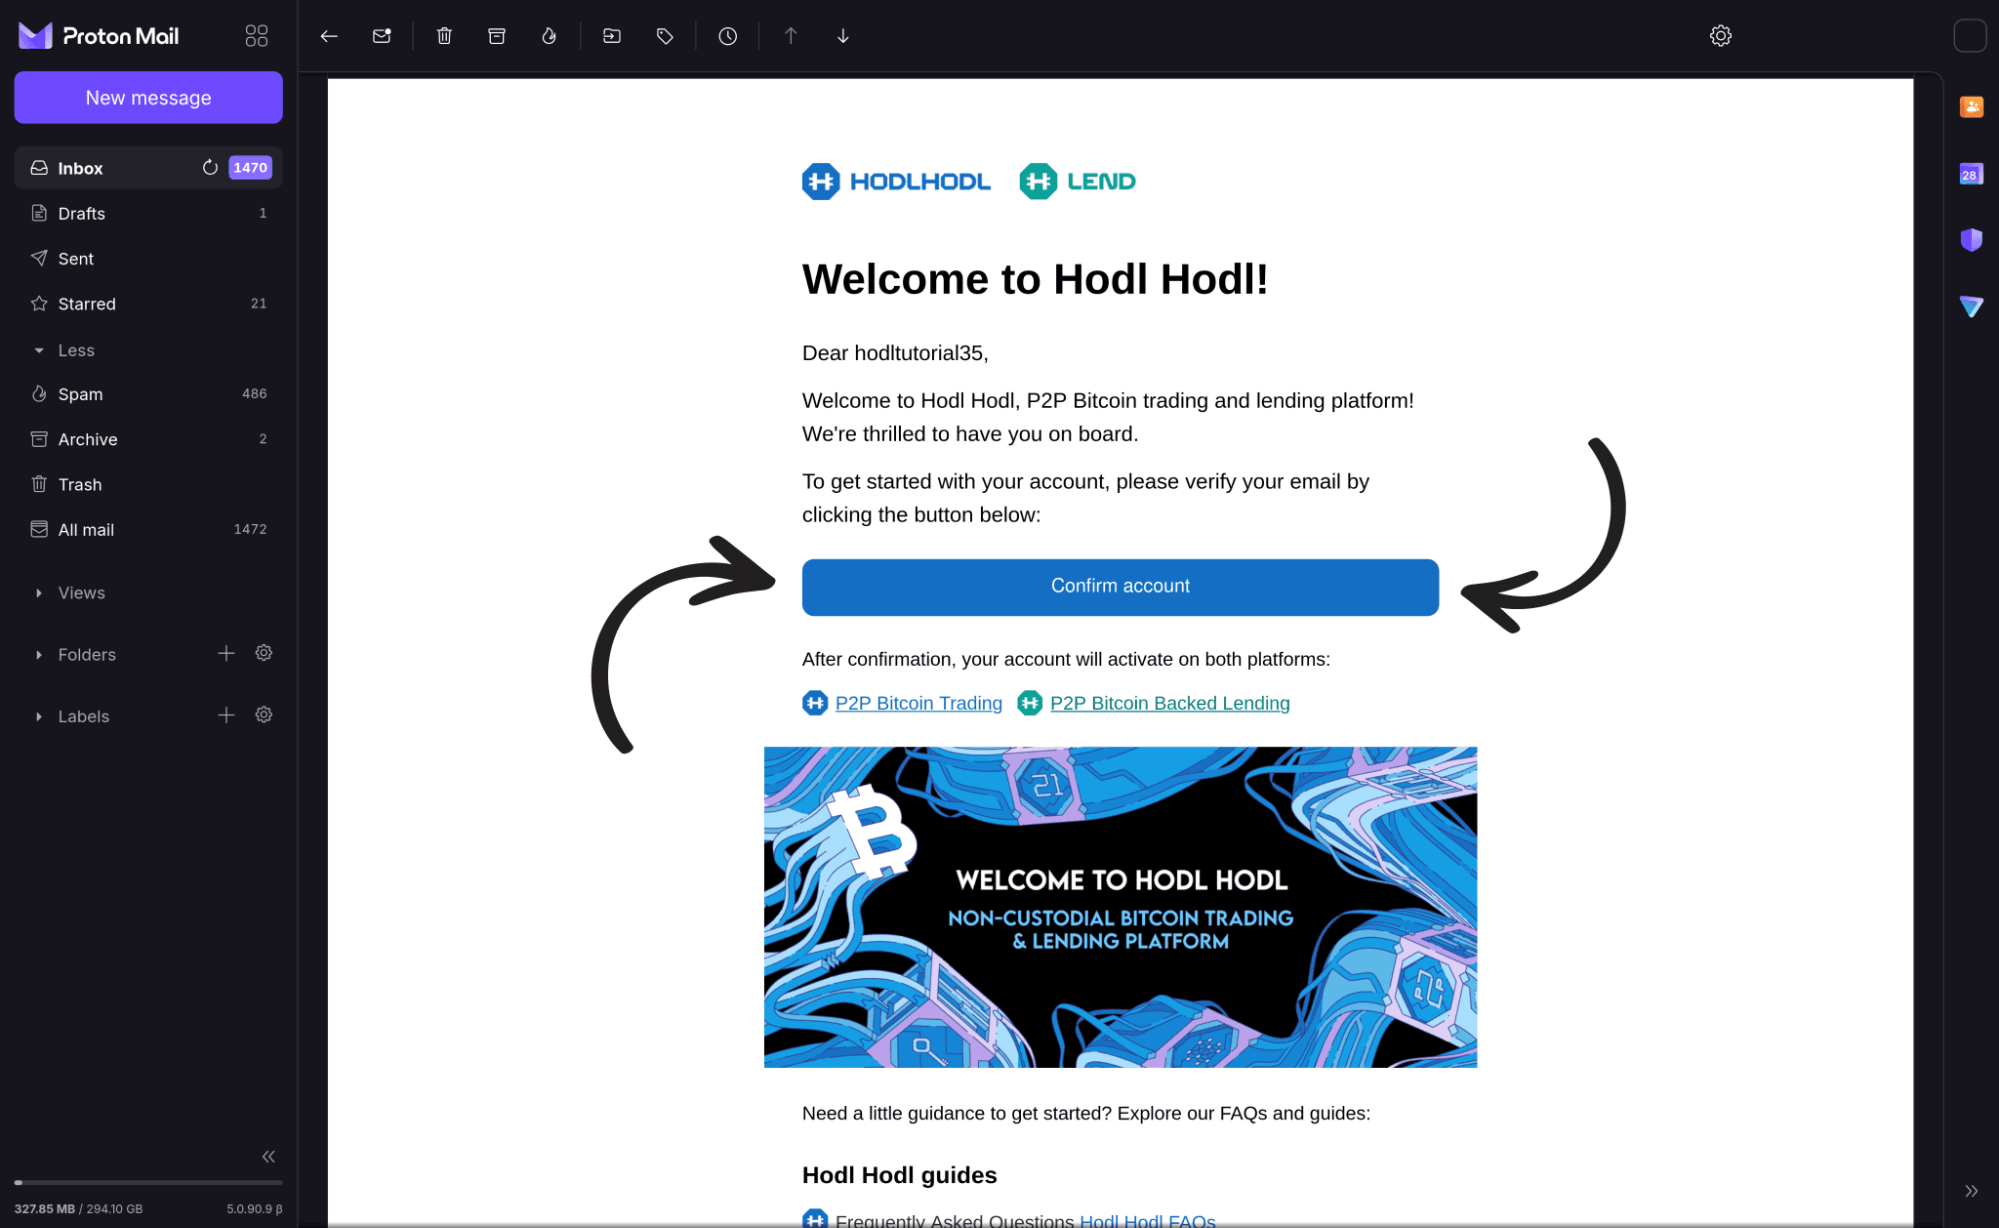
- Then, click on the "Confirm account" button.
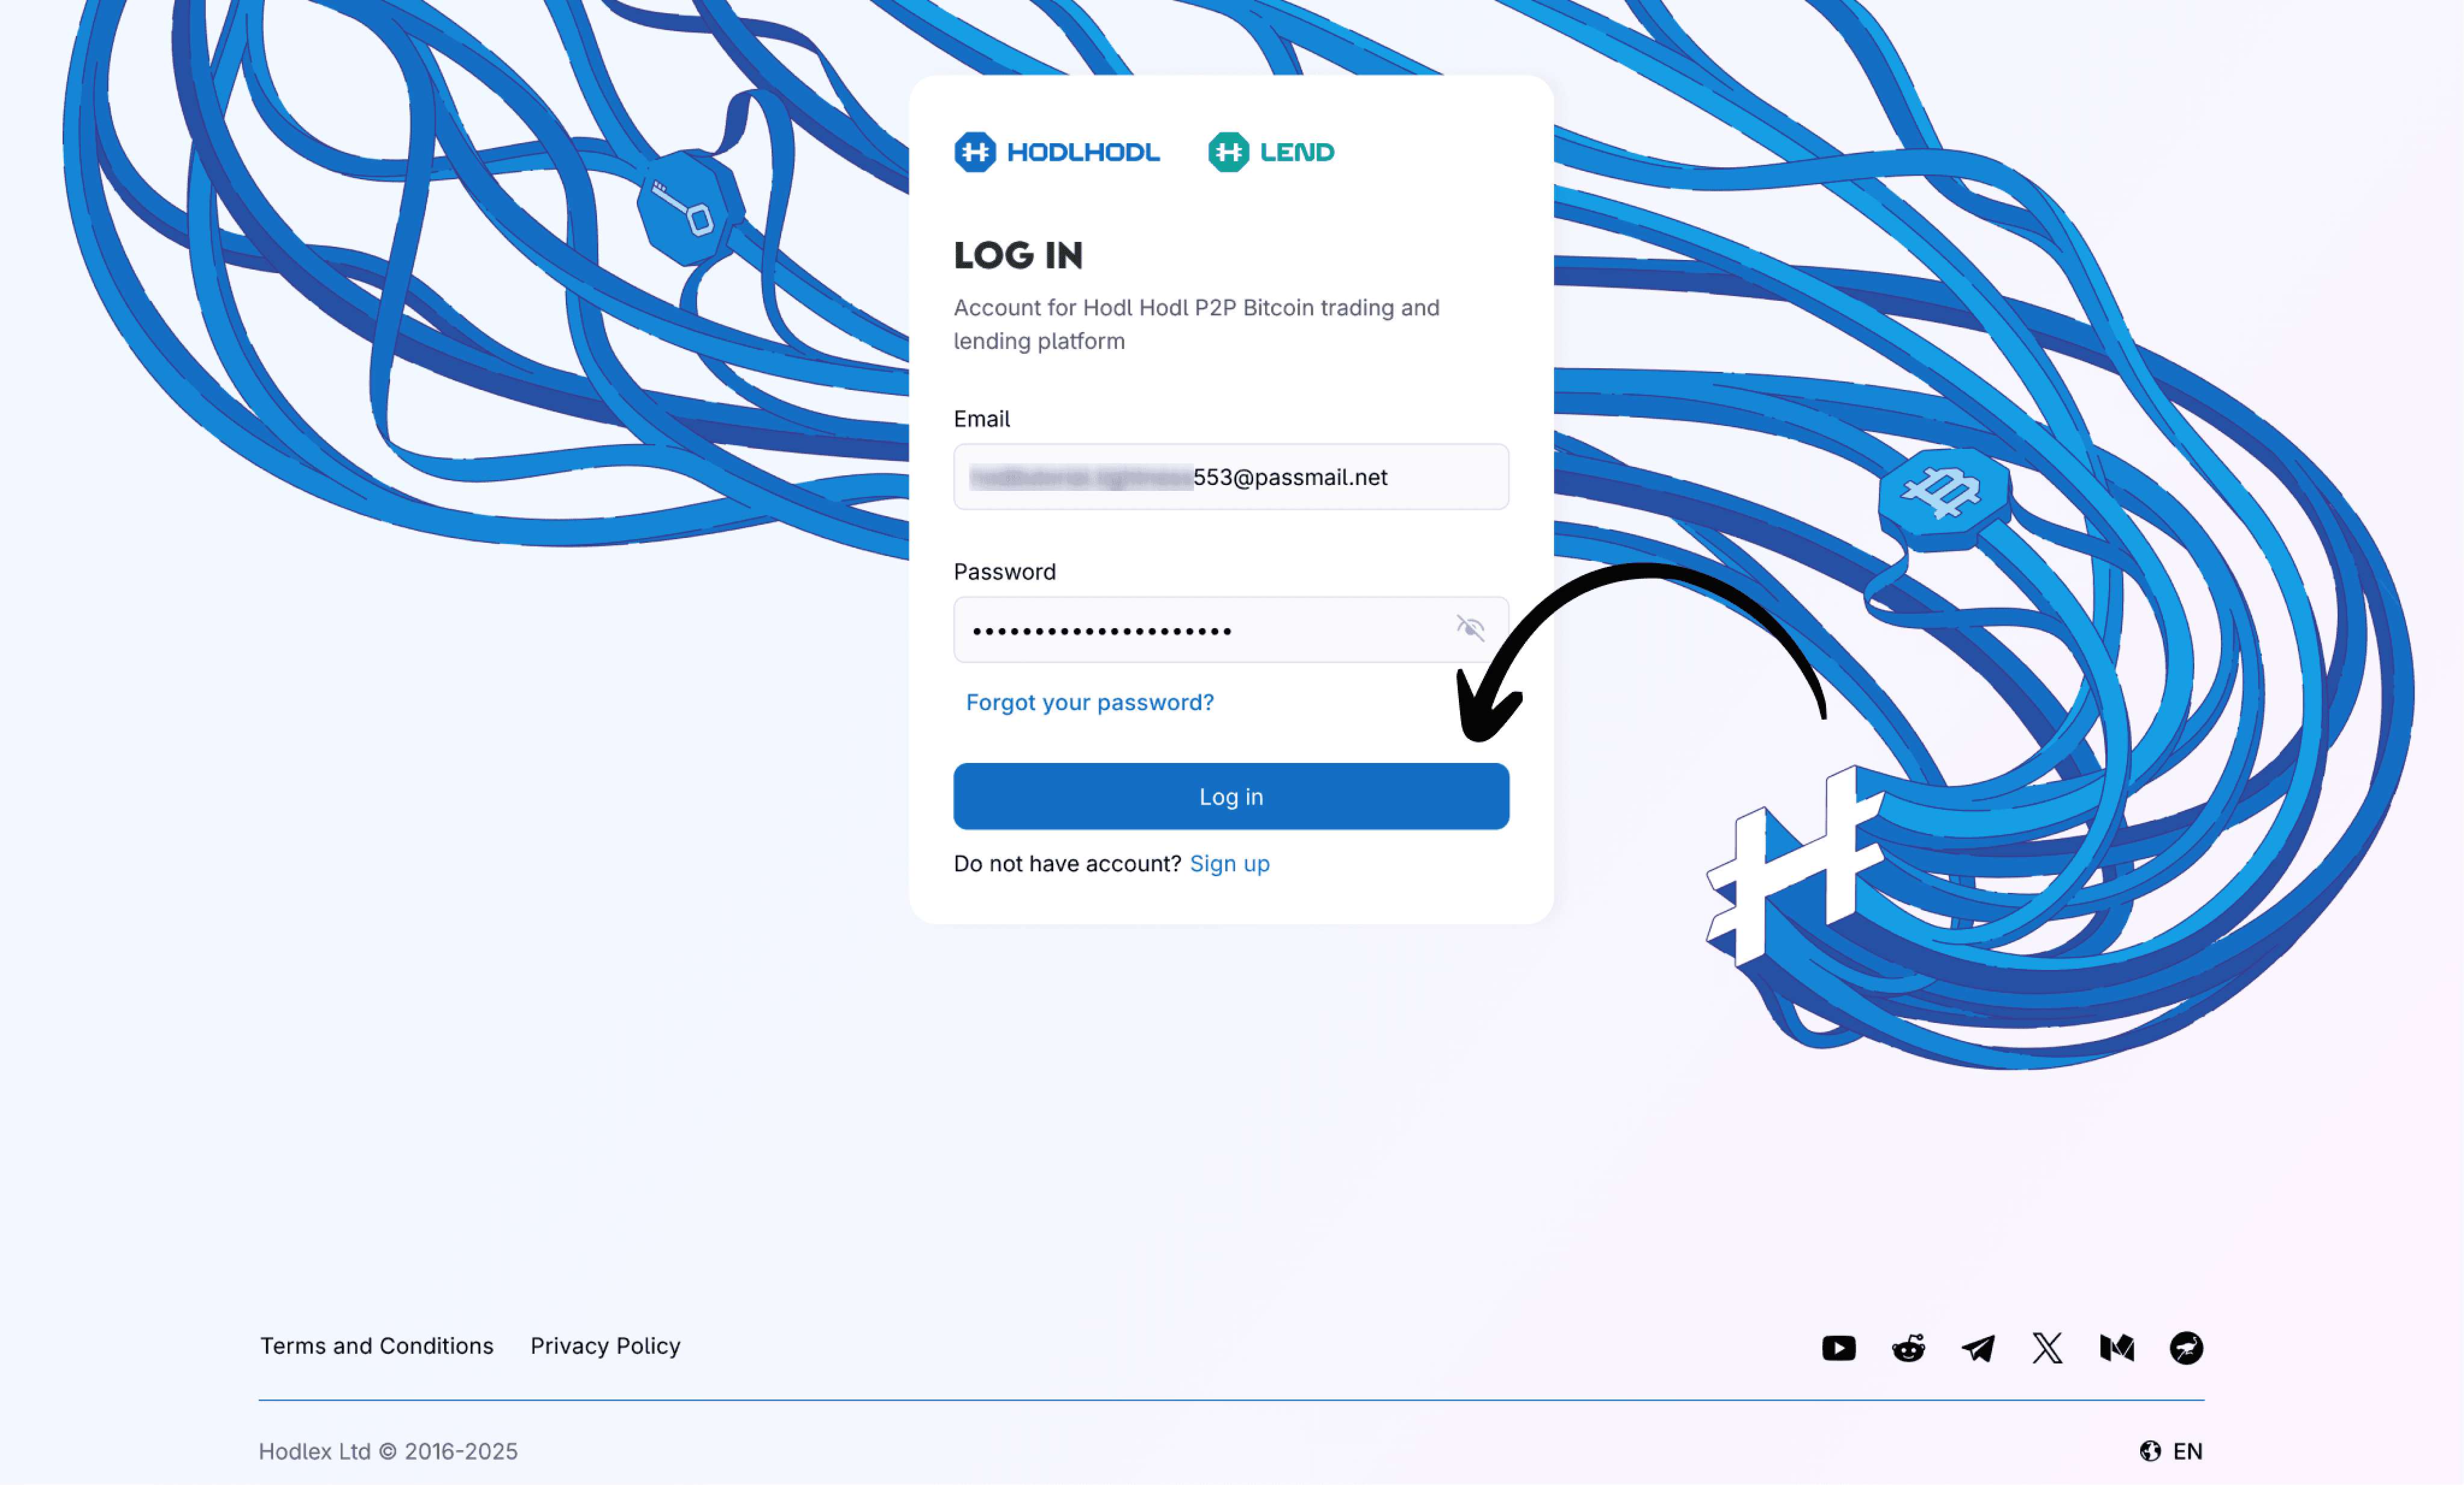
- Next, log in to your account using your email and password.
- We're now going to configure the 2FA to secure the account. Use an authentication application on your smartphone, such as Proton Authenticator, Google Authenticator or Authy for example.
⚠️ Important: Be sure to securely save your backup codes in a safe, offline location. If you lose your phone or access to your authenticator app, these codes are the only way to recover your account.
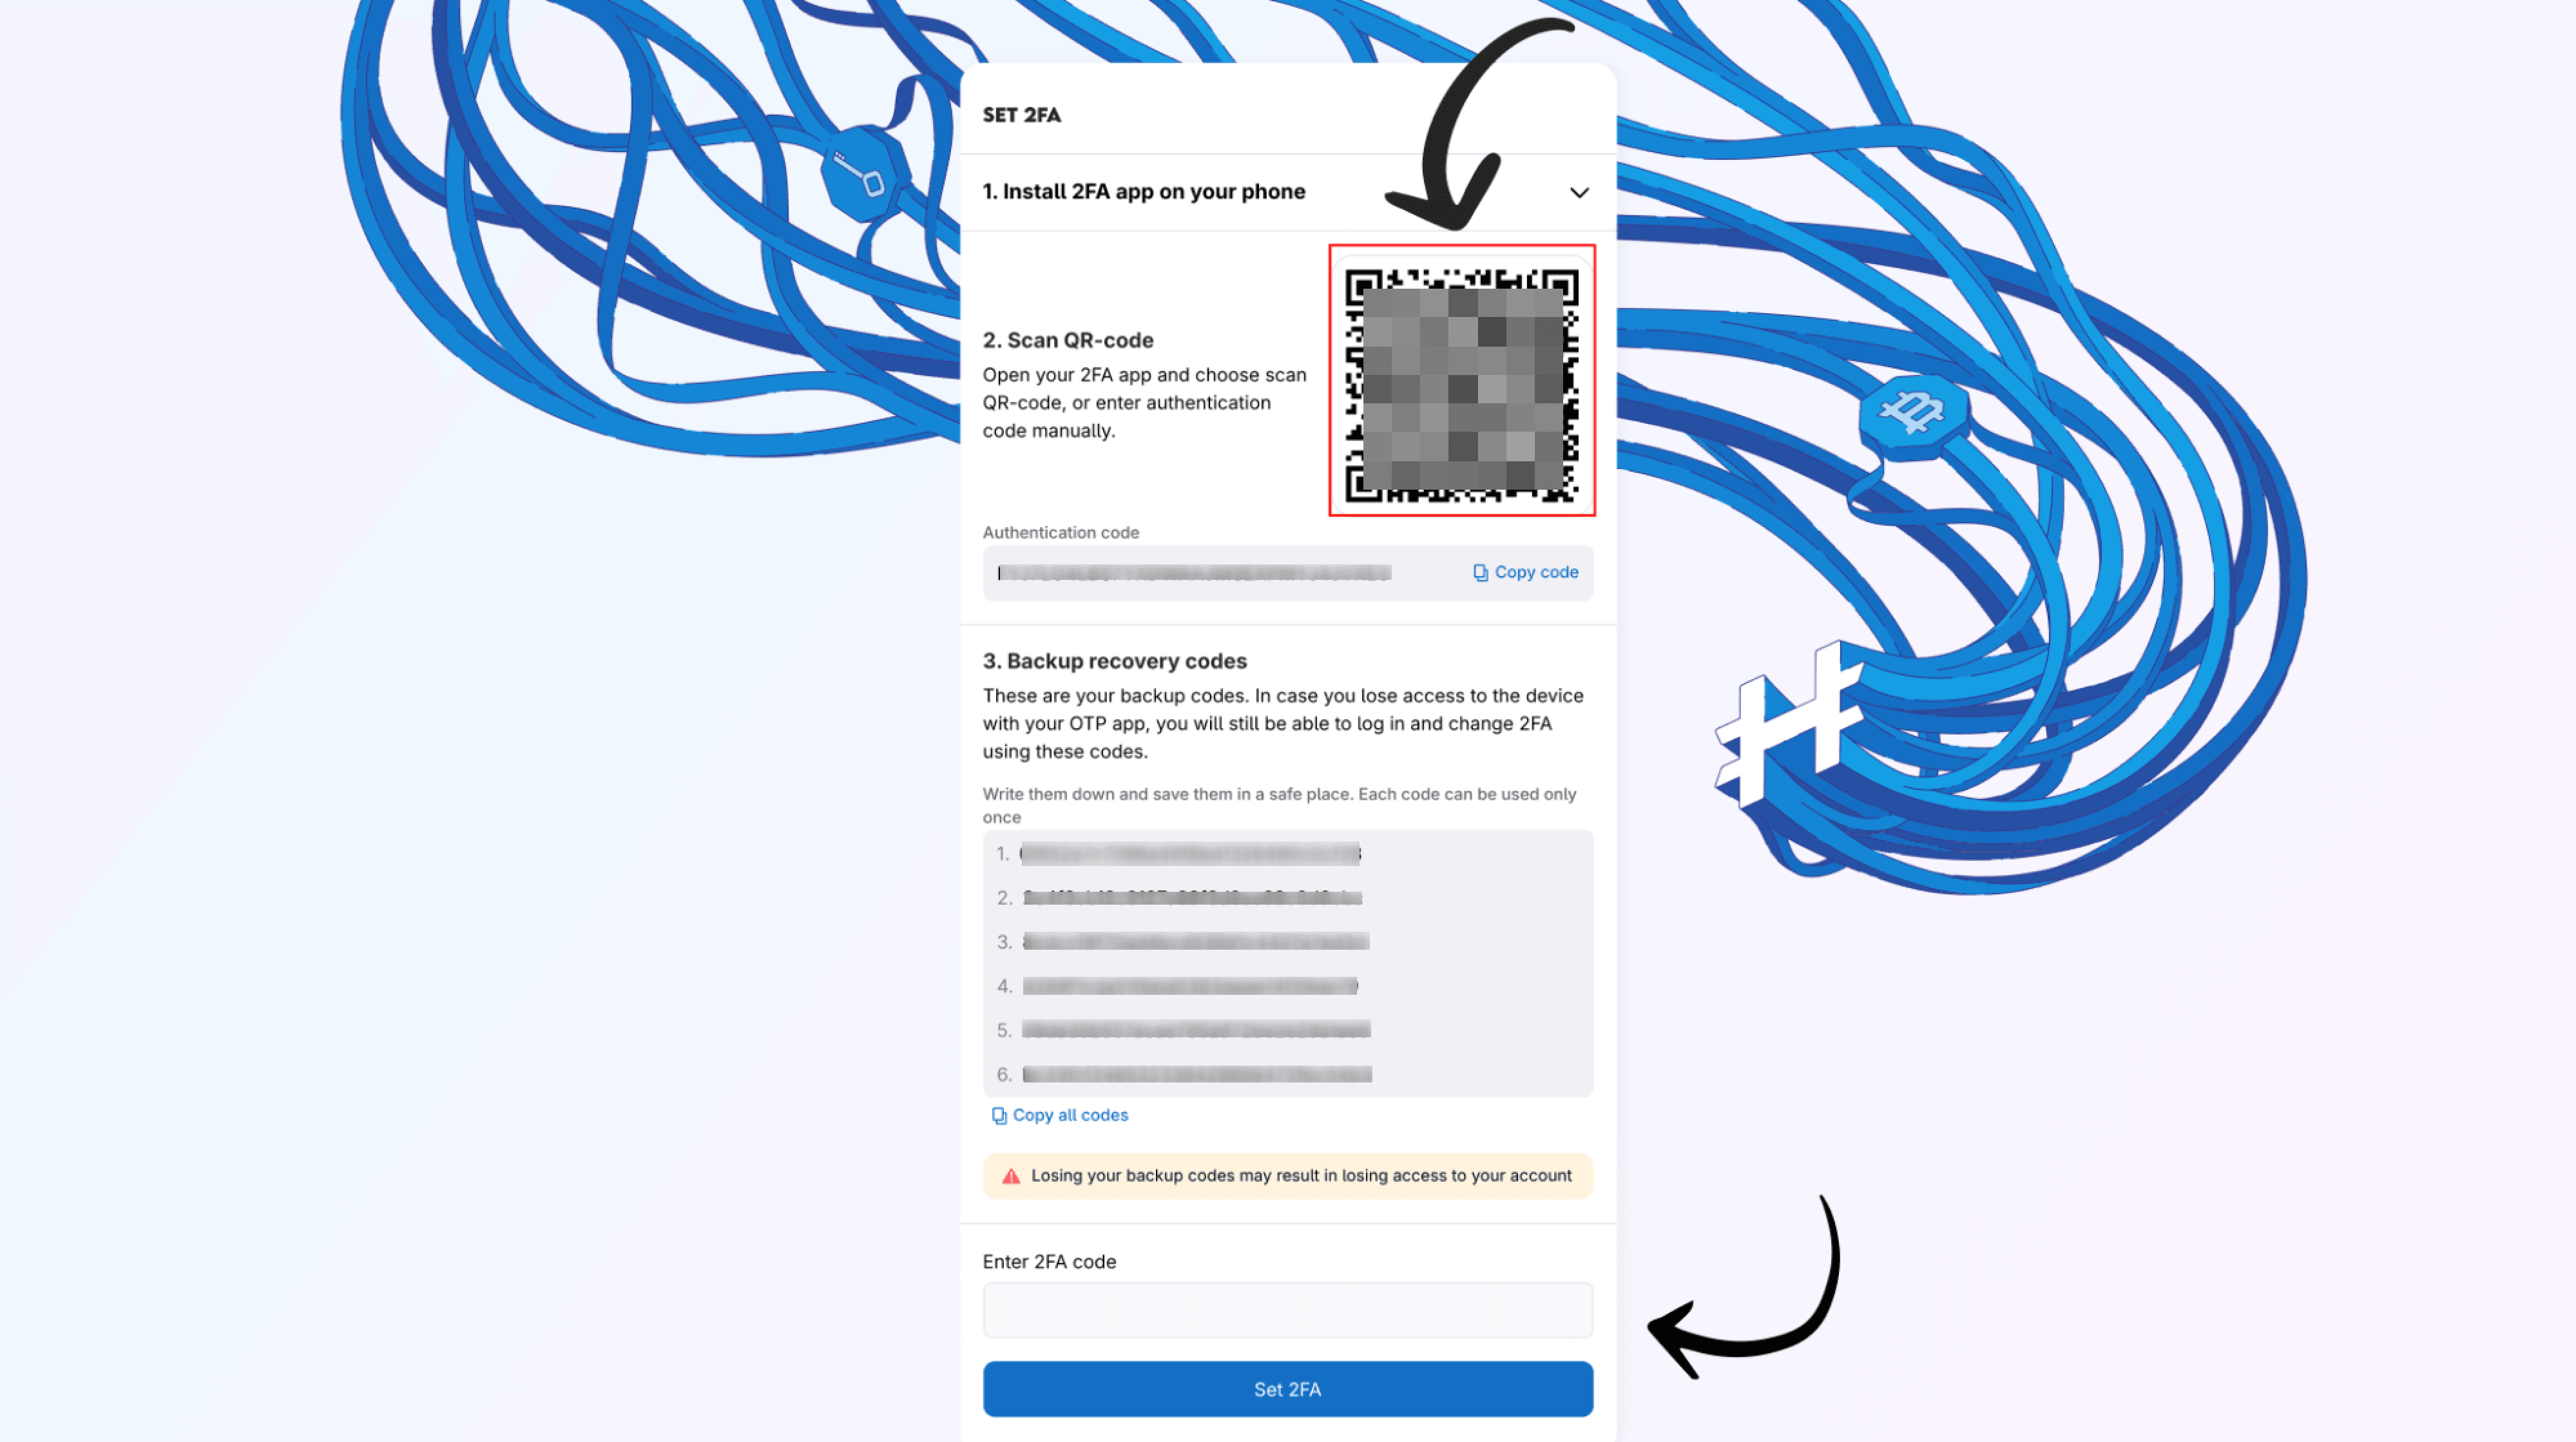
- After installing Proton Authenticator, we click on “Create new code” and scan QR Code. This will immediately generate 6-digit code (e.g 502 666) with remaining time displayed
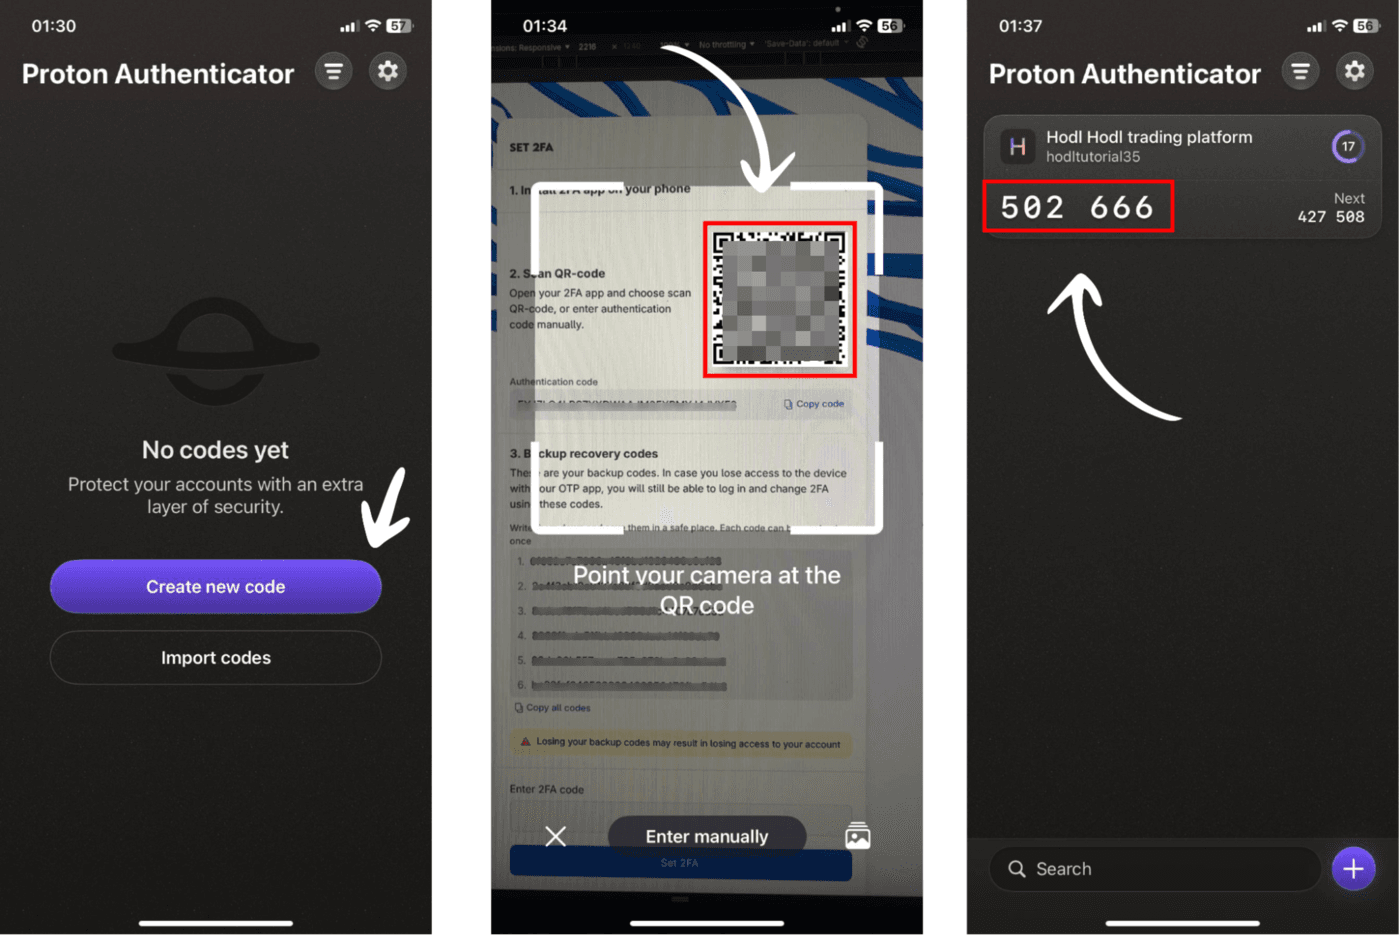
-
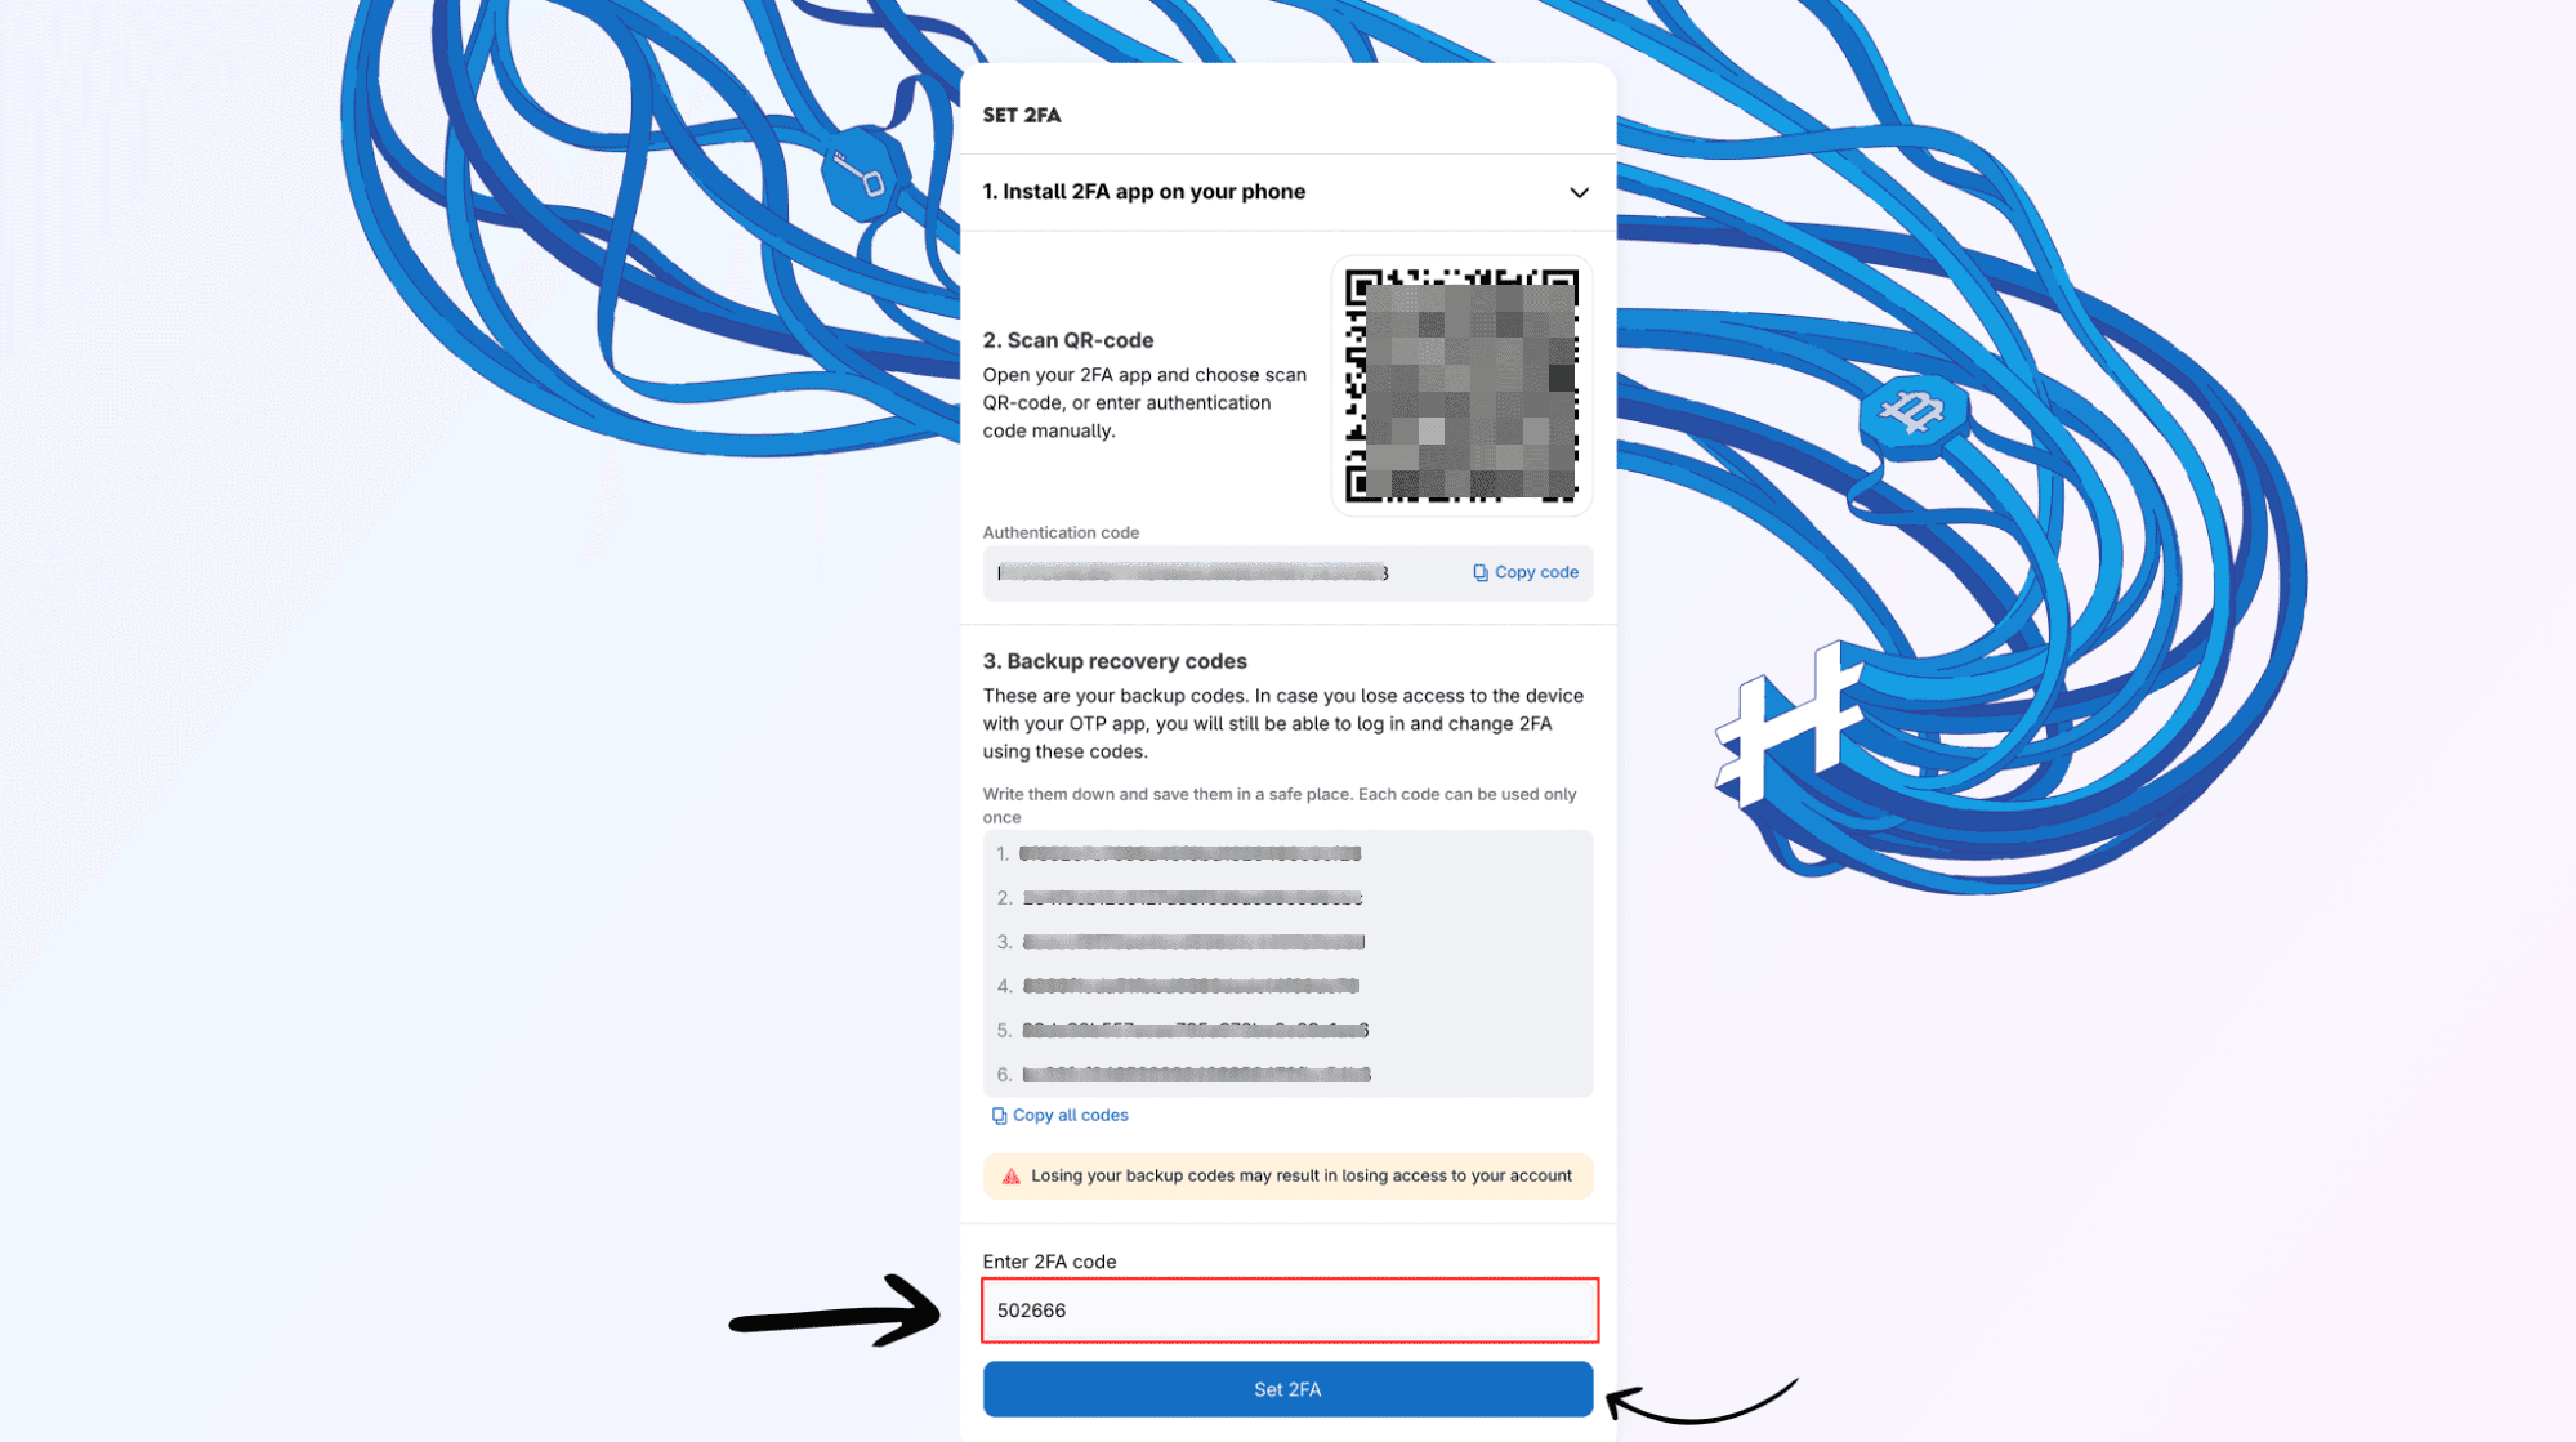
Copy the code from the application (by clicking on it) and paste it into the field “Enter 2FA code”
-
Then click on the “Set 2FA” button.
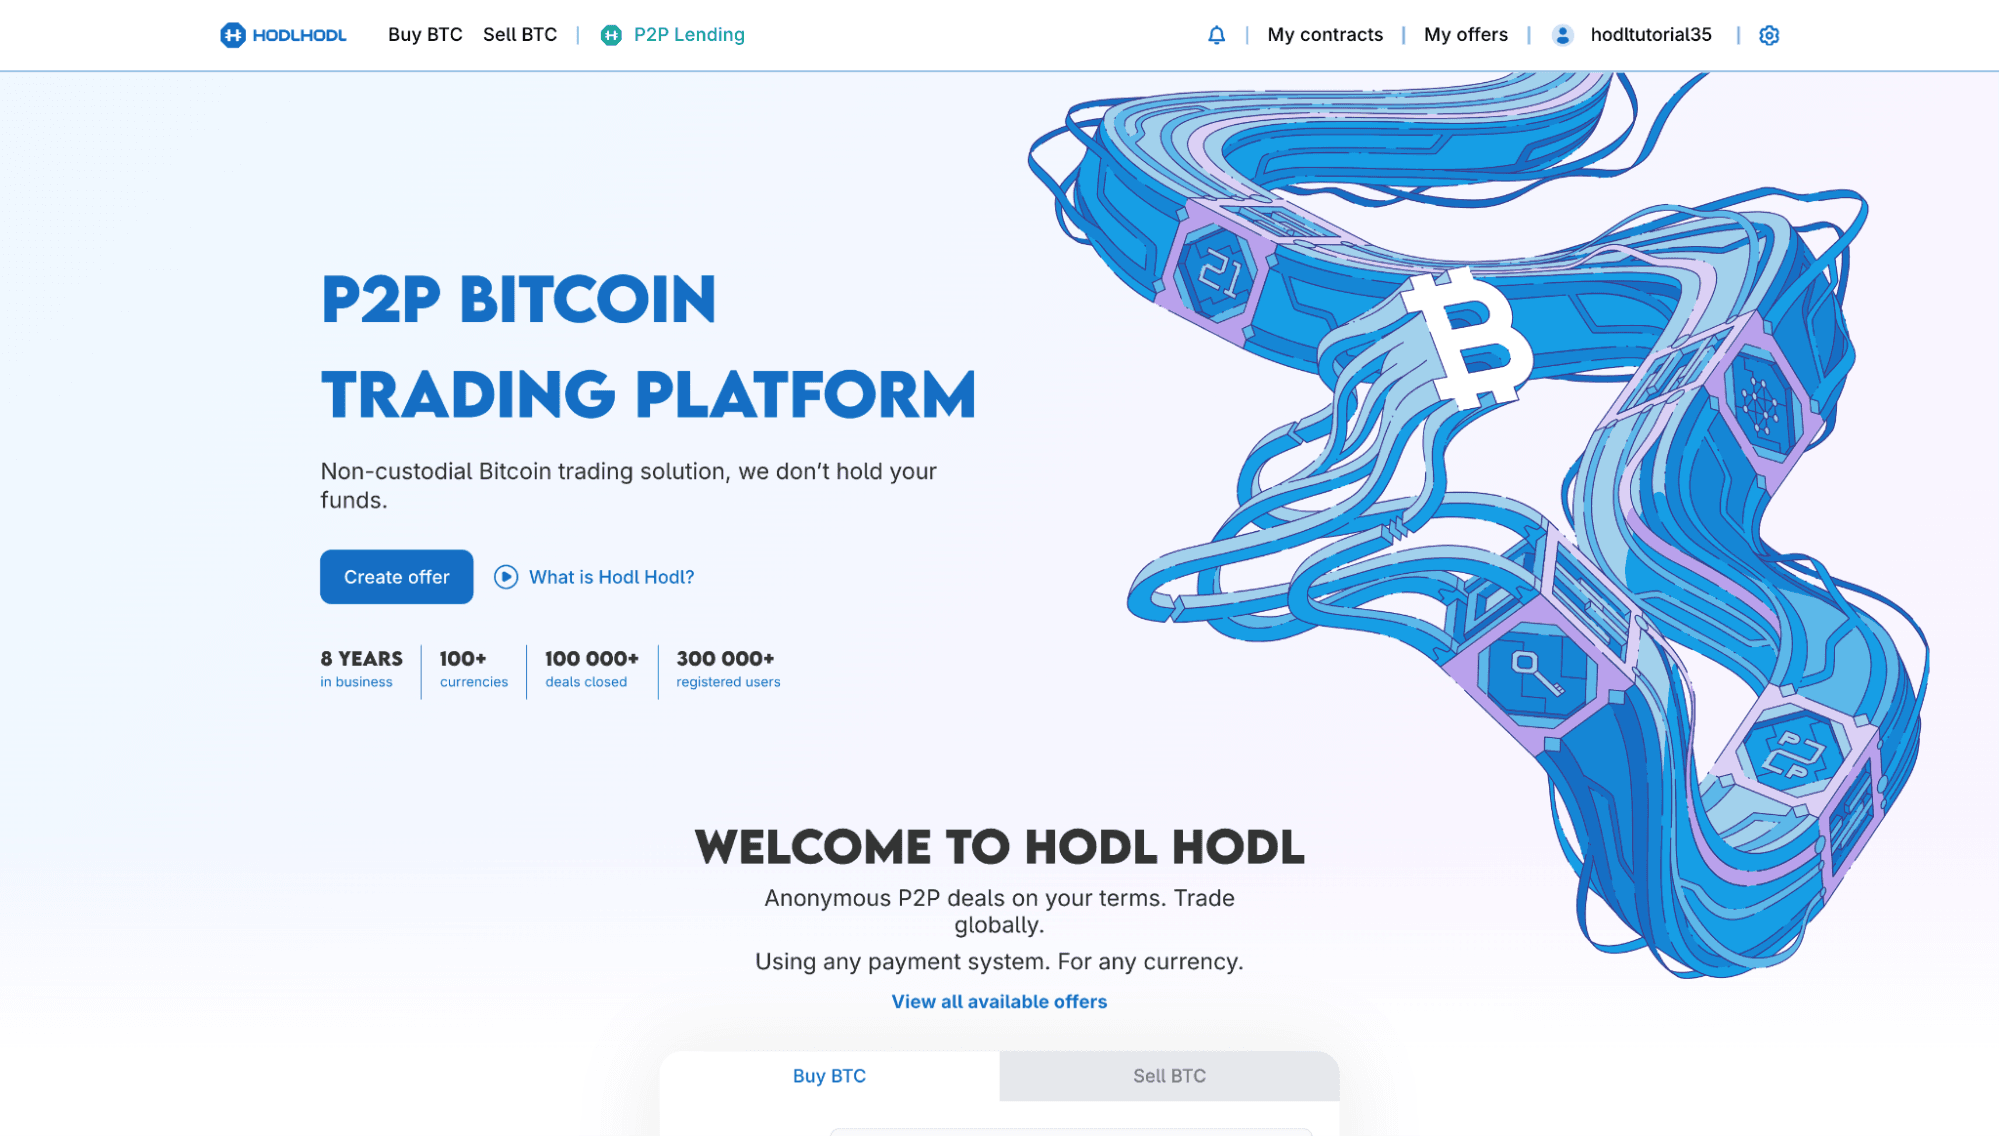
- Welcome to HODL HODL:
BUYING
Find a Seller
- Navigate to the buying page - From the top menu, click the “Buy BTC” button.
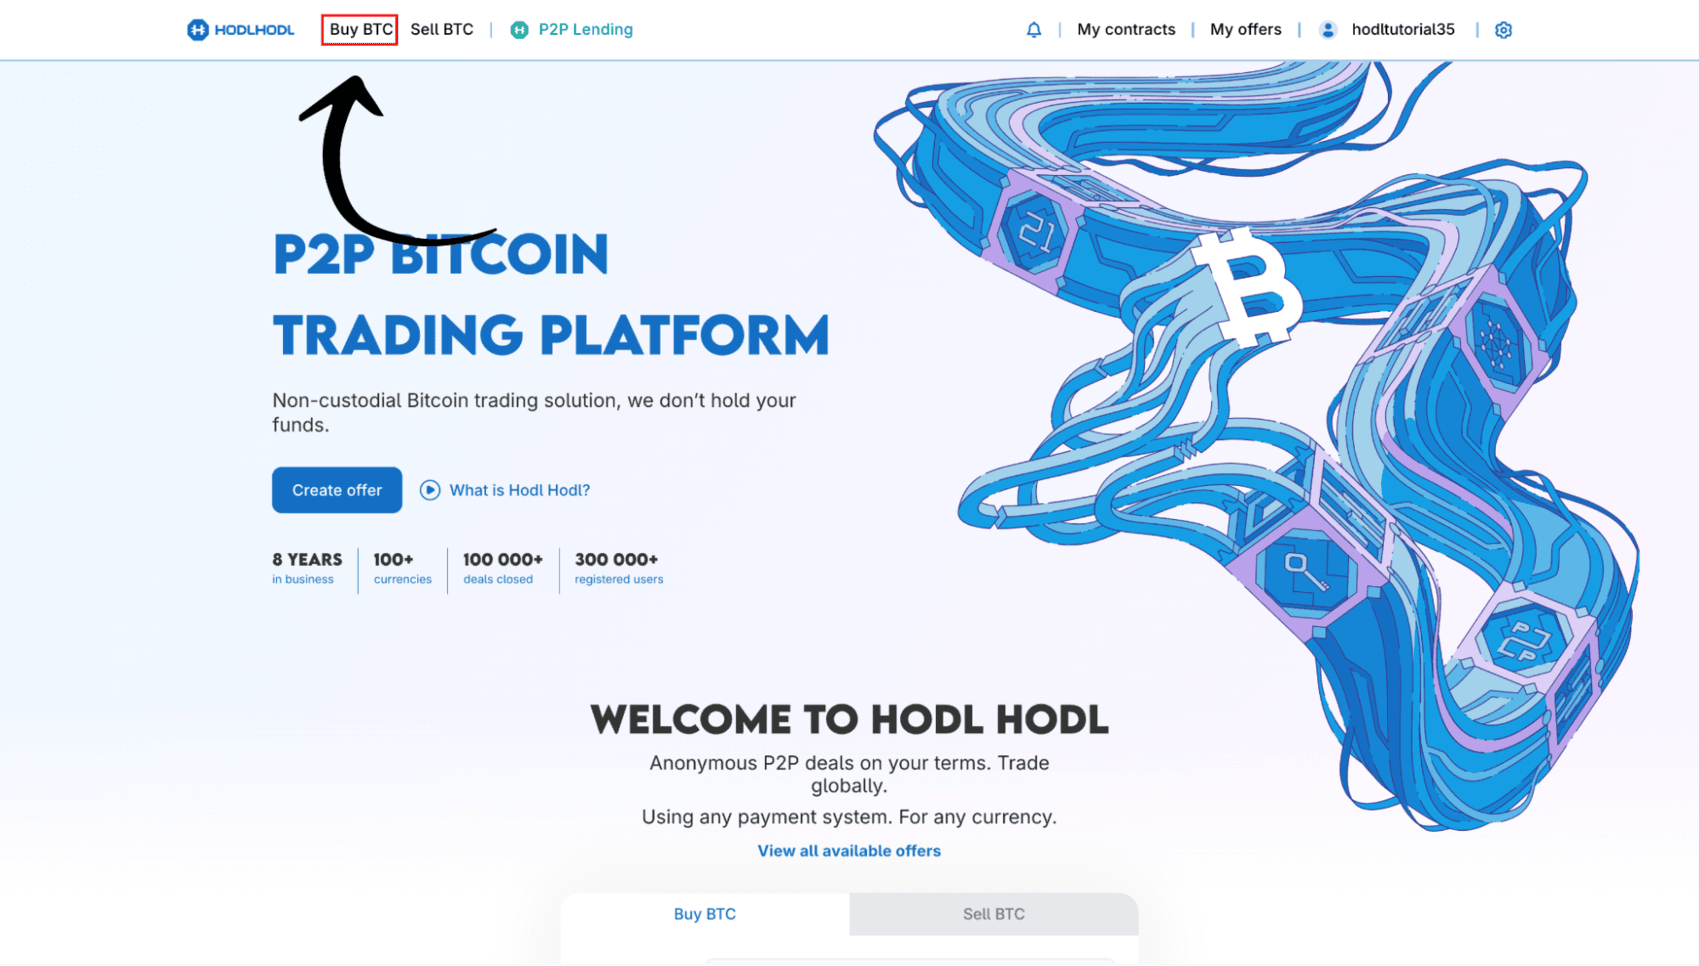
-
Browse offers – You’ll see a list of offers from sellers:
-
Filter field – Use this to narrow offers by currency, purchase amount, payment method, and country.
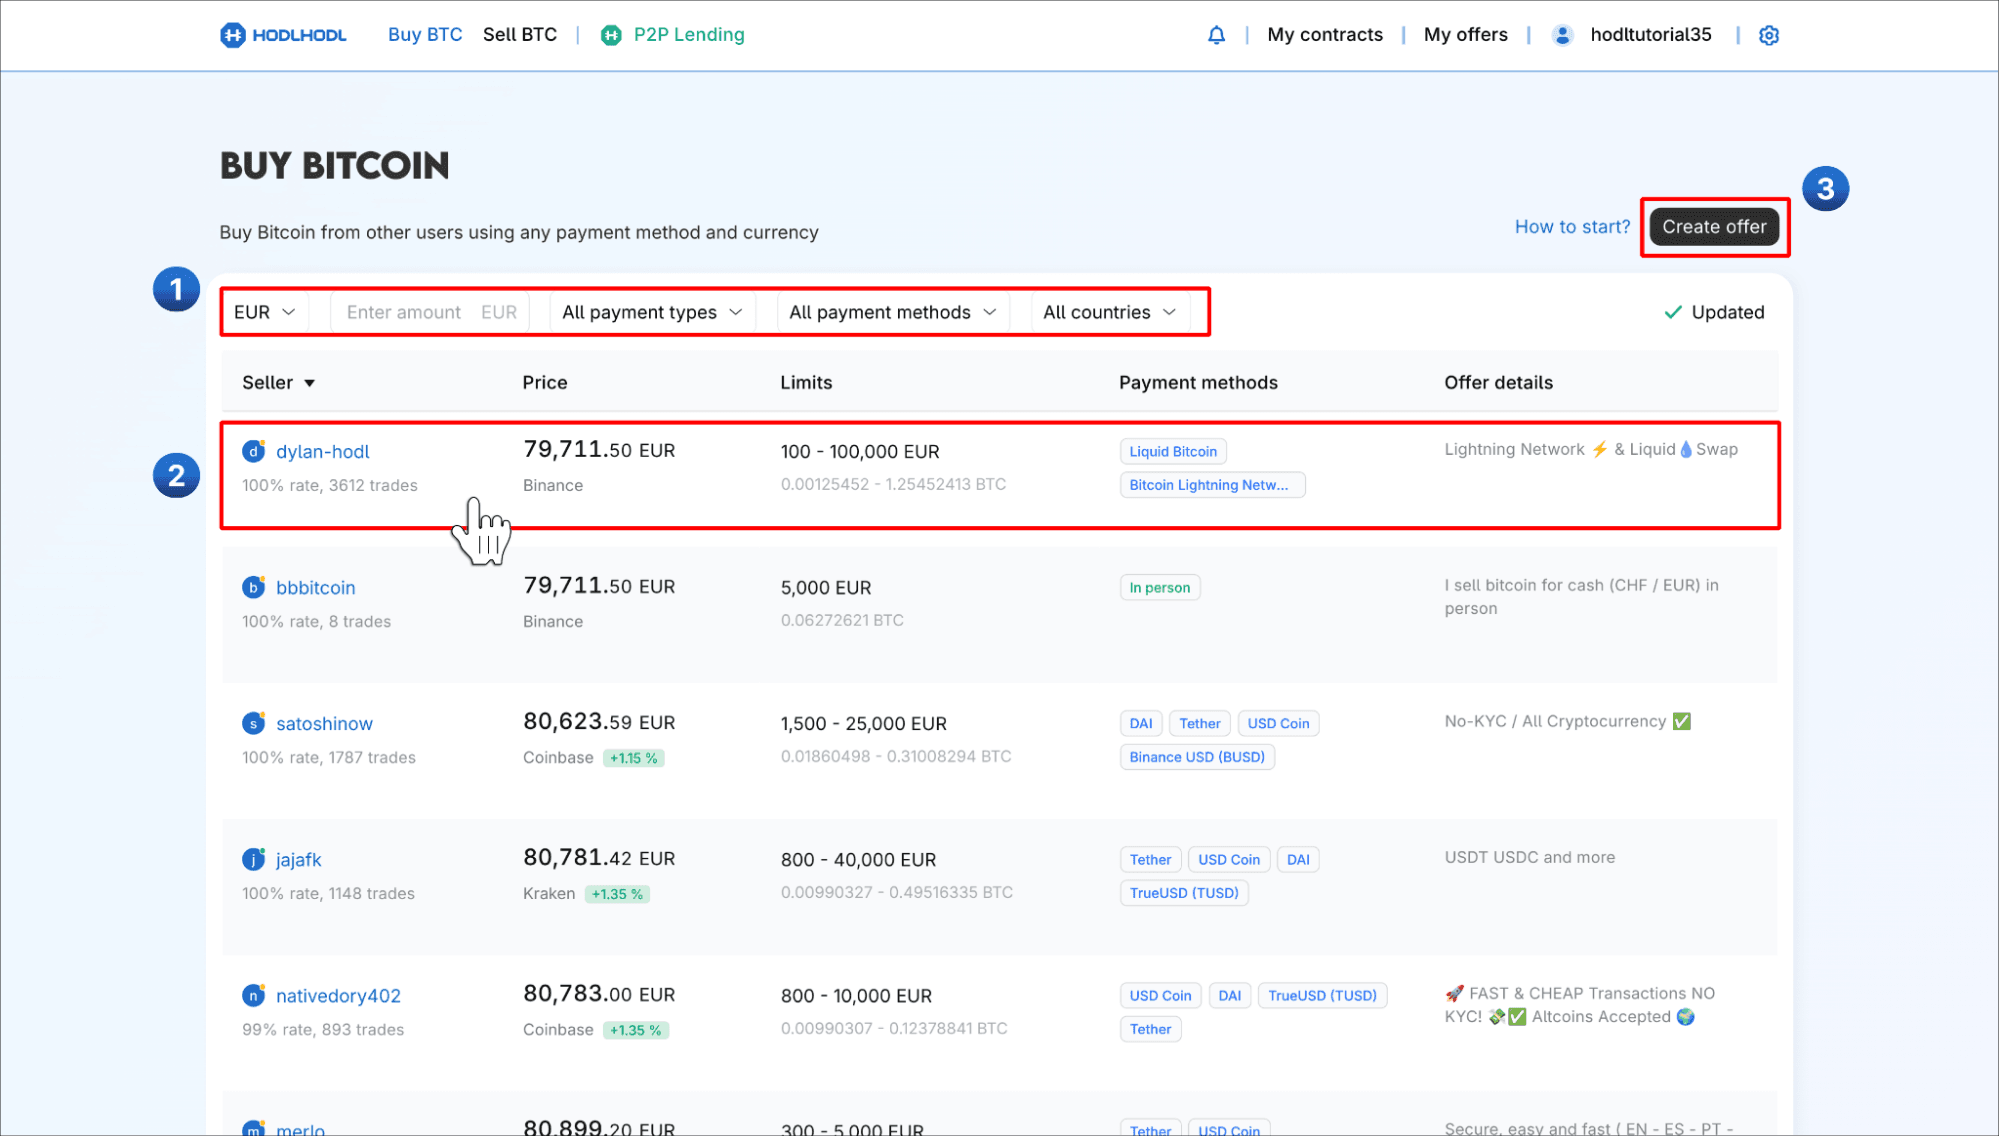
- Offer details – Each listing displays:
- Seller’s username
- Success rate of past trades
- Total completed trades
- Price (tied to an exchange rate or fixed)
- Trade limits (minimum ↔ maximum amount)
- Payment methods accepted by the seller
- Offer description (terms and instructions from the creator)
- Create your own offer – If none of the existing listings suit you, you can publish a custom offer with your preferred terms and limits.
Payment Password & Bitcoin address
- Every time you interact with an offer, a unique multisignature (multisig) escrow Bitcoin address is created for that contract.
- Both the buyer and the seller must have a payment password before the escrow address can be generated.
What is the payment password?
- The payment password is the password used to encrypt the keys that are required to generate and access escrow. From the trader’s perspective, the payment password is used to deposit and release Bitcoin, to and from escrow. Every trader is asked to create a payment password during the first contract, it can also be done in the Dashboard settings.
What's the difference between an account password and a payment password?
- The account password is the password that you use to access your account and make changes to your profile.
- The payment password is used to encrypt the key to an escrow address, and to deposit Bitcoin into escrow and release Bitcoin from escrow.
How to create a payment password
Option 1 - First‑time popup (recommended)
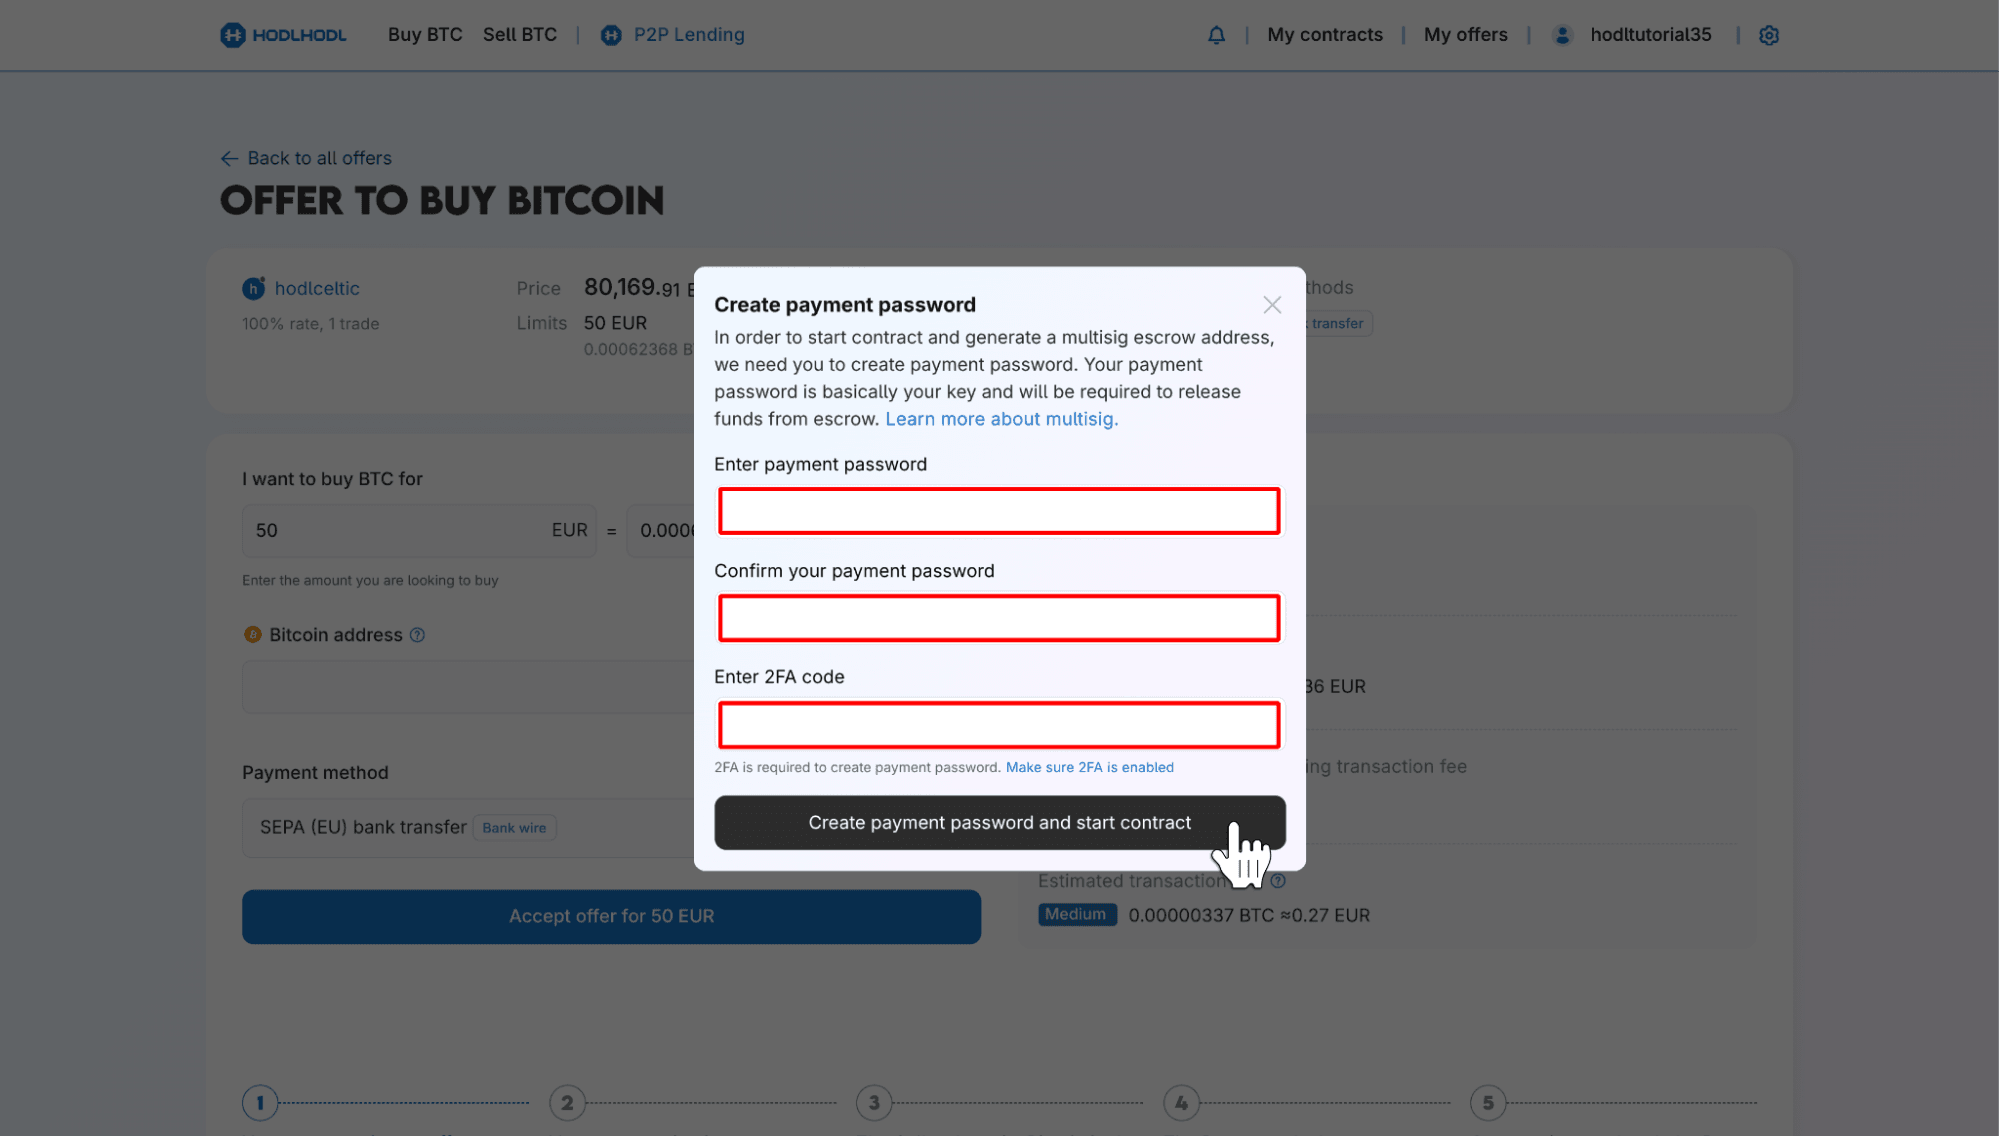
- The first time you accept or create a contract, a popup window will appear asking you to set a payment password. Just follow the prompts and save the password in a secure place (e.g., a password manager).
Option 2 – From your account settings
- Click your username at the top of the main page.
- Choose “Dashboard.”
- Open the “Settings” section.
- Locate the “Payment password” field and click the “Create payment password” button.
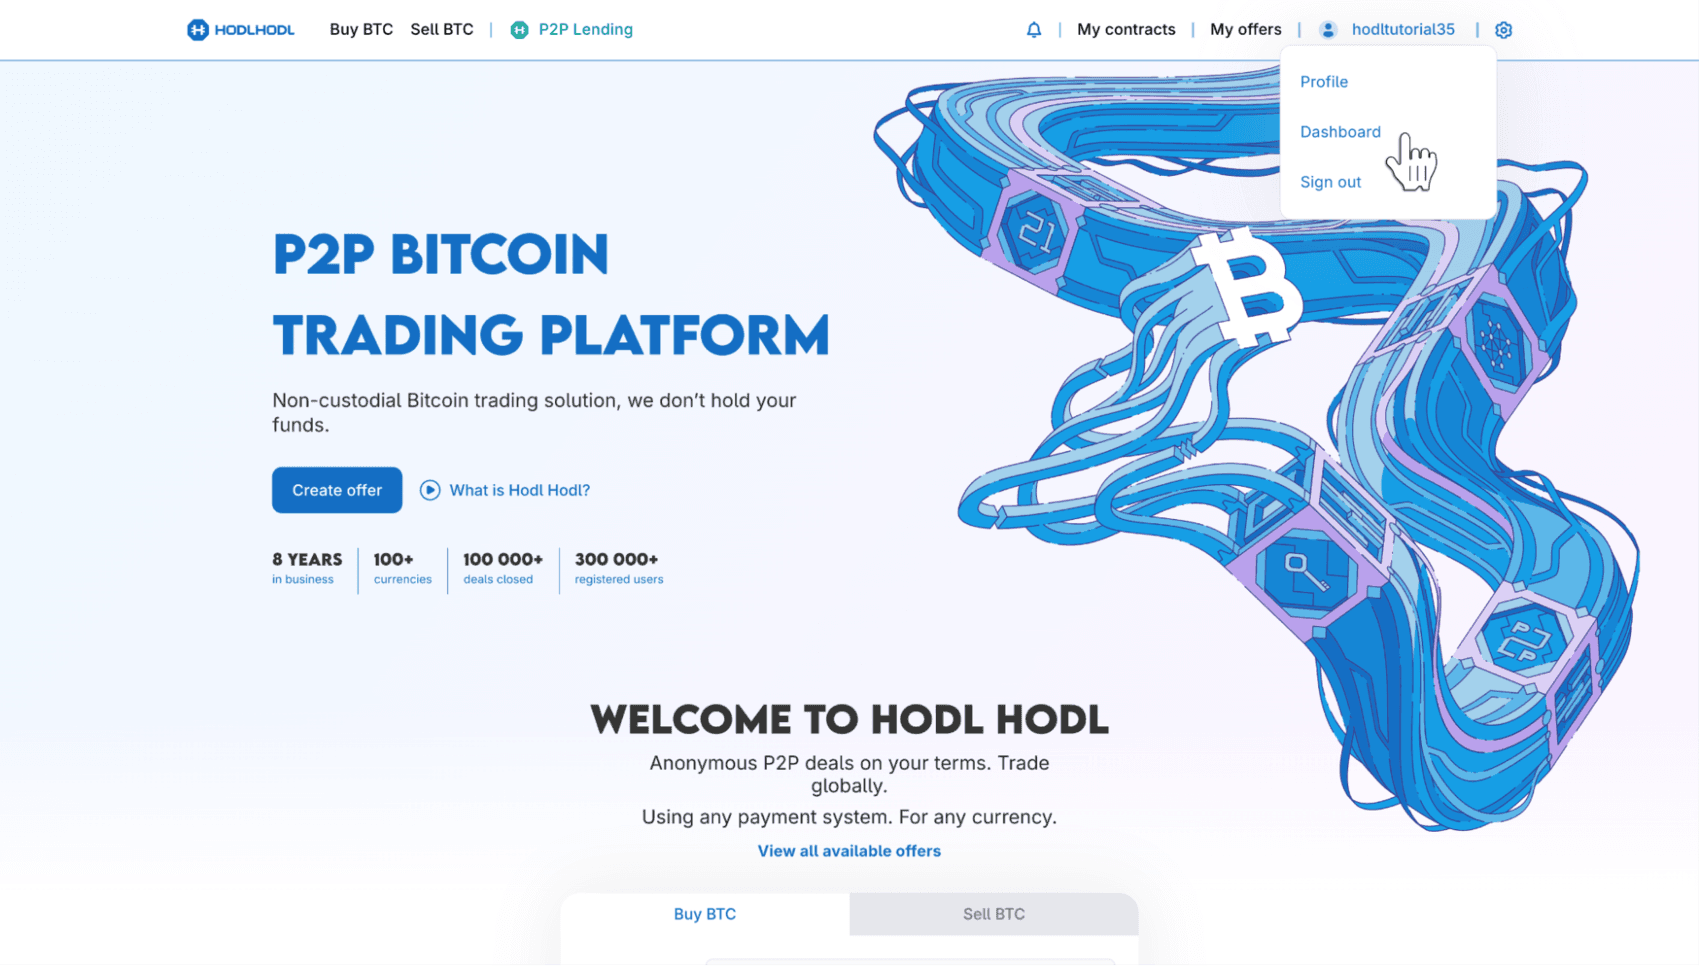
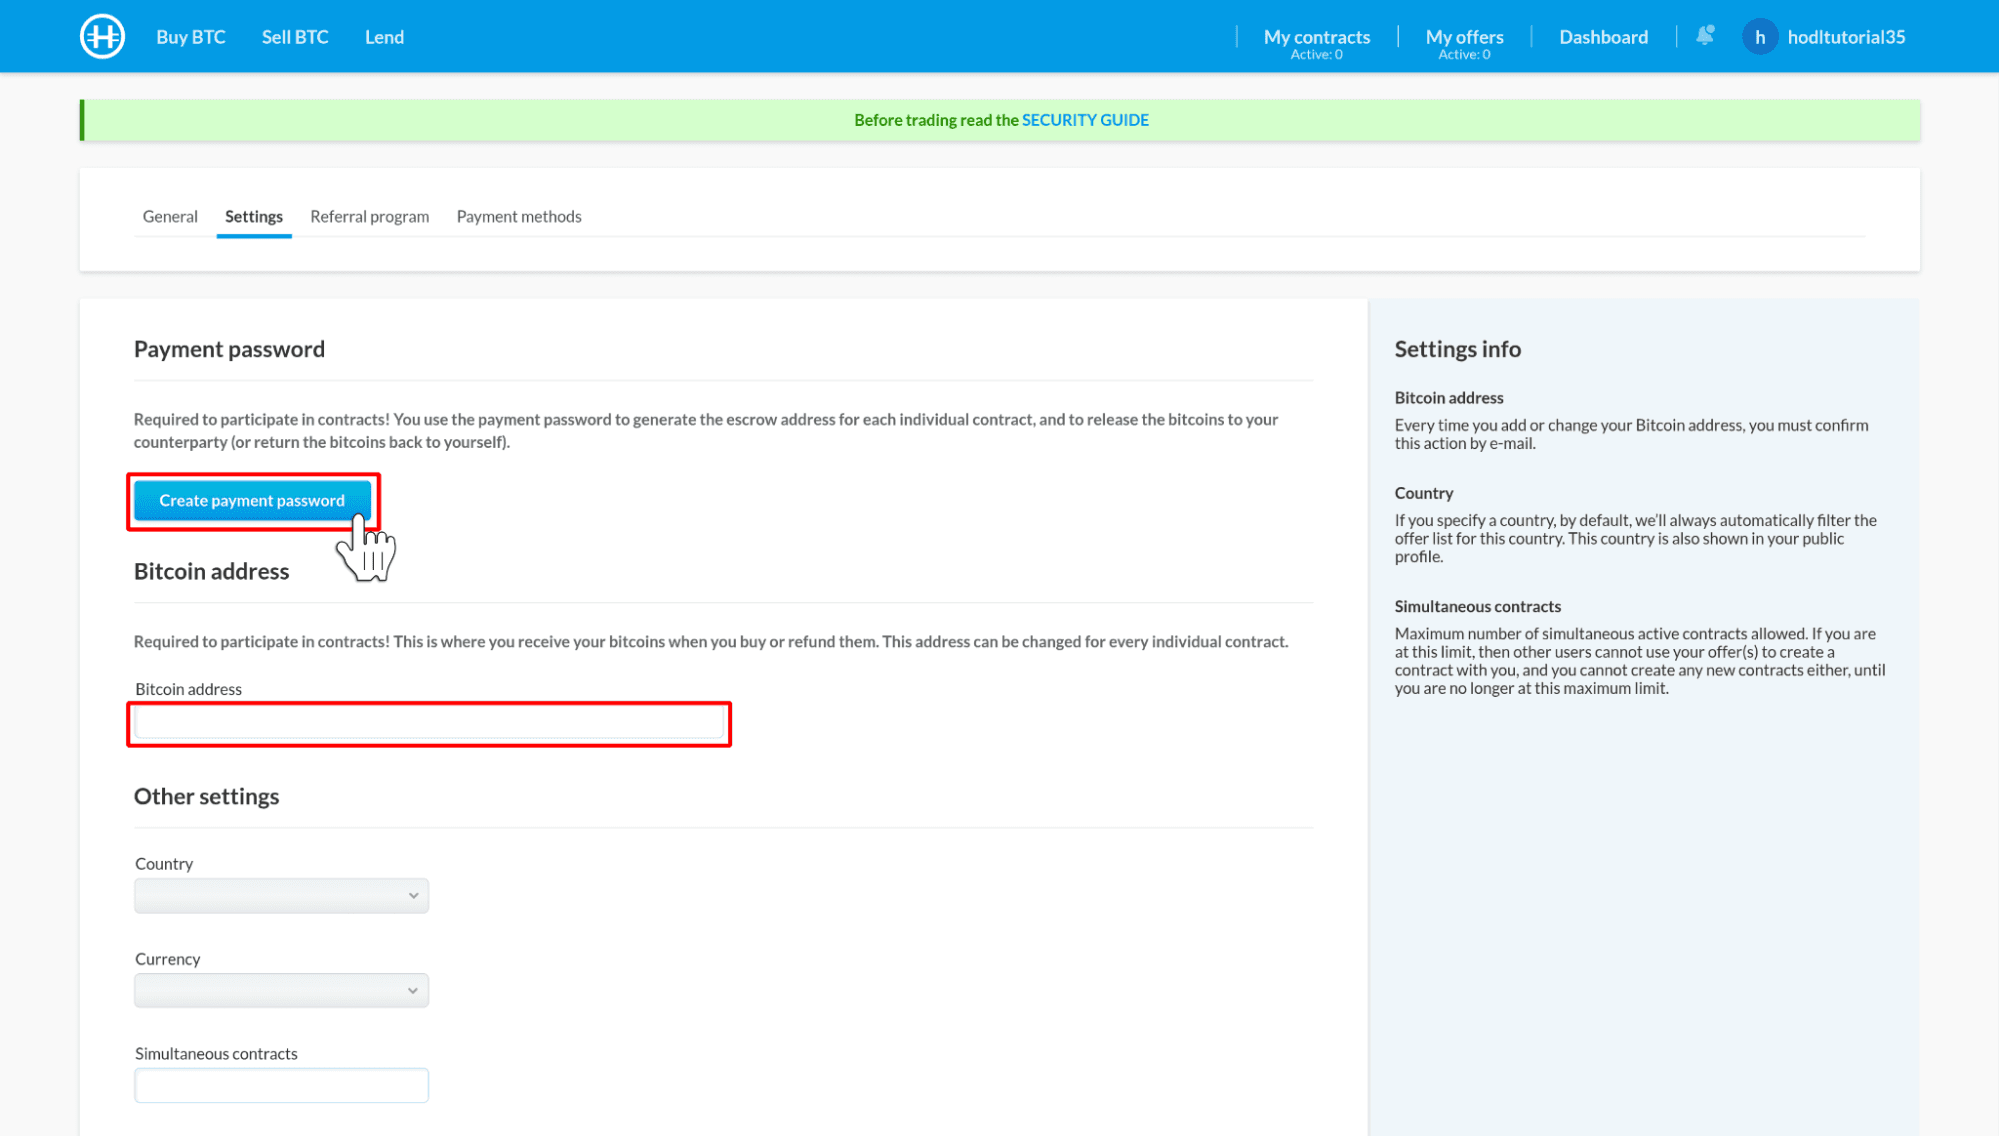
- Follow the instructions to create one.
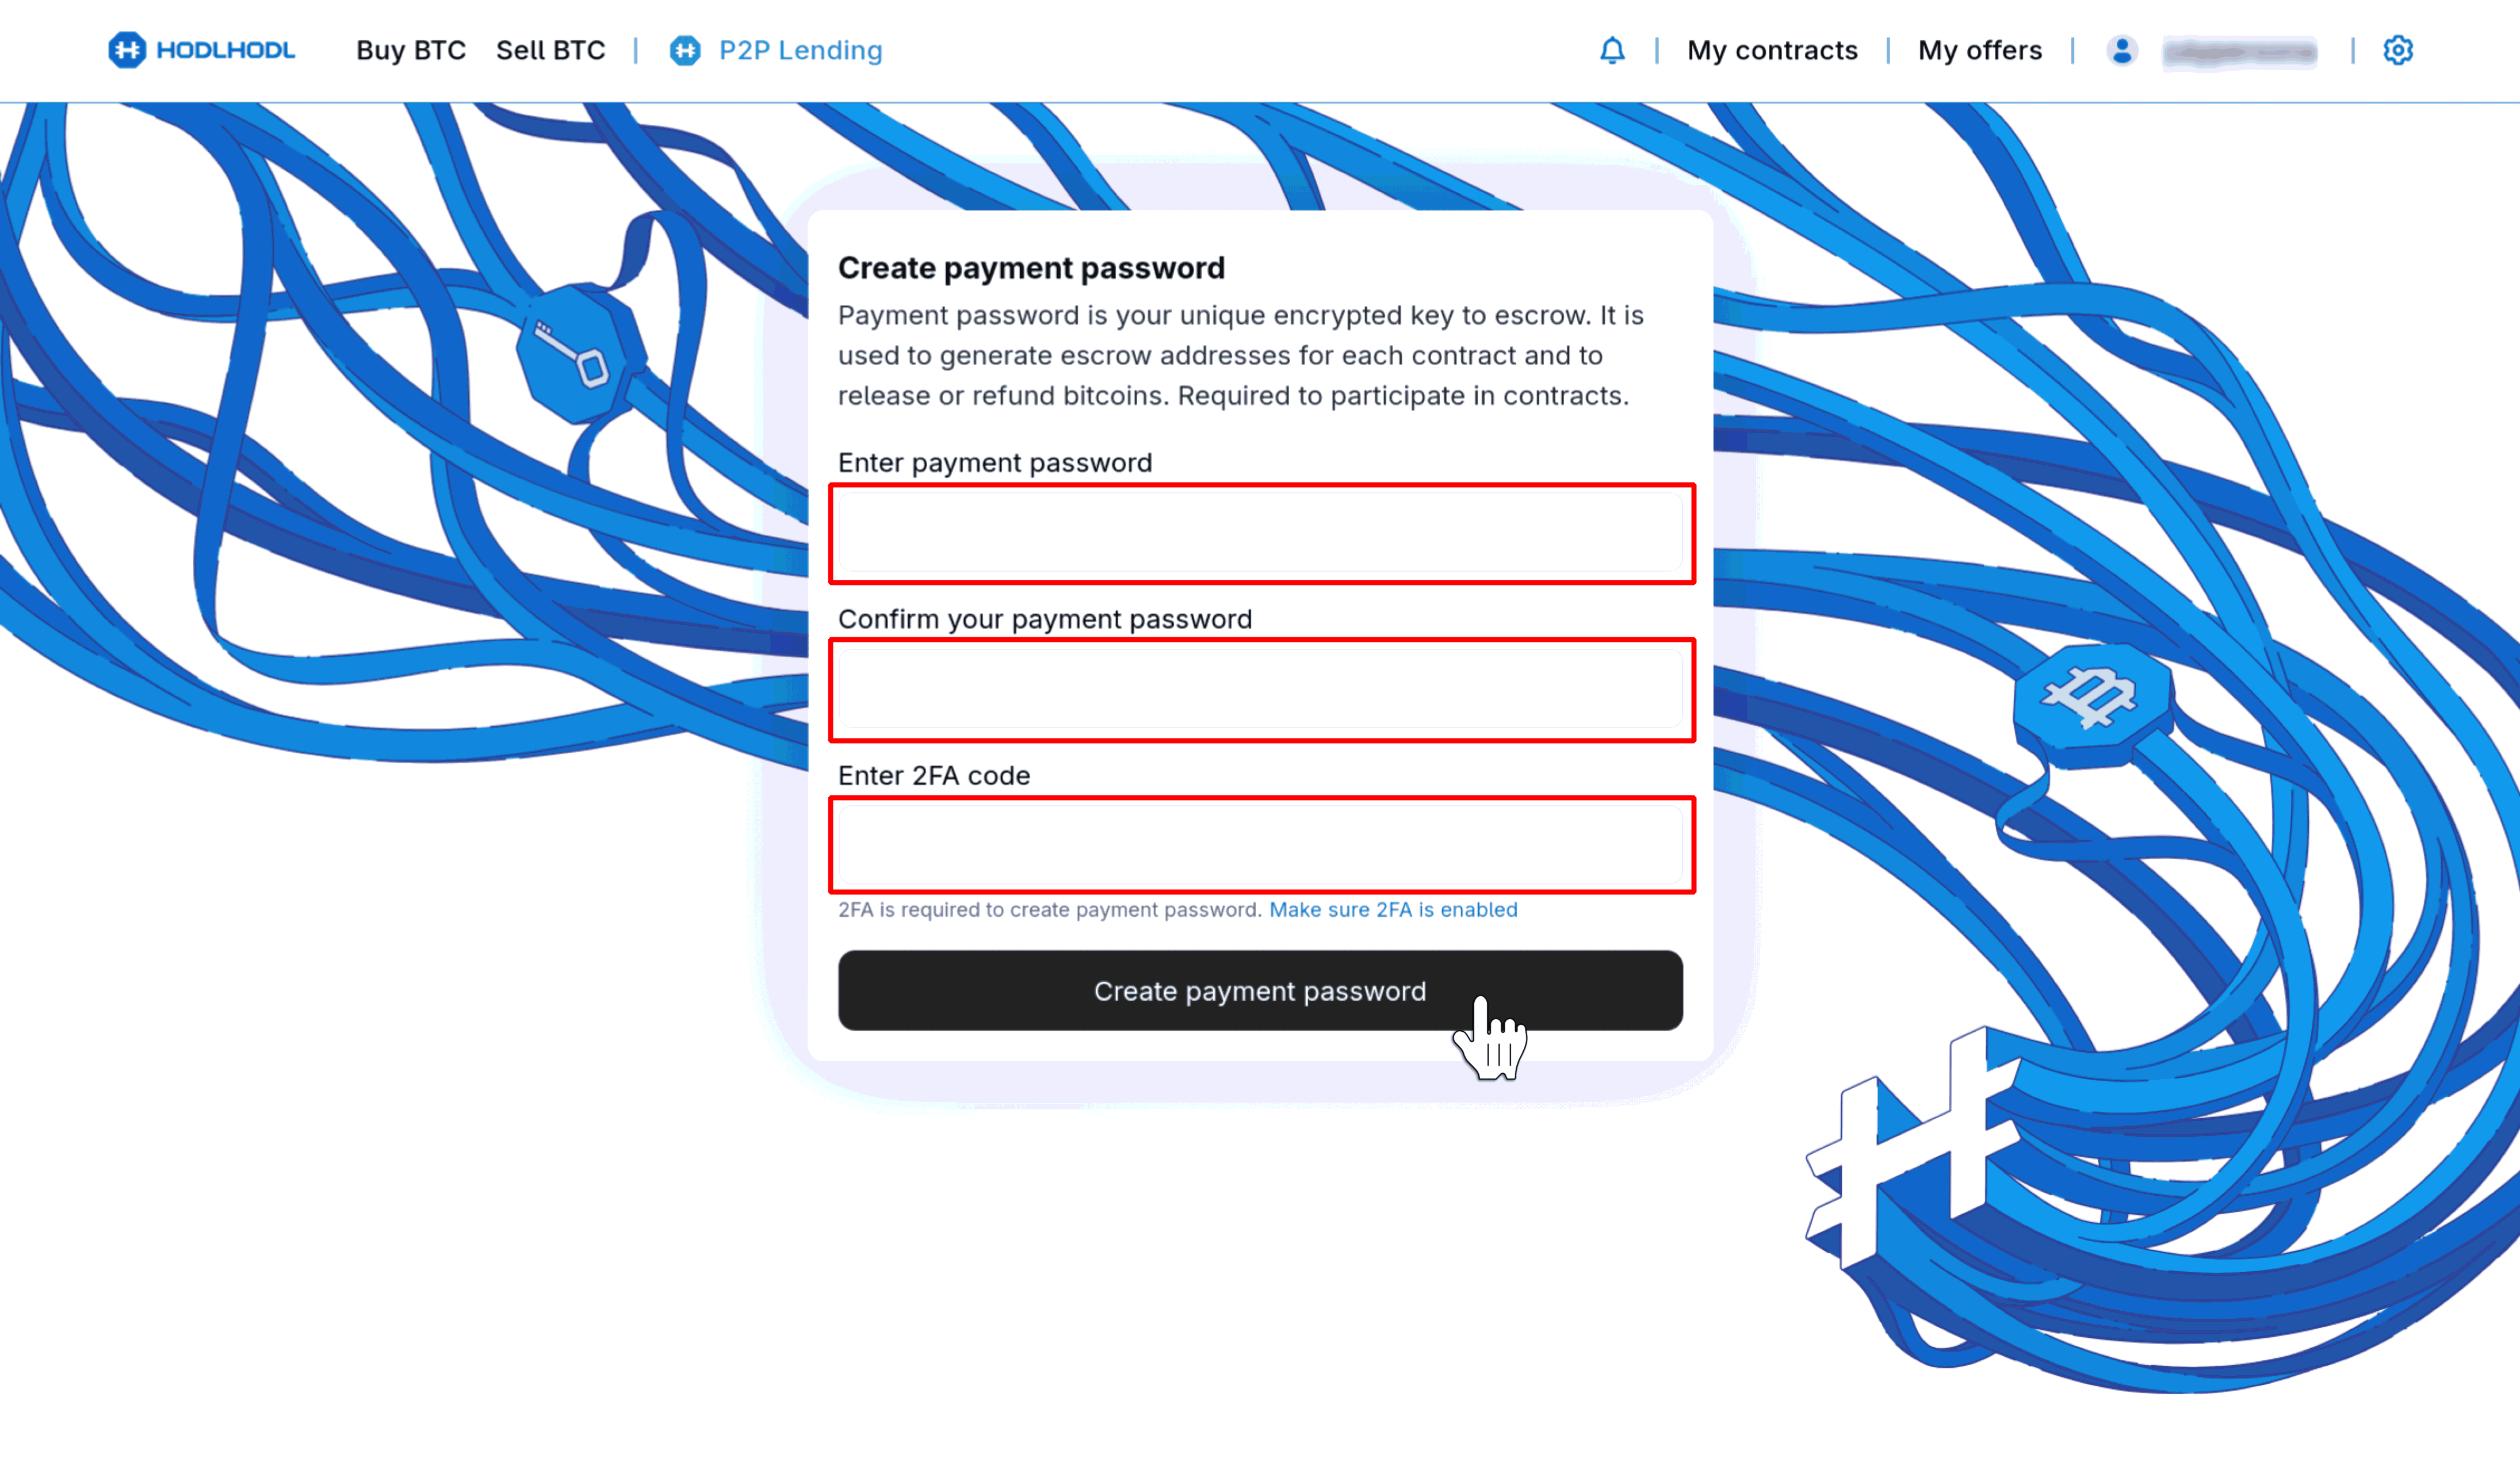
💡 Tip: Use a strong, unique password that you store safely; you will need it for every future contract.
Buying BTC
Step 1: Accept the offer
After selecting your preferred offer, review the details on the page and complete the following steps:
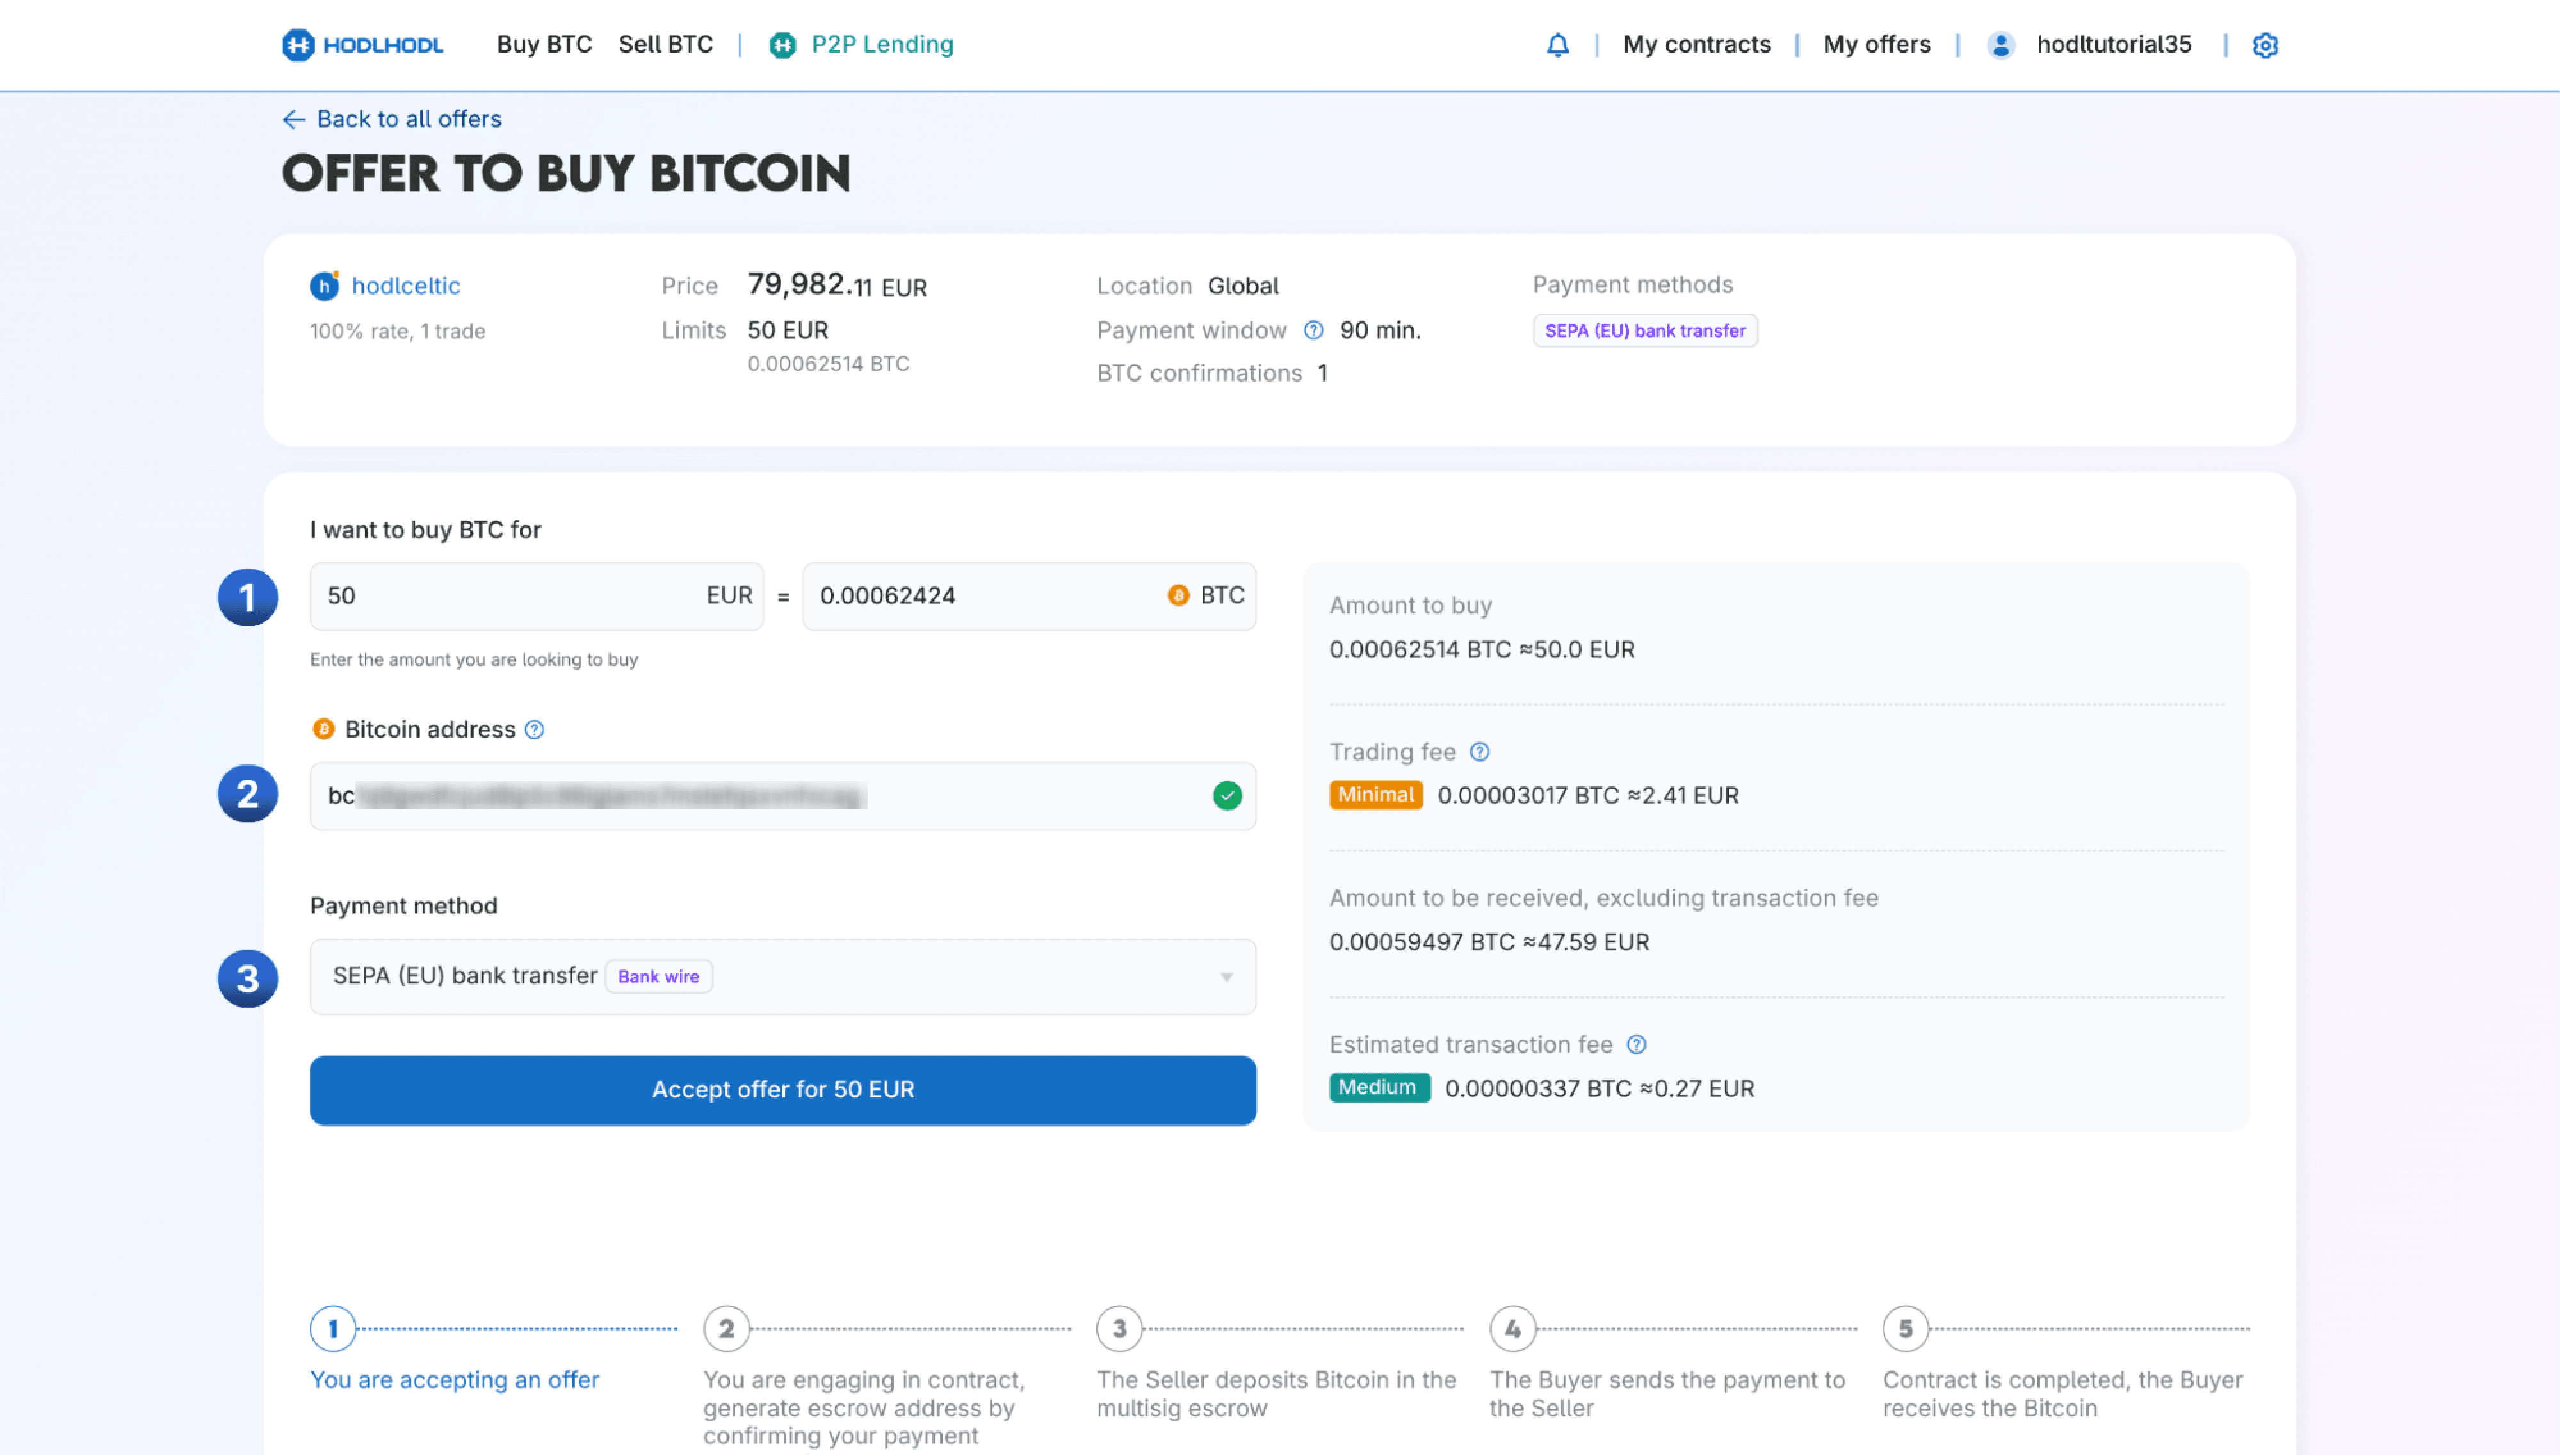
- Enter amount: Input the exact amount of BTC (or fiat) you wish to buy.
- Set payout address: Enter the Bitcoin address where you want to receive your BTC.
💡 Tip: For maximum privacy, we recommend using a unique payout address for each contract.
- Select payment method: Choose your preferred option from the seller's available payment methods.
- Confirm contract: Click the Accept offer for xx EUR button to proceed.
Step 2: Engaging in contract
- You are now on the contract page:
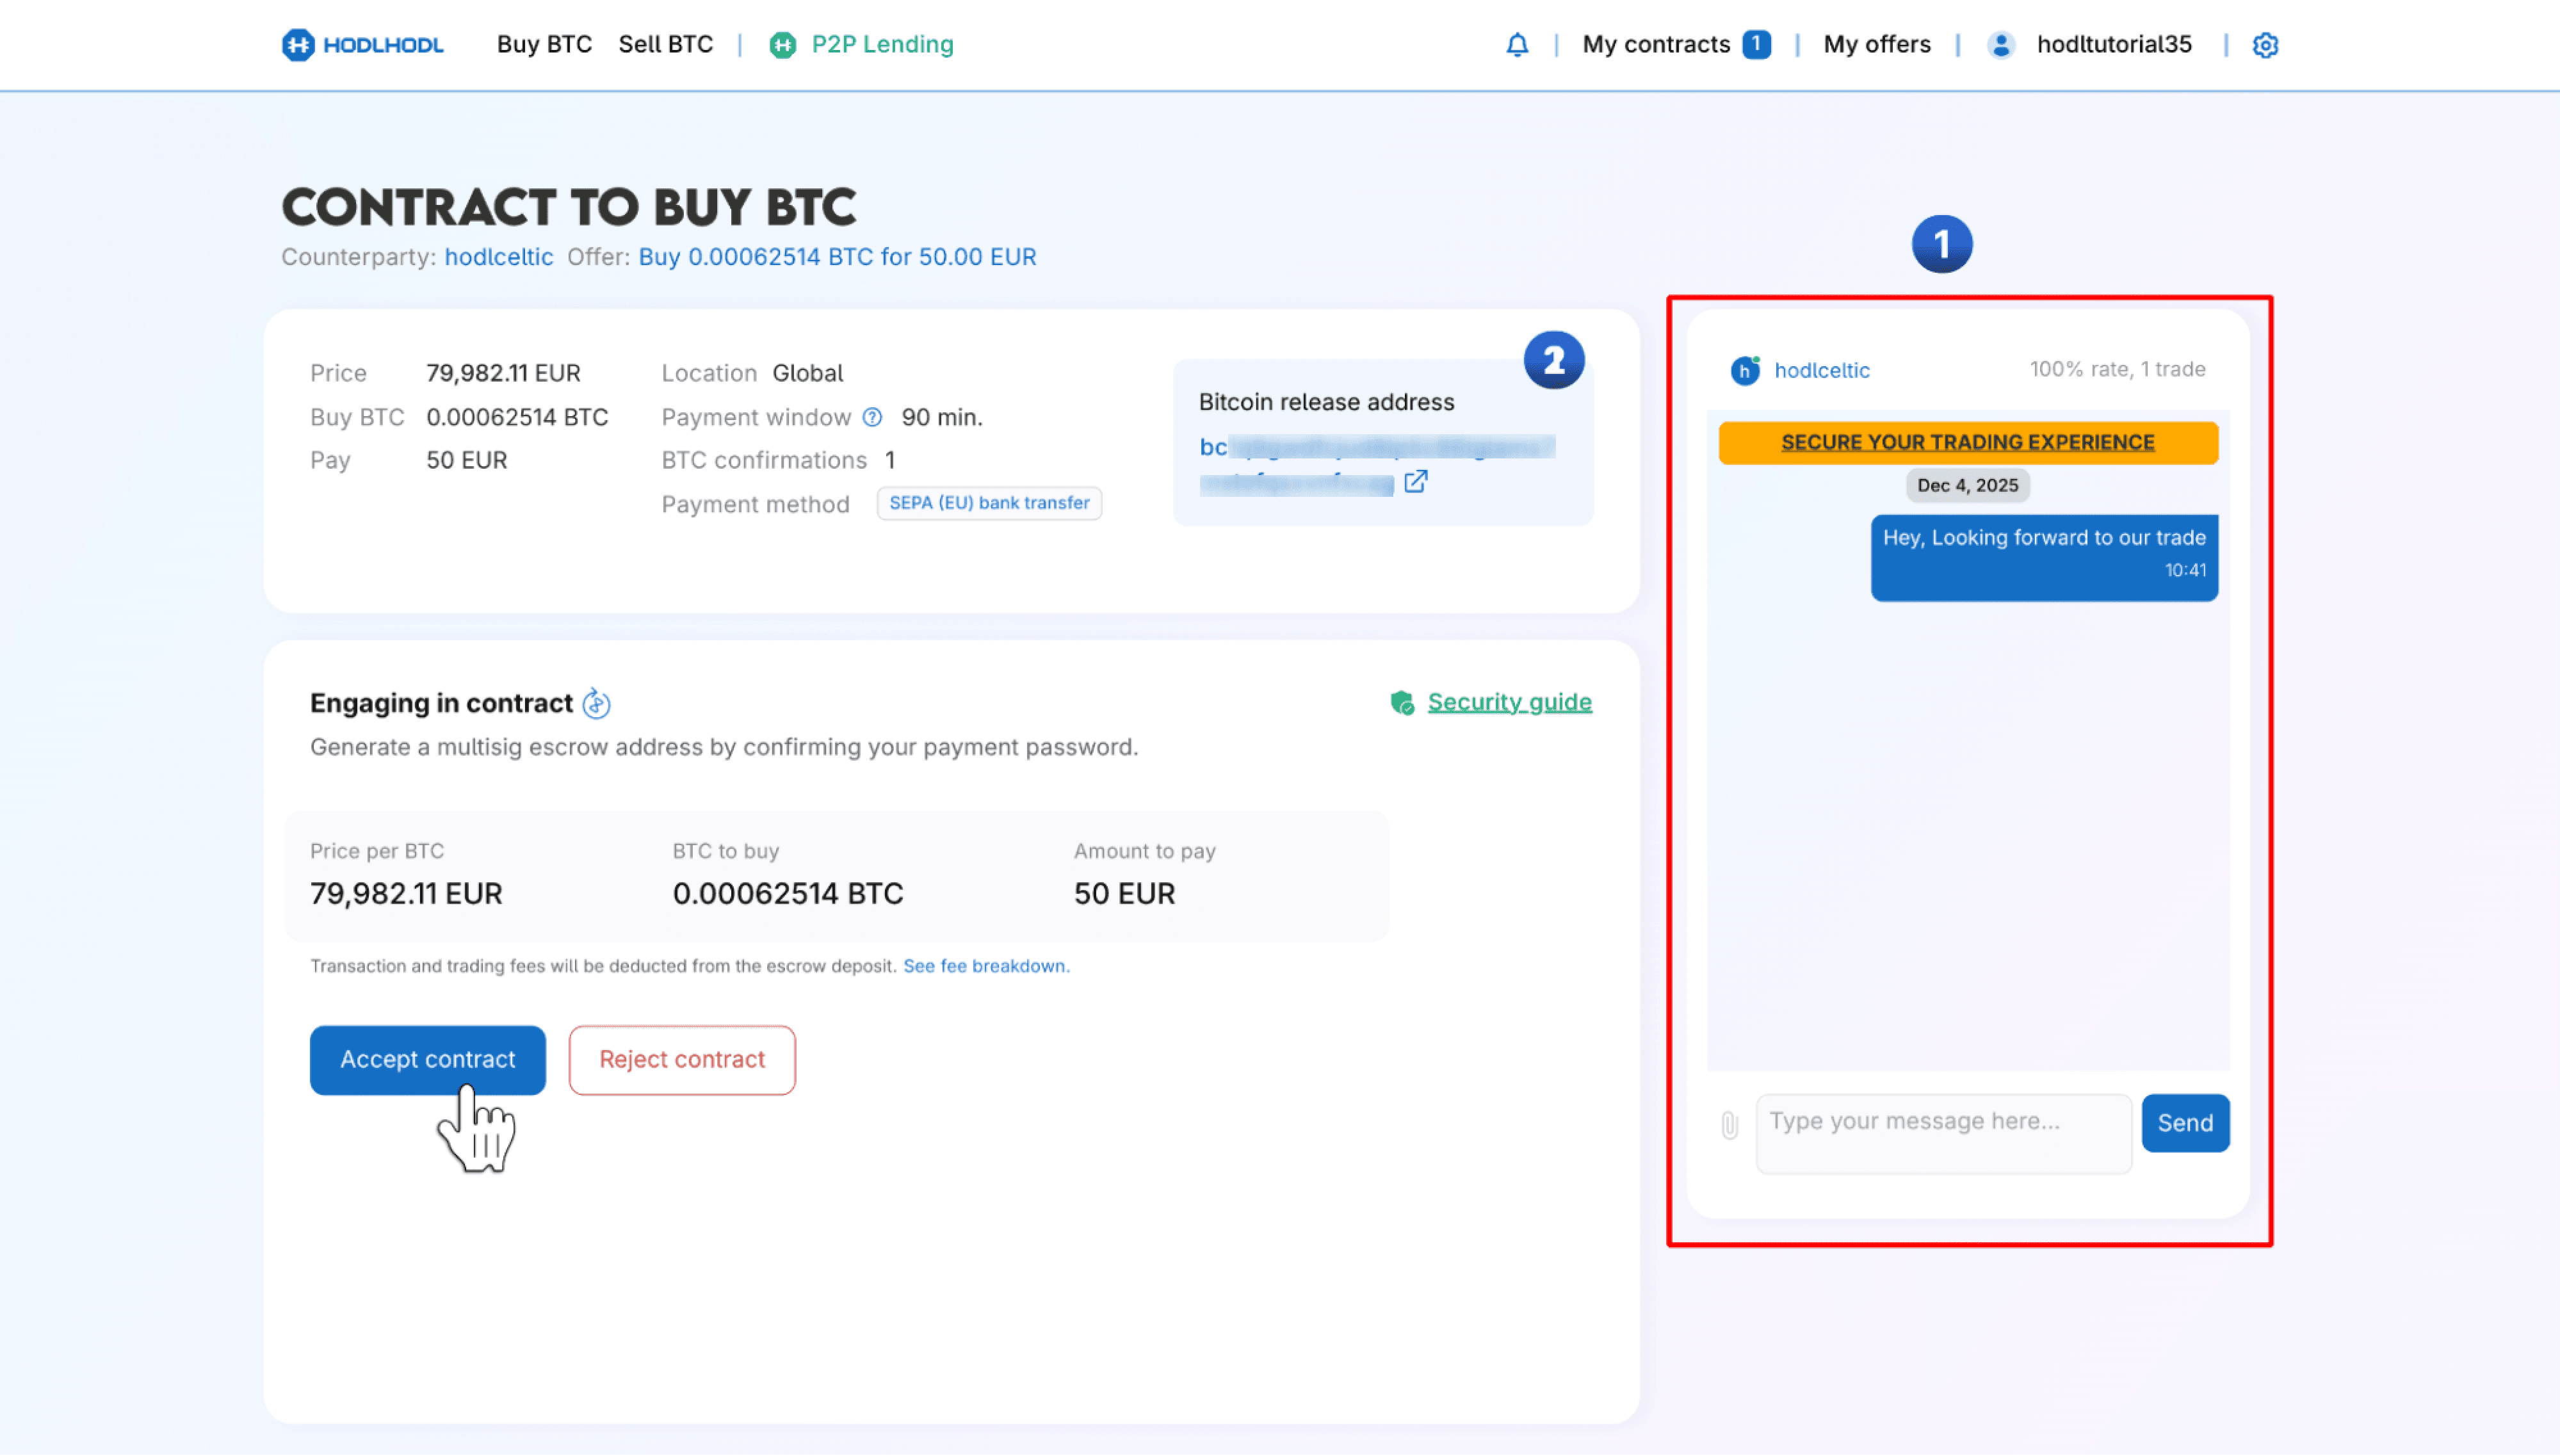
1 - The chat window with the seller is now available.
2 - You can see the address you set up where you will receive BTC.
-
Review the contract details and message the seller that you are ready to trade.
-
Click the Accept contract button.
-
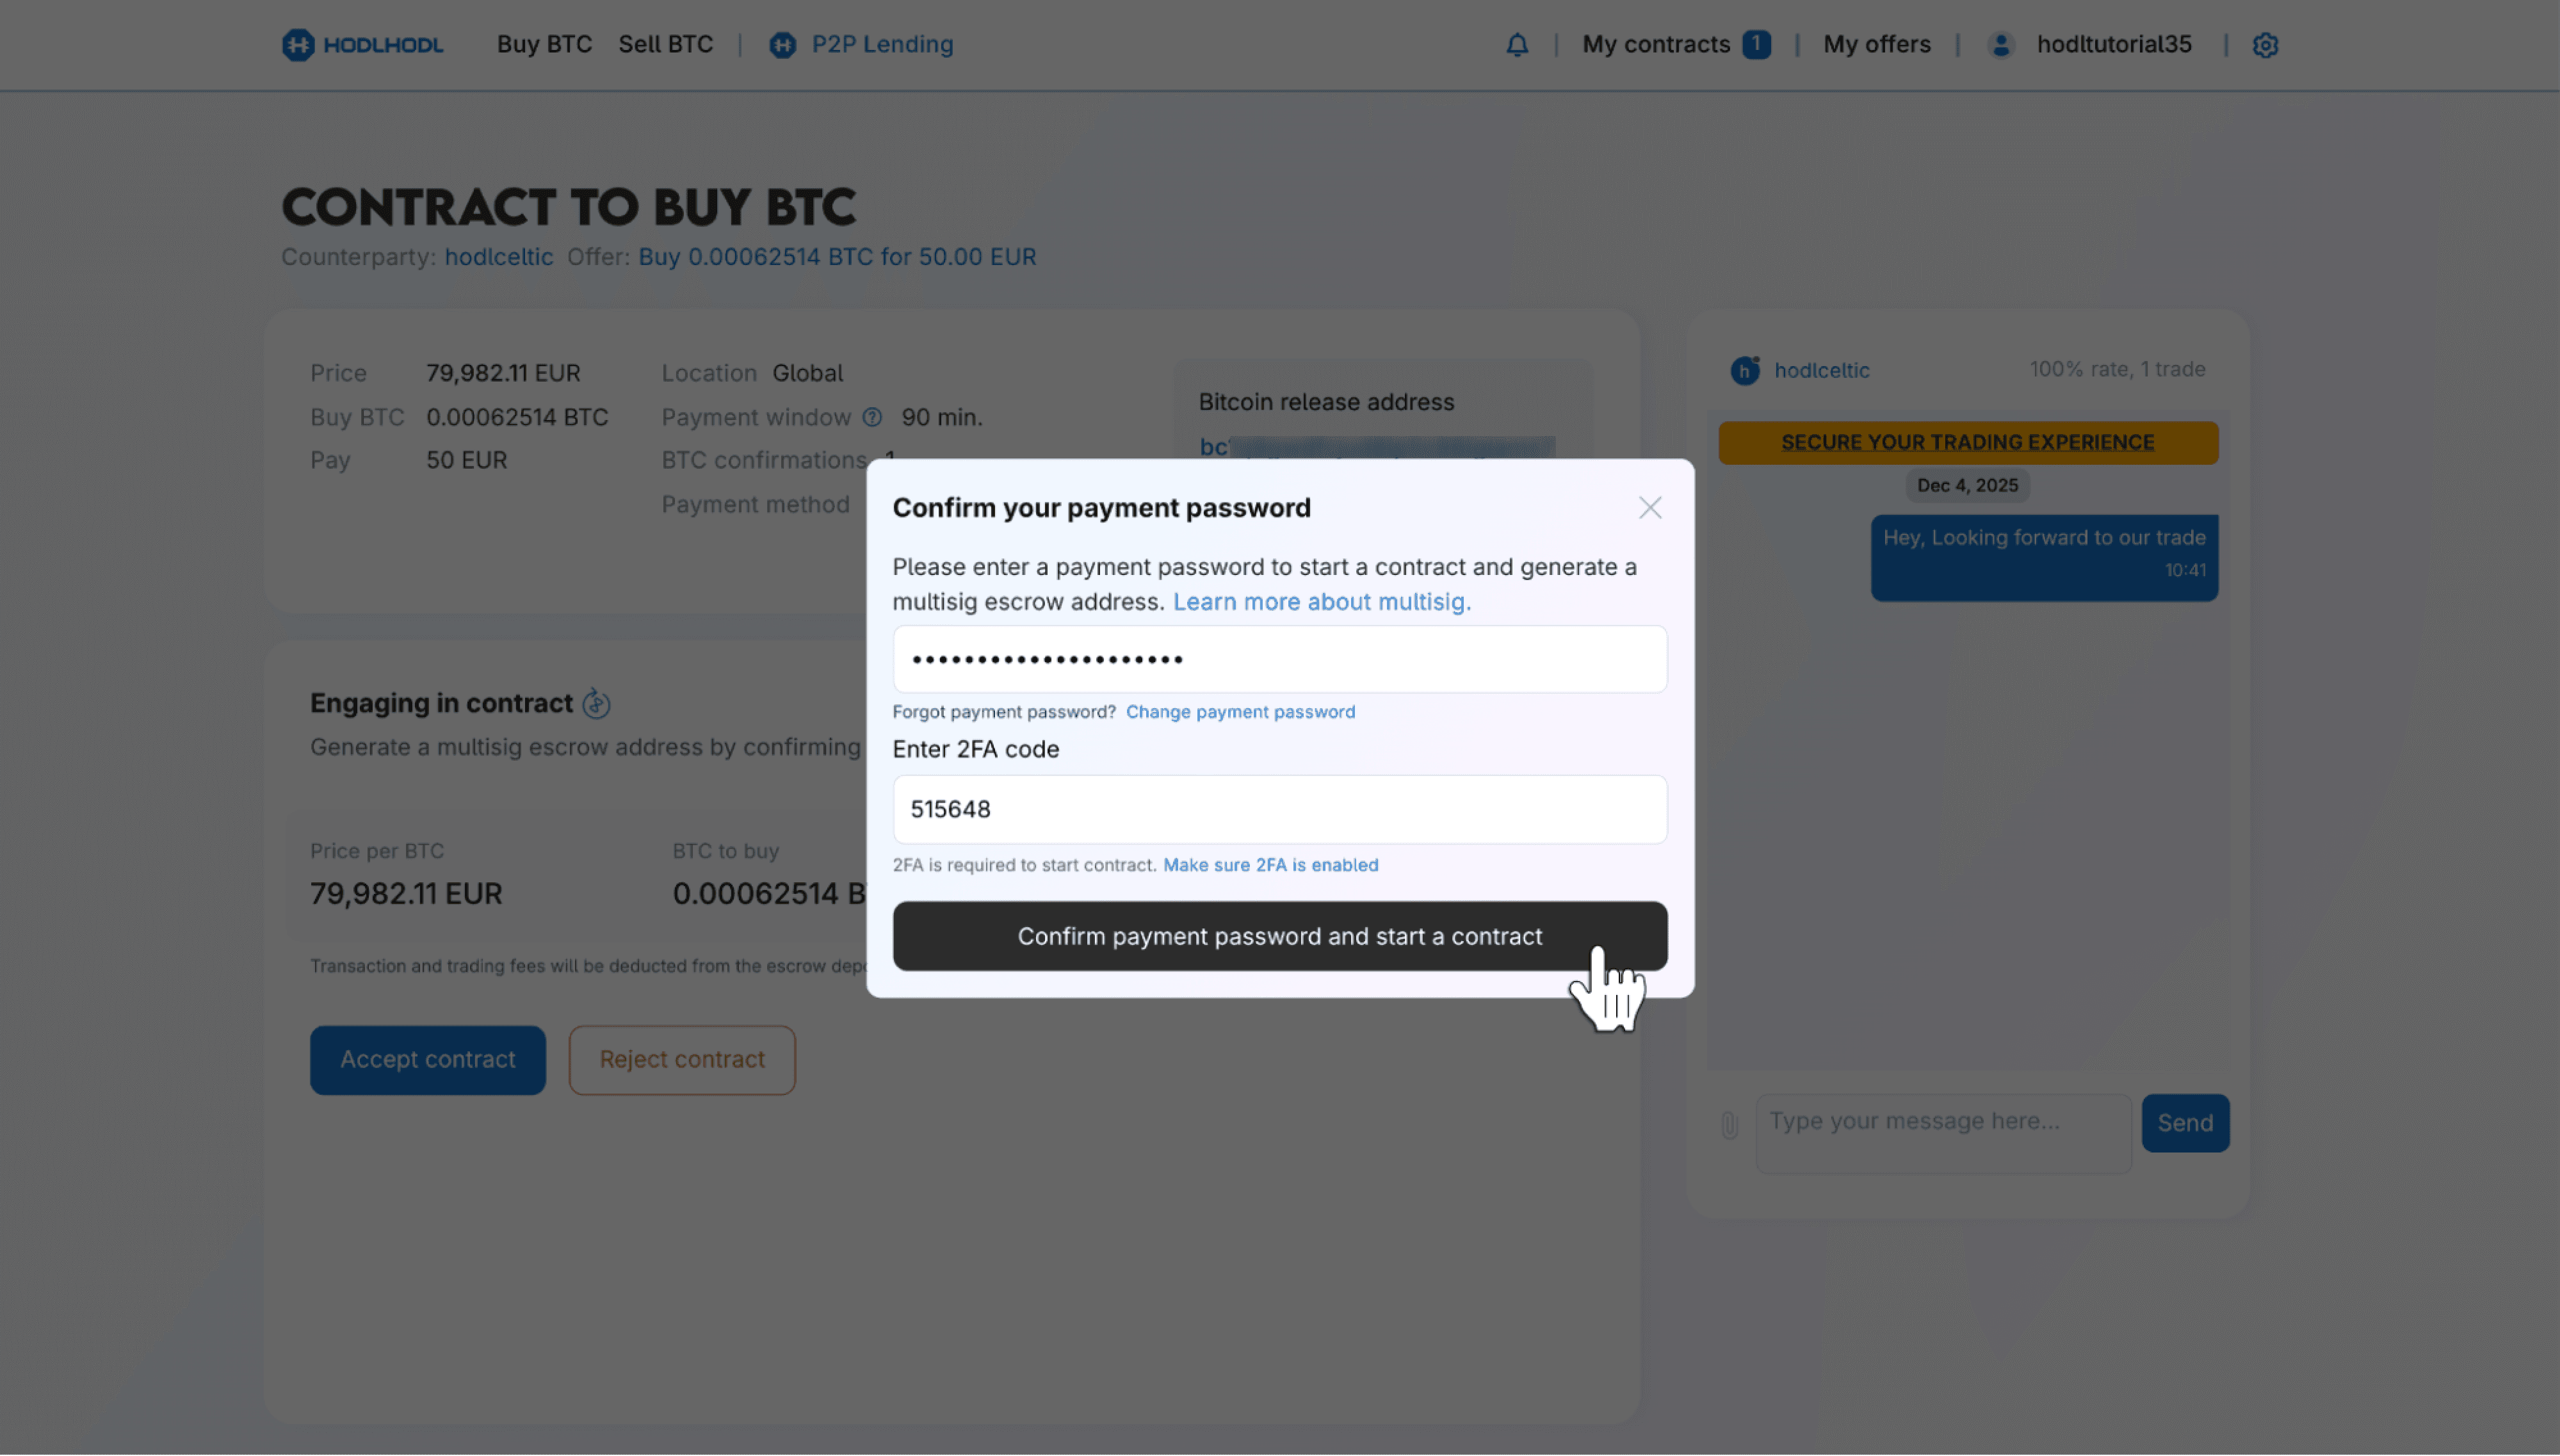
To generate the escrow address and start the contract, you will be required to confirm your payment password. Fill in the following fields and click the Confirm payment password and start contract button.
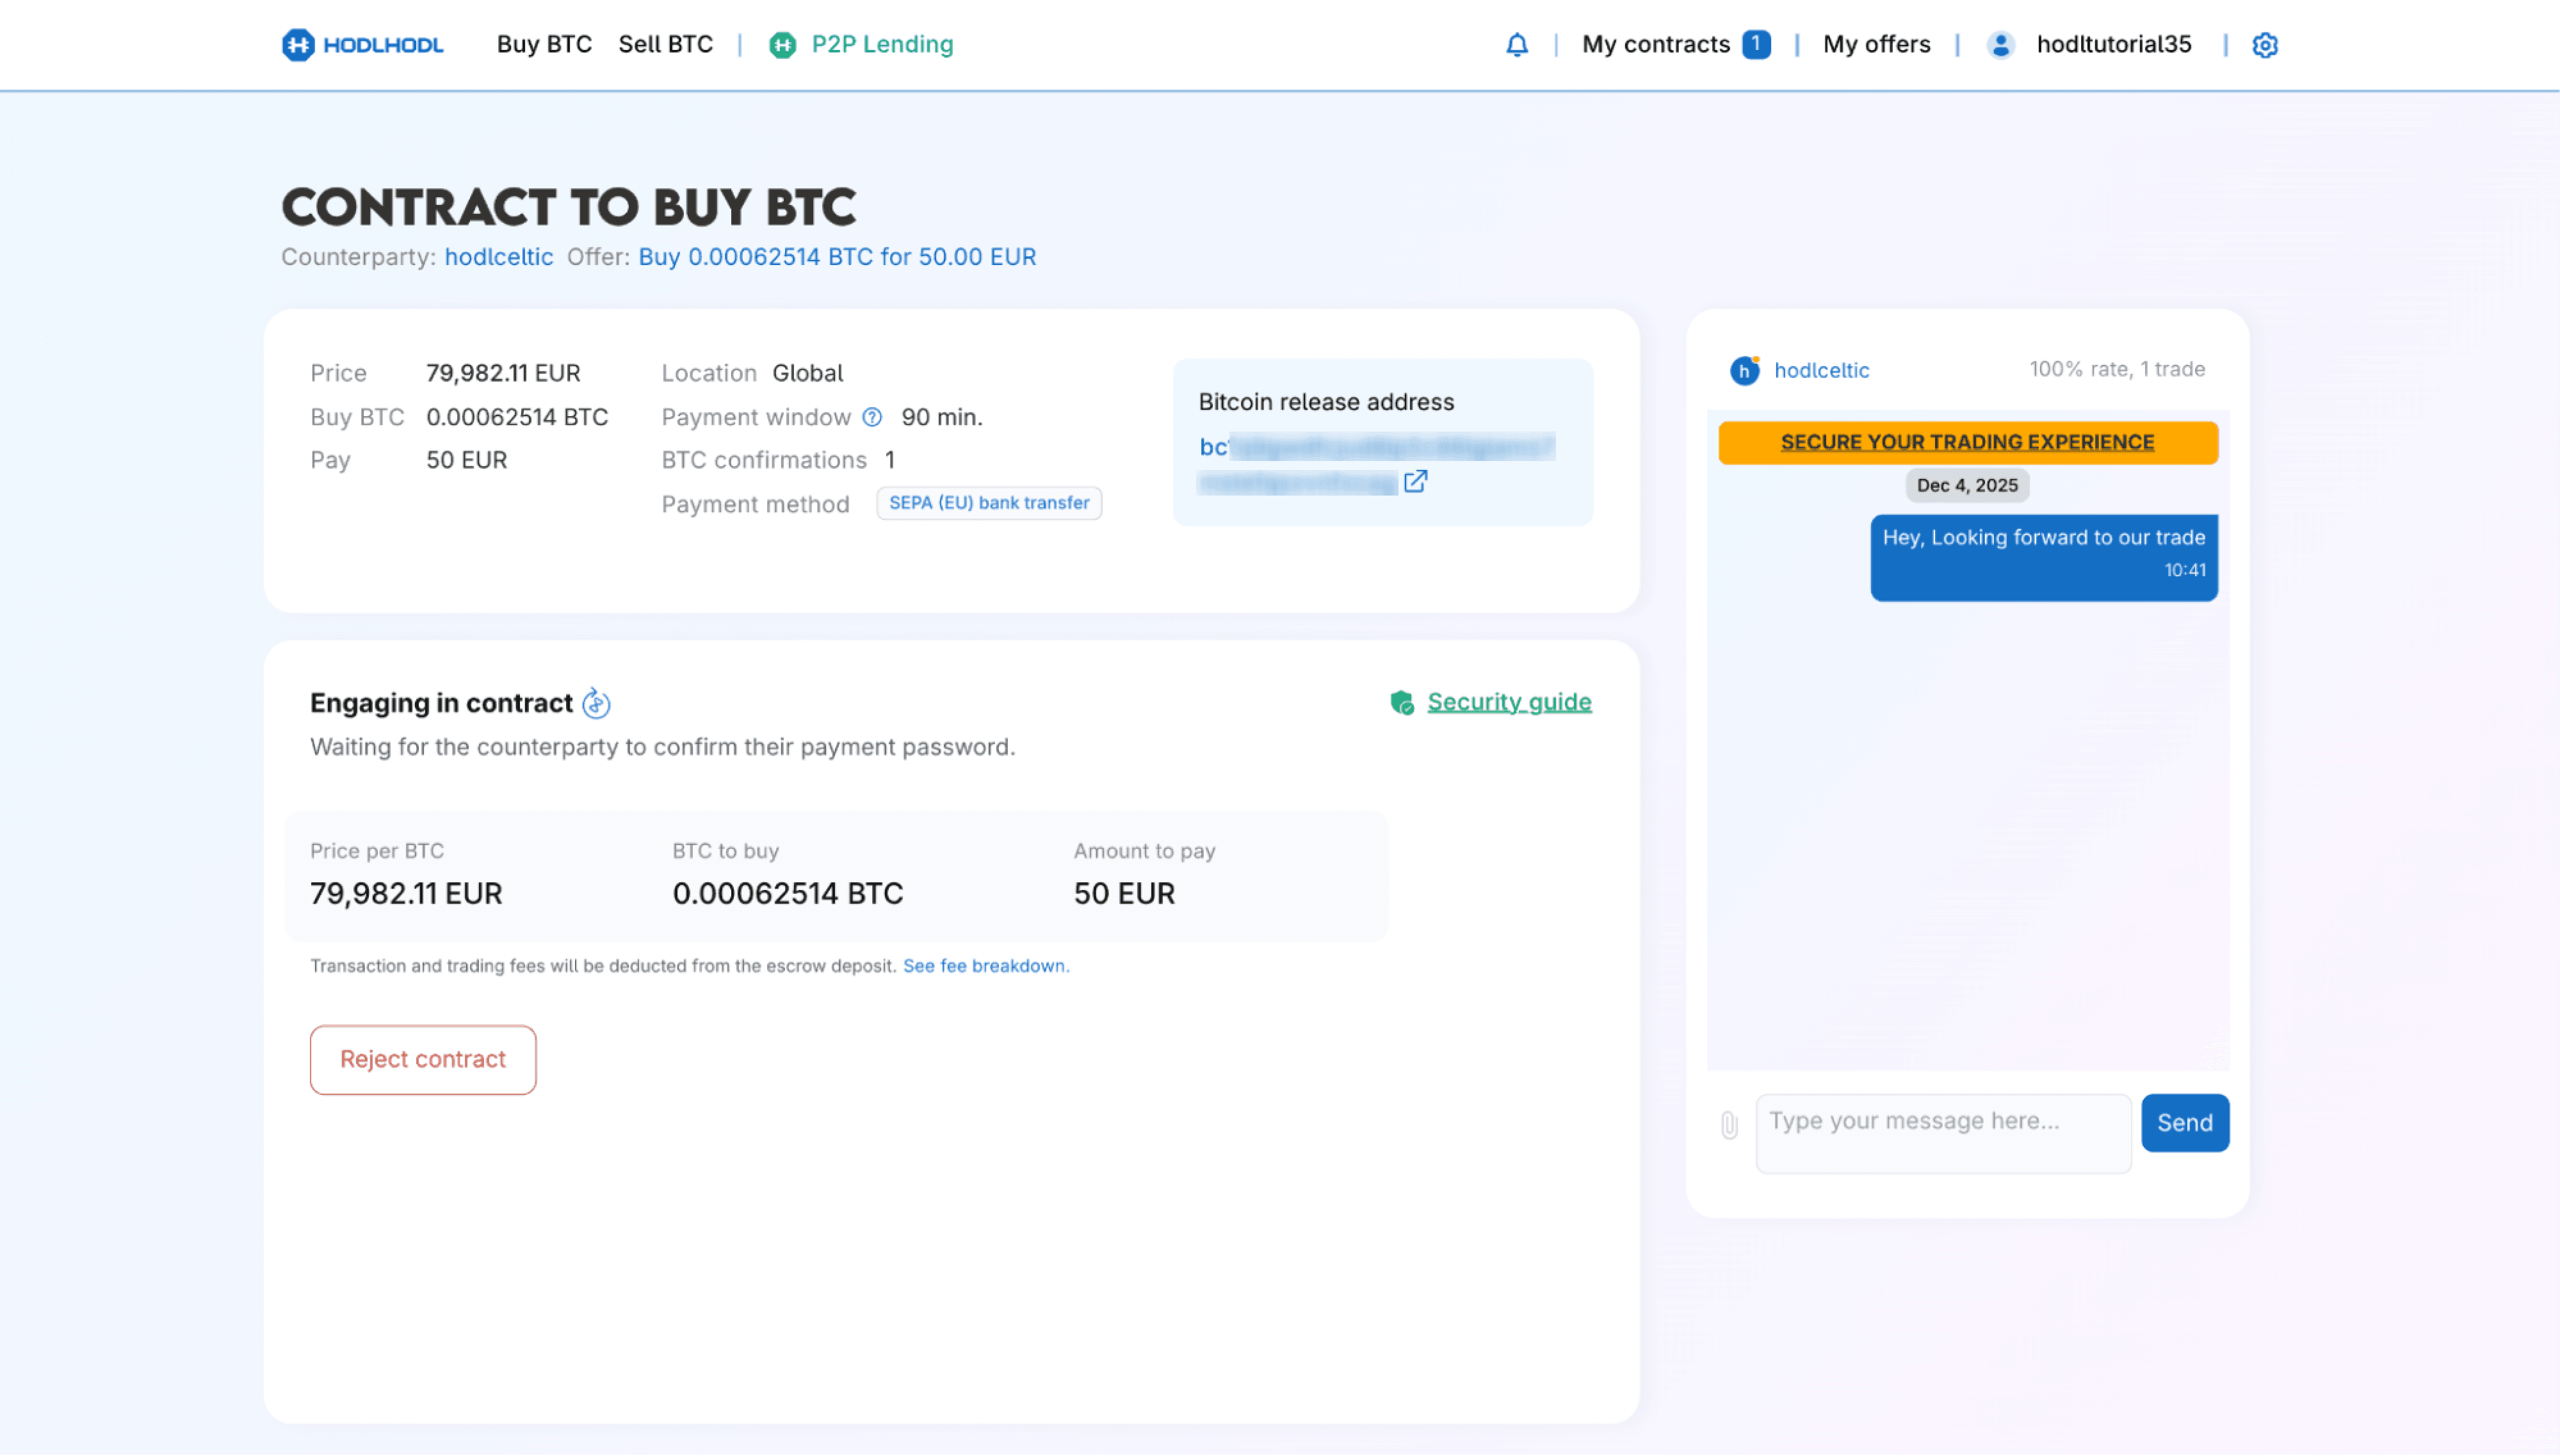
Step 3: BTC deposit
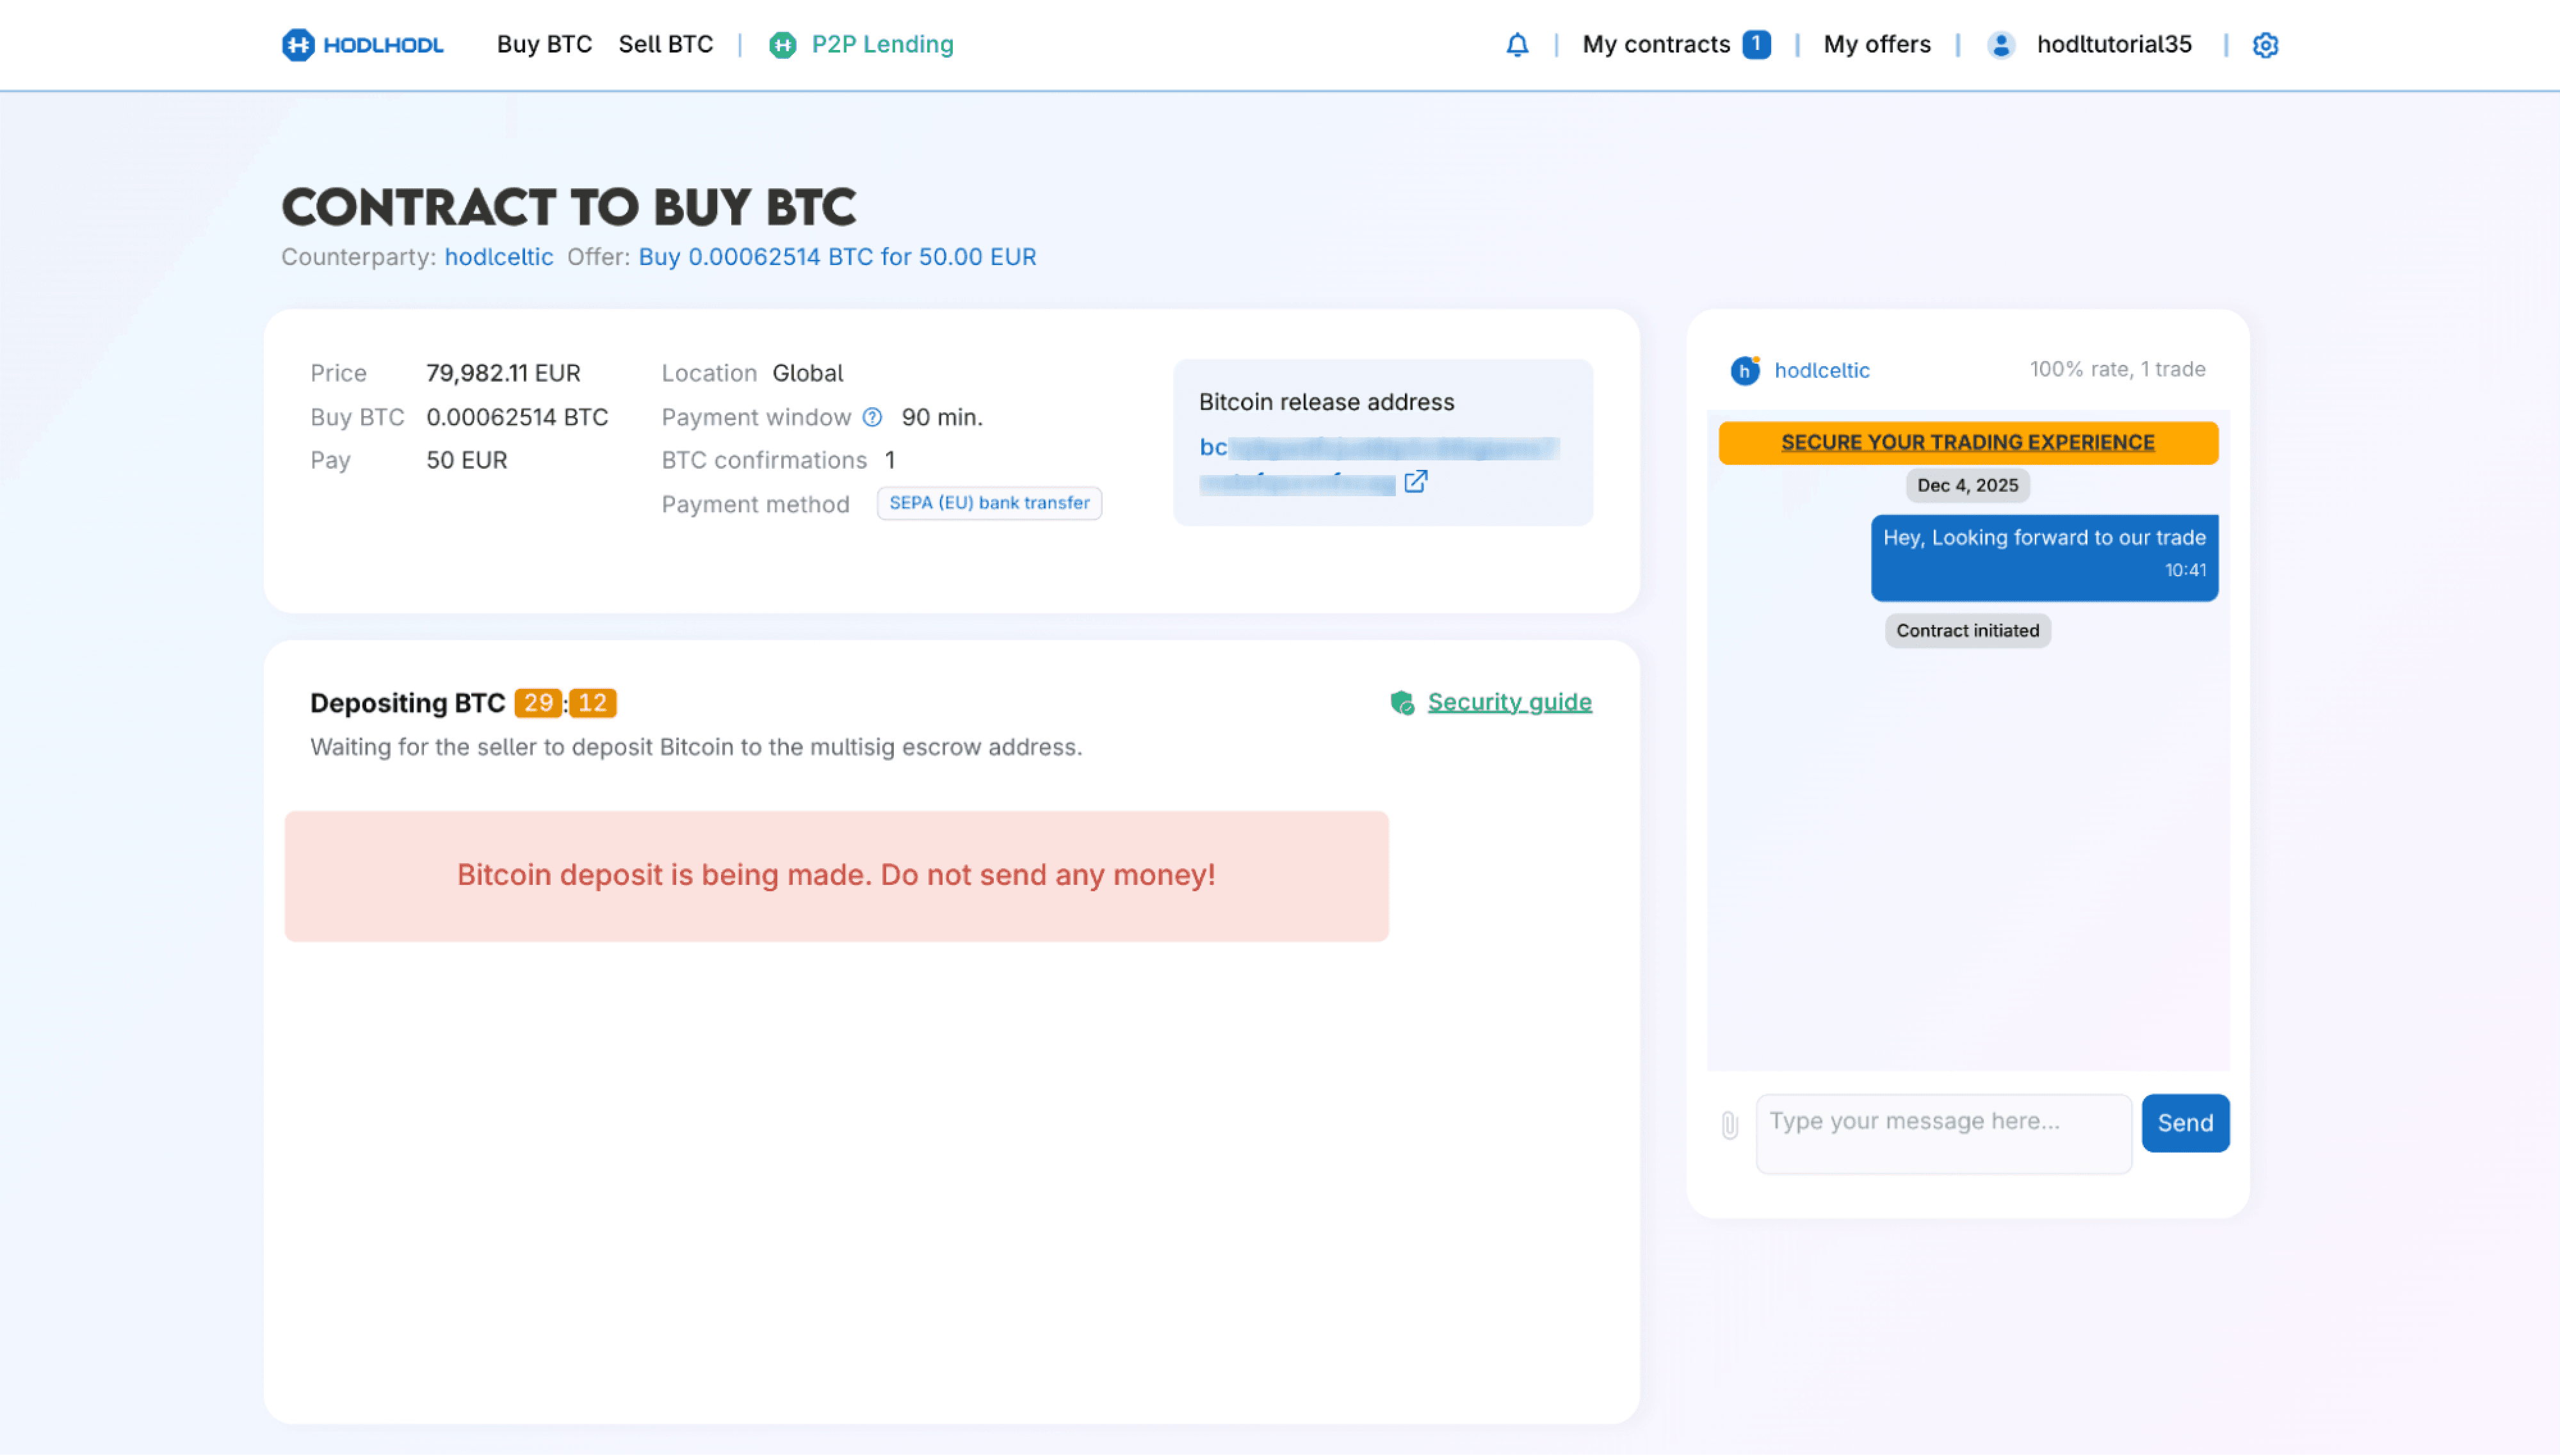
- At this stage, you just need to wait until the seller deposits Bitcoin to the multisig escrow address.
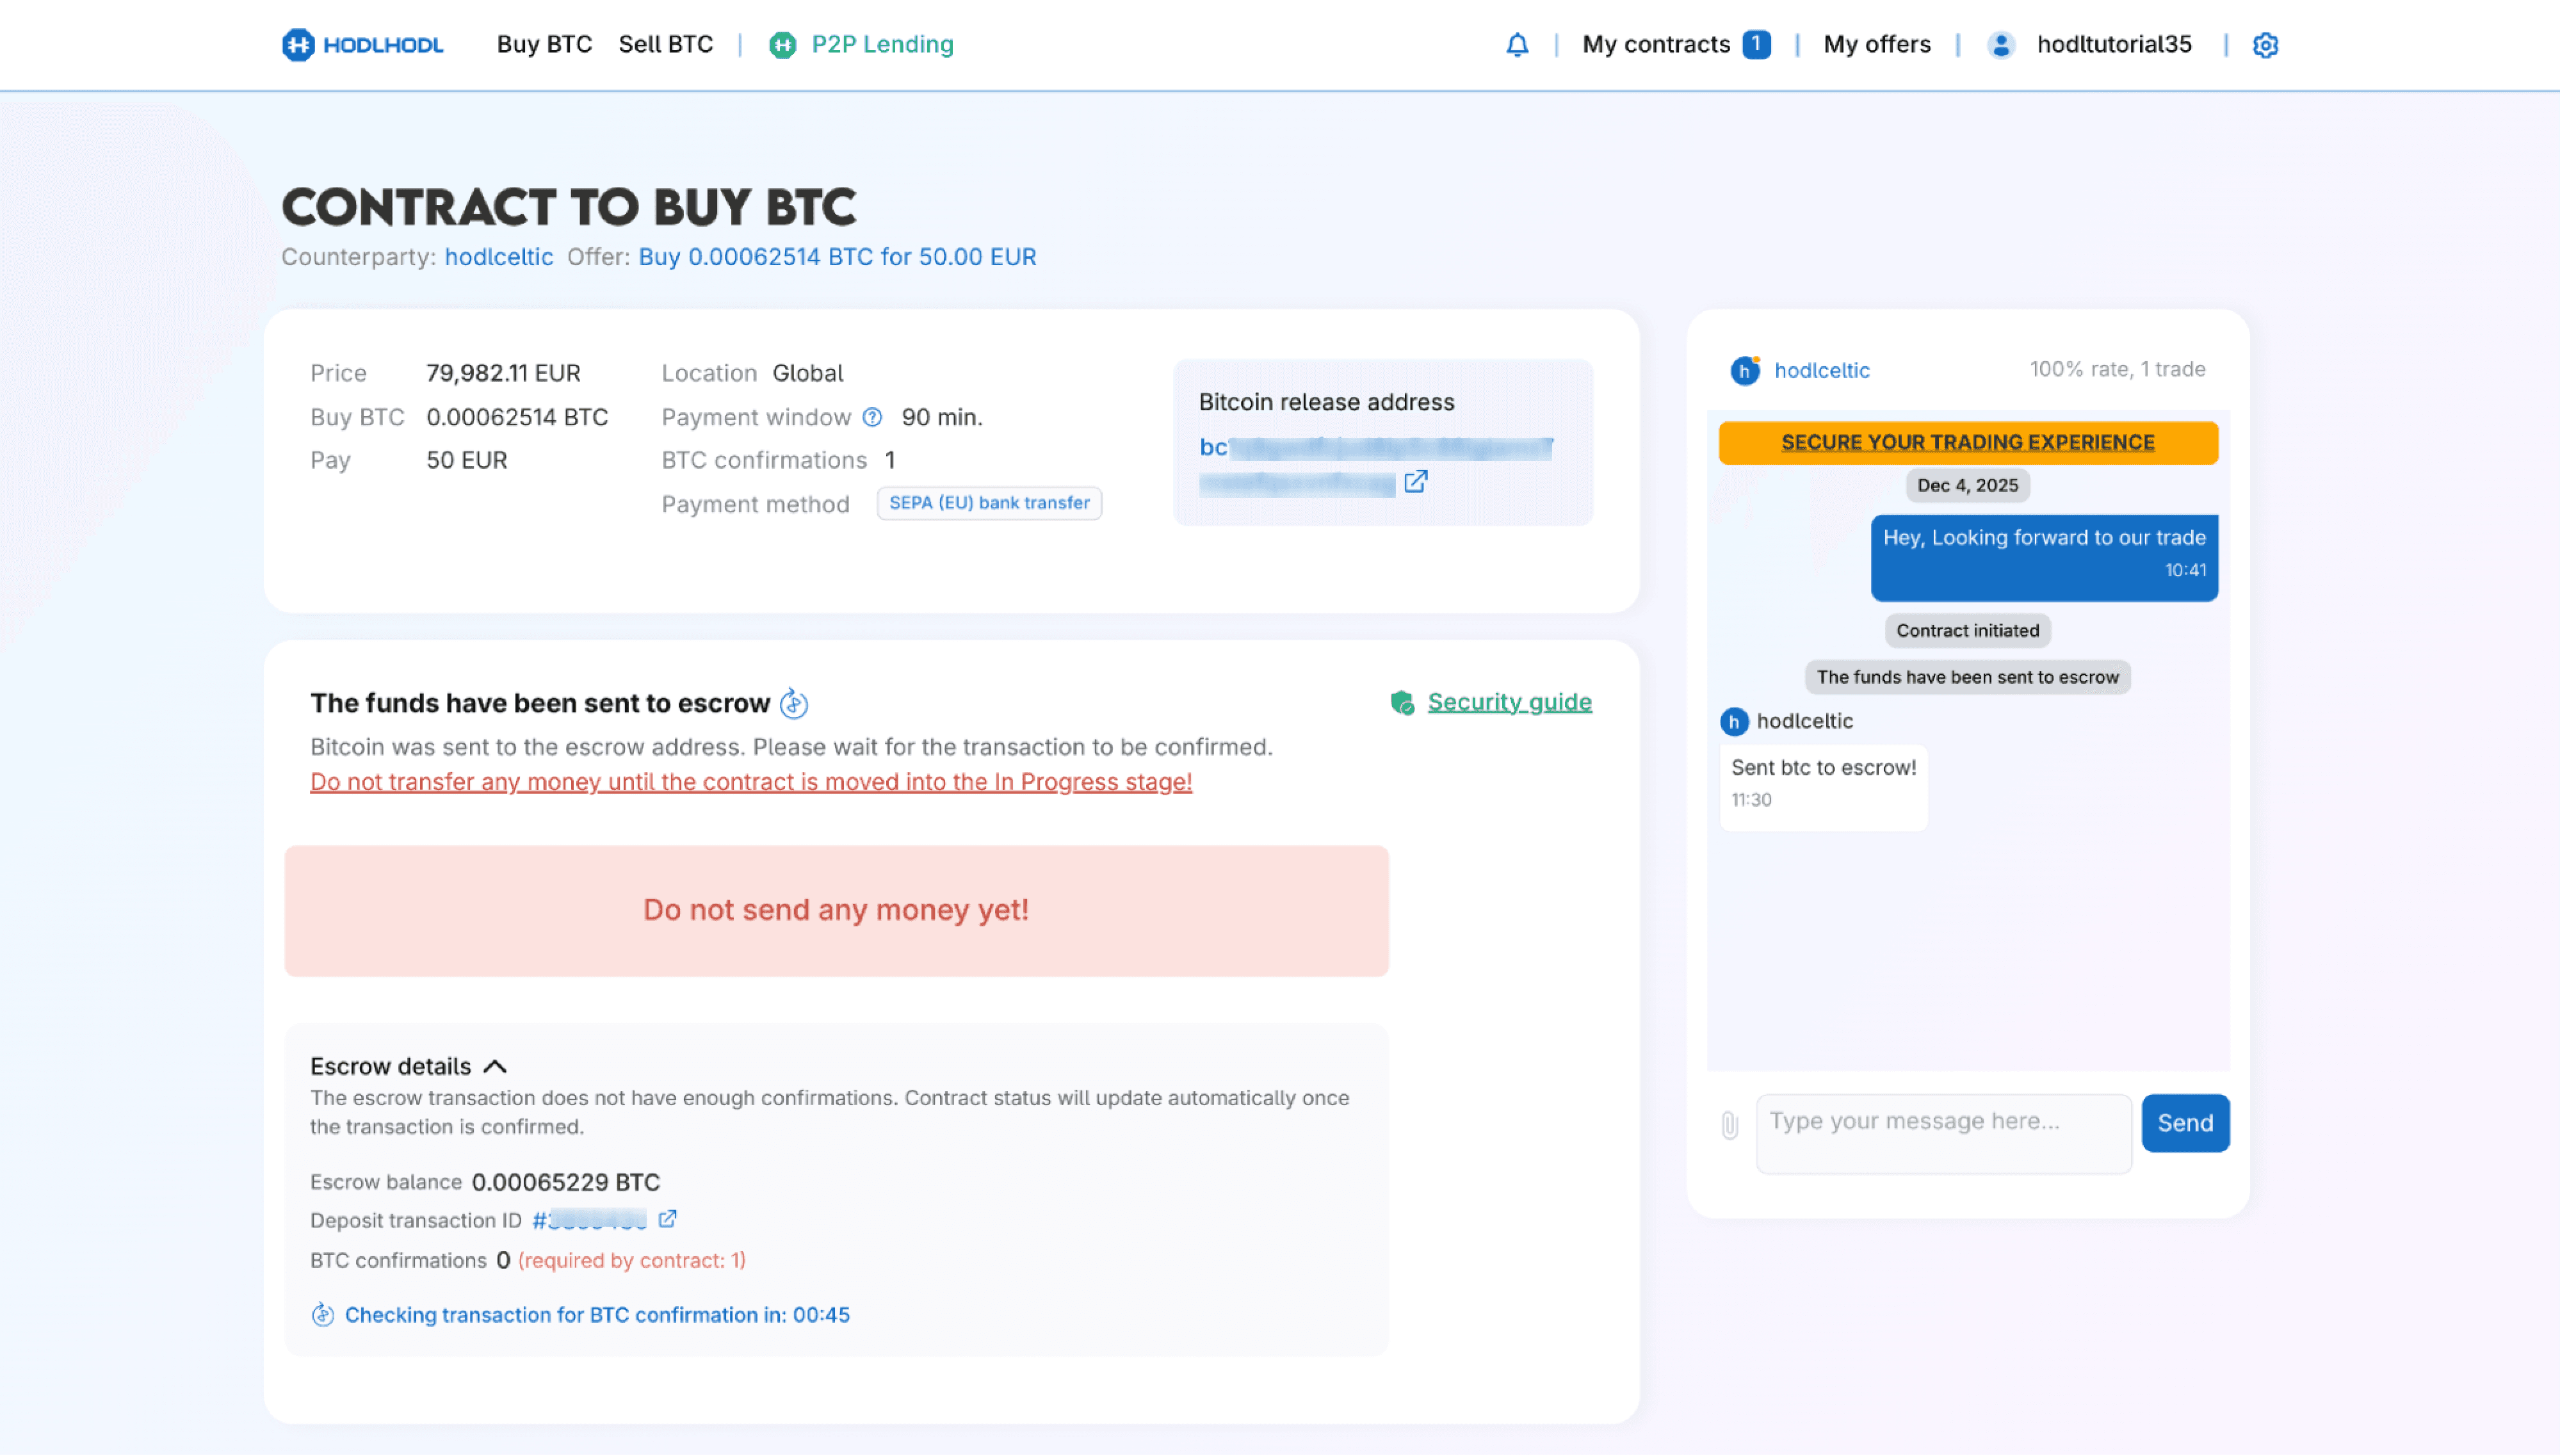
- The status will update to show the seller sent Bitcoin to escrow. Continue to wait for the transaction to be confirmed.
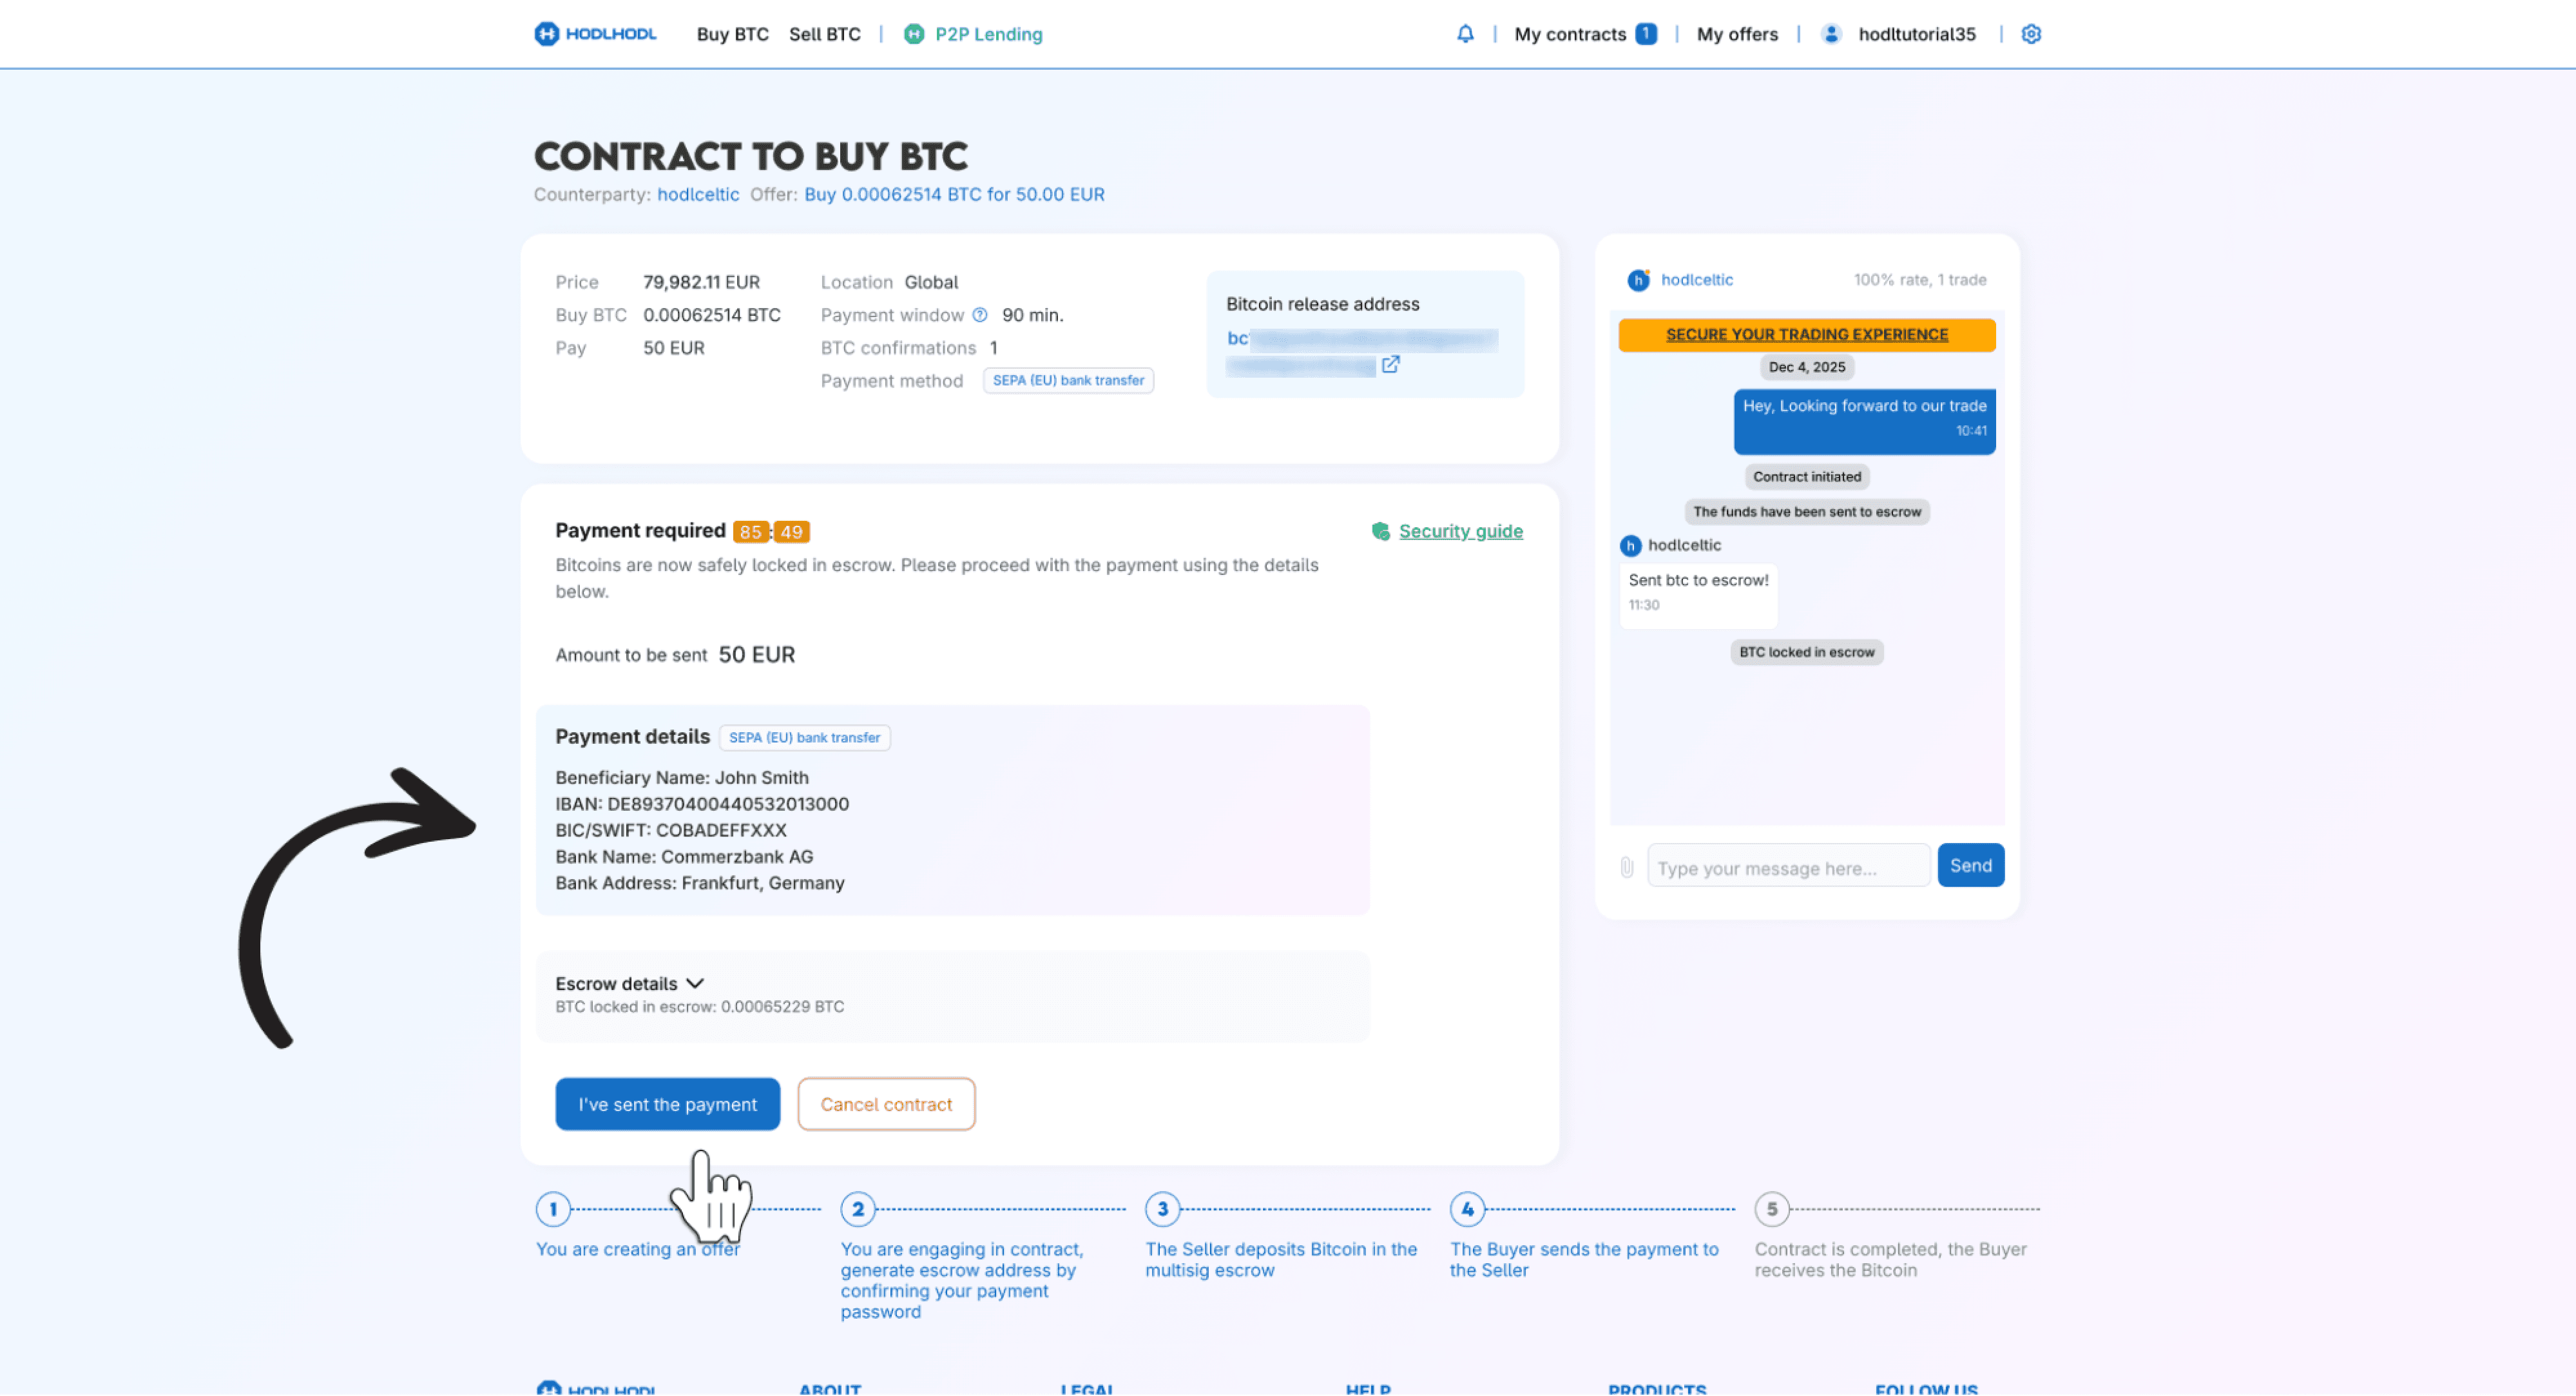
Step 4: Payment transfer
- After the deposit to the escrow address is confirmed, you will be presented with the payment method provided by the seller:
-
Use the details to make the payment.
-
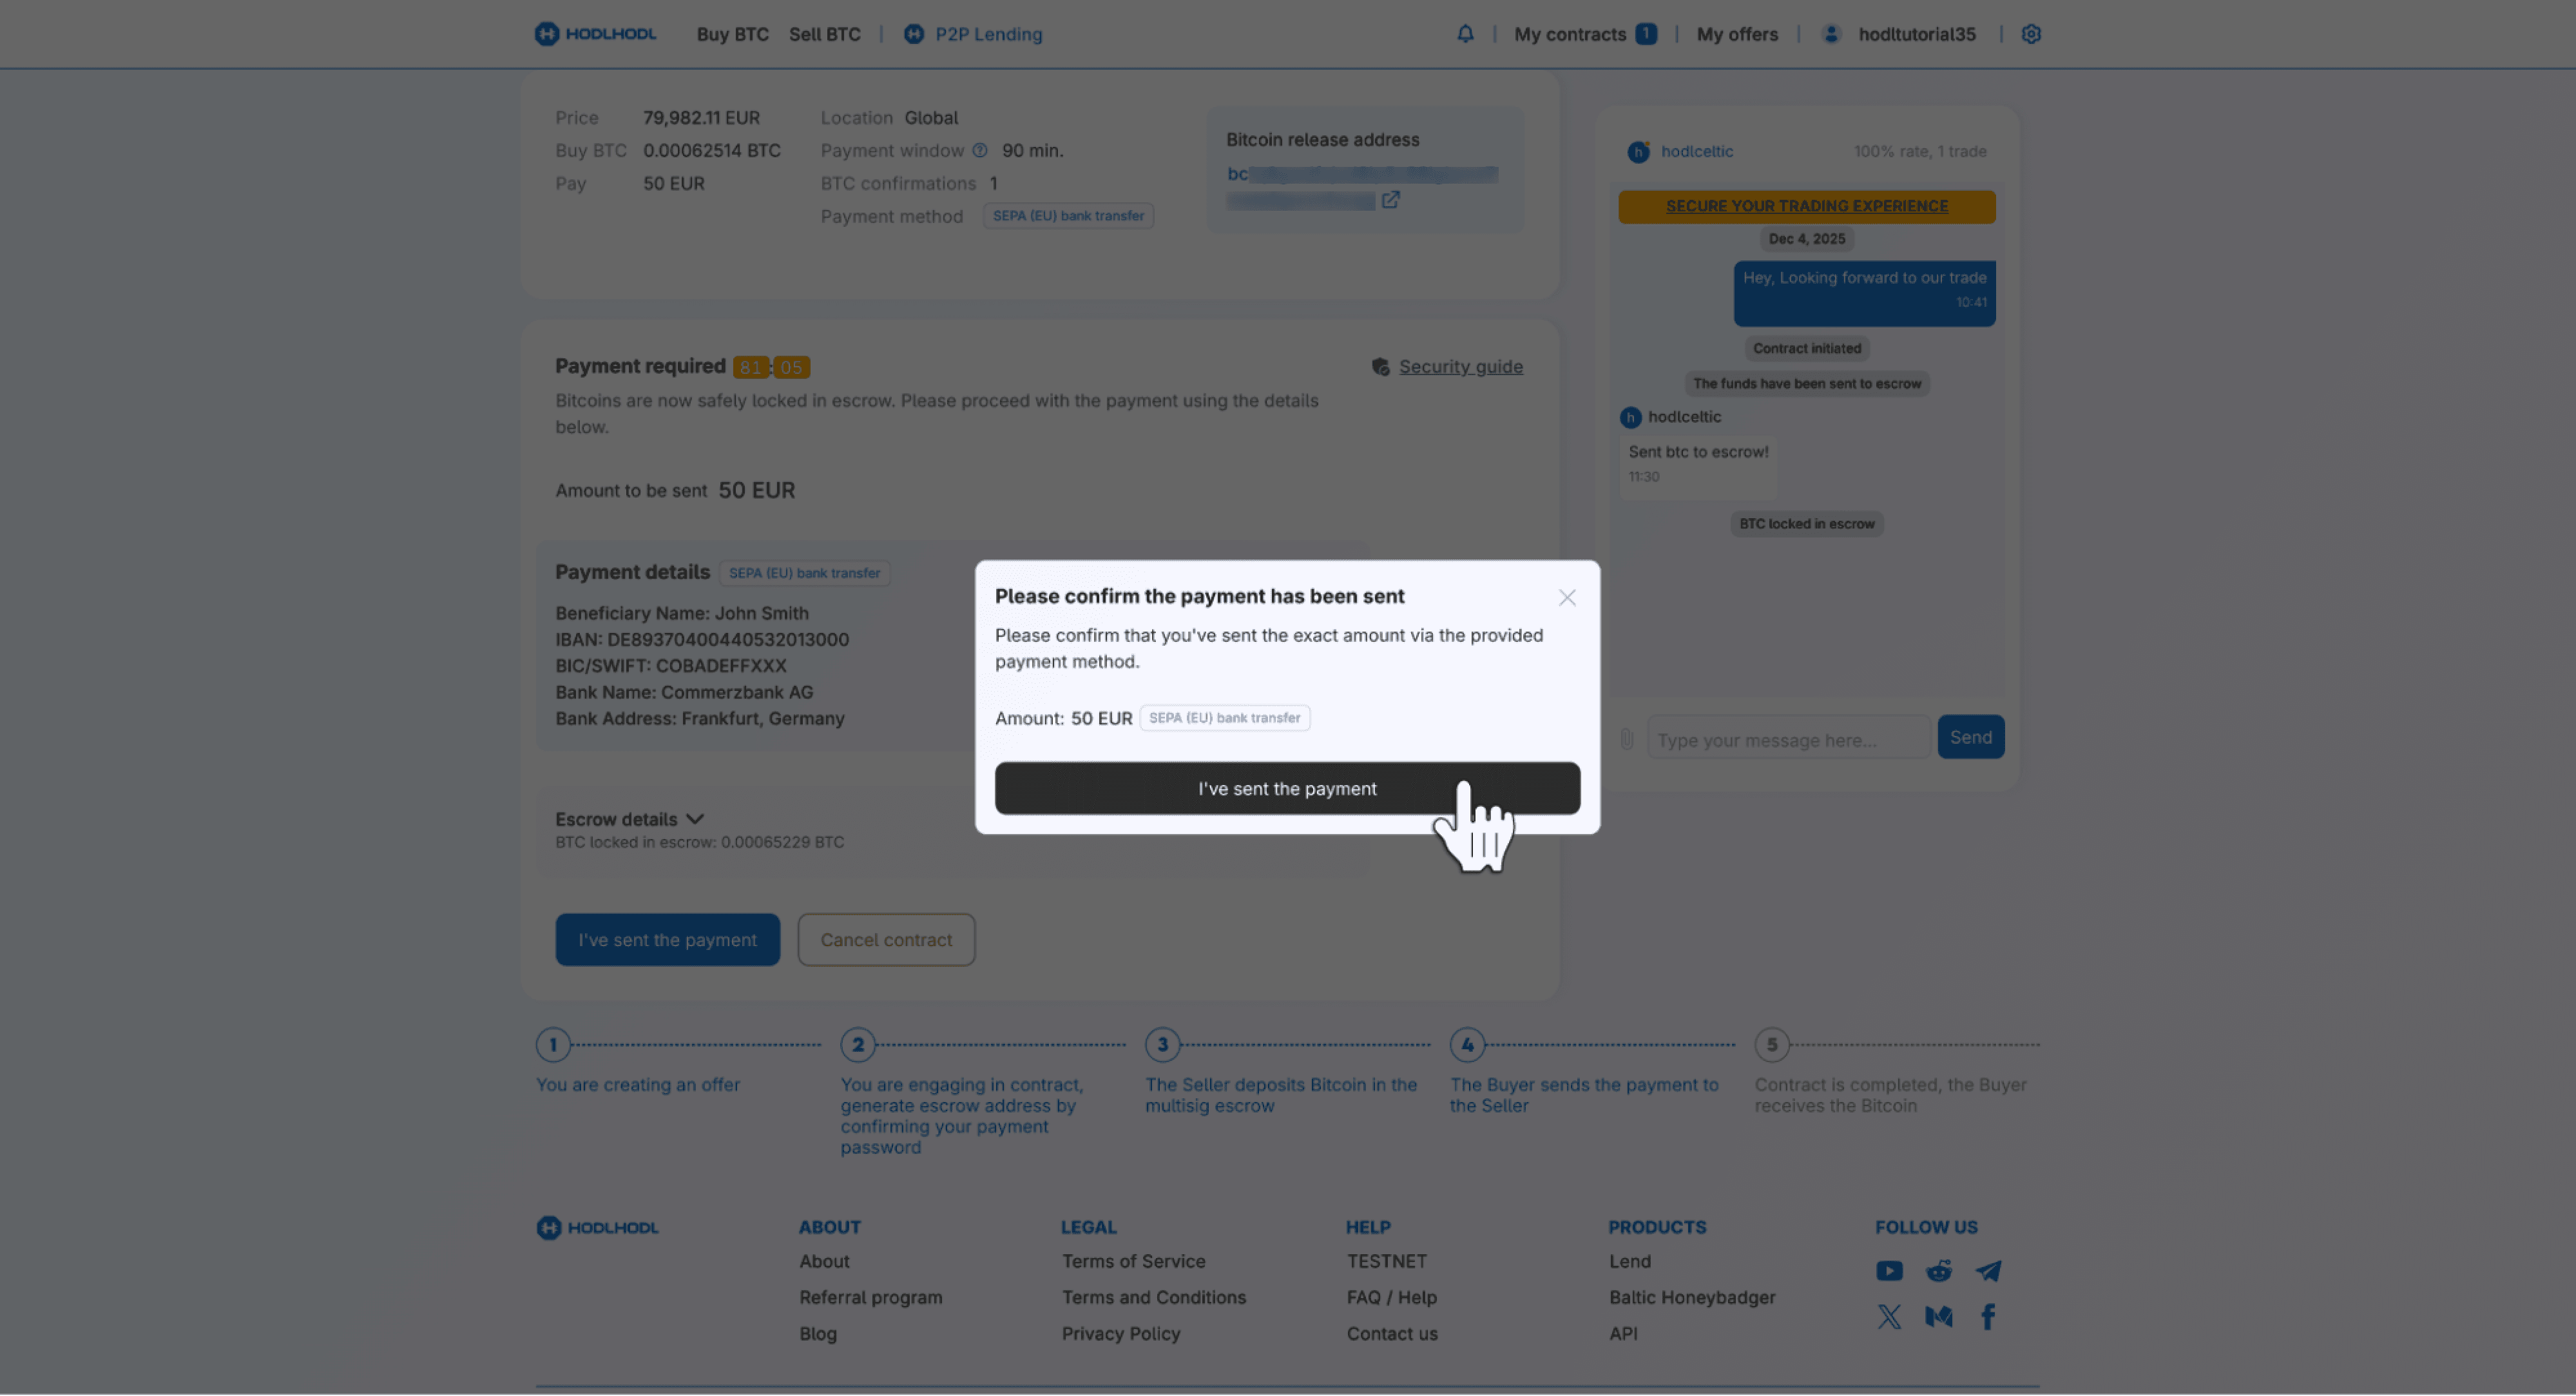
Once sent, click the I've sent the payment button.
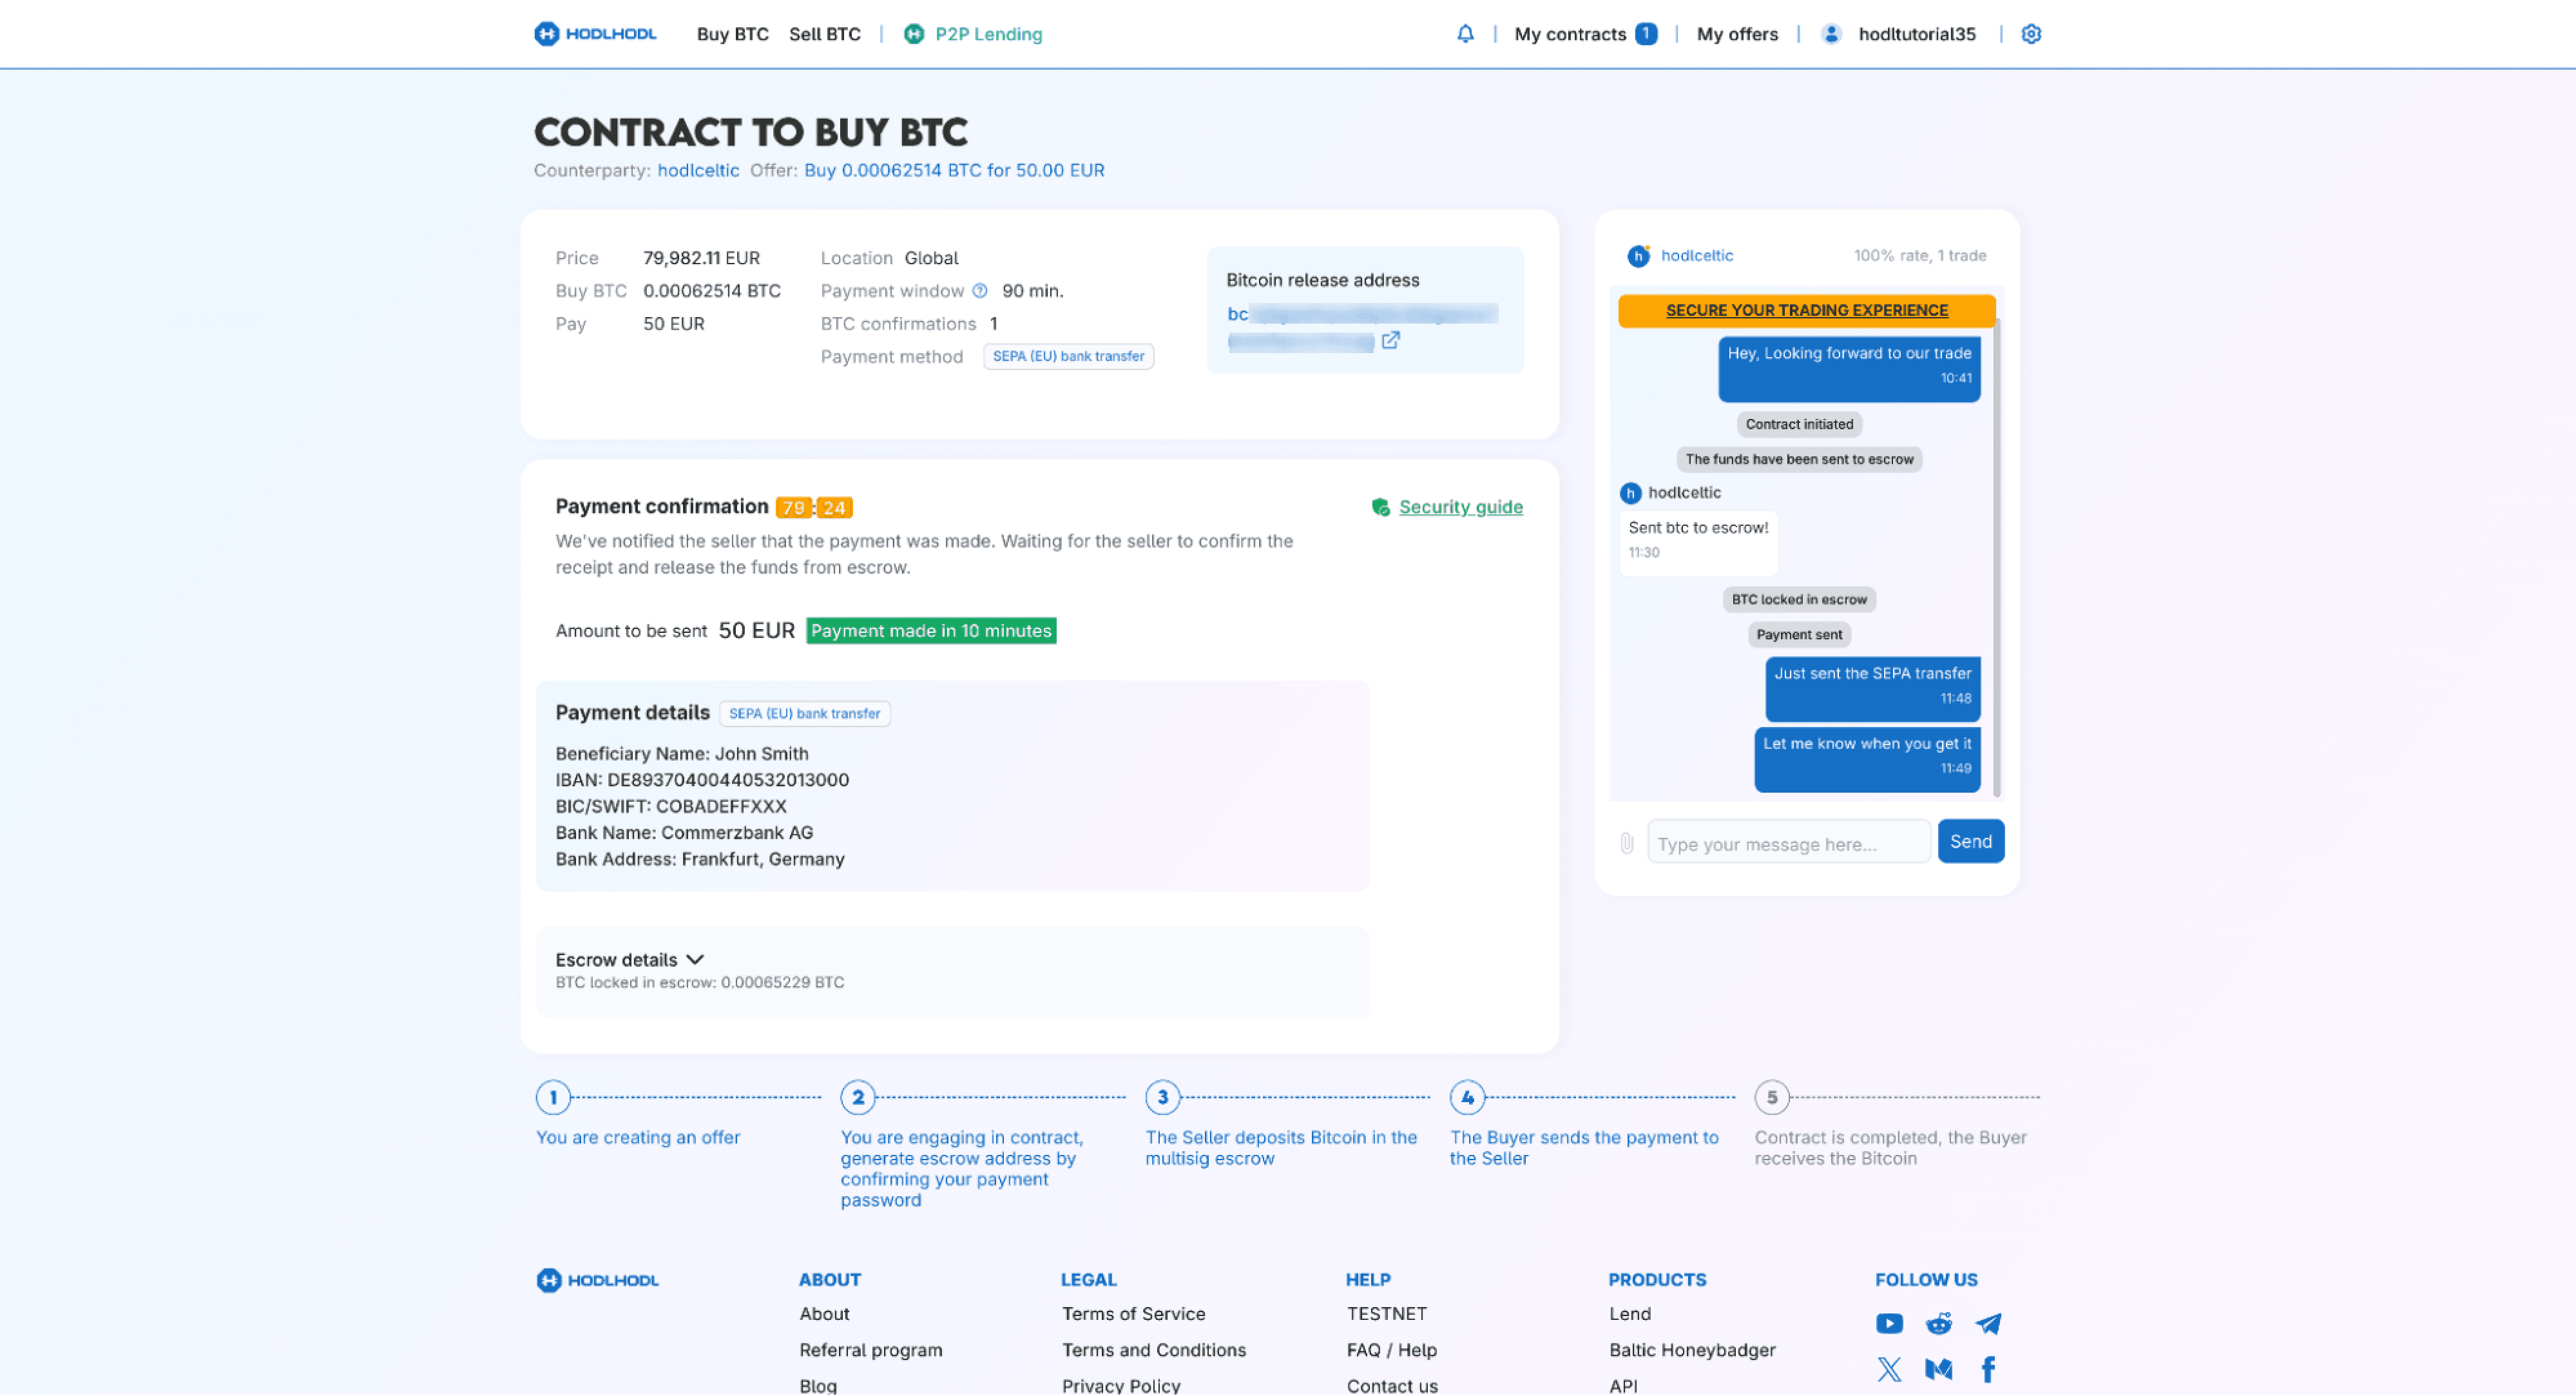
Step 5: Payment confirmation
- Now wait for the seller to confirm they received the payment
Step 6: Release escrow
- The seller has confirmed the payment. Bitcoin has been sent to your wallet address.
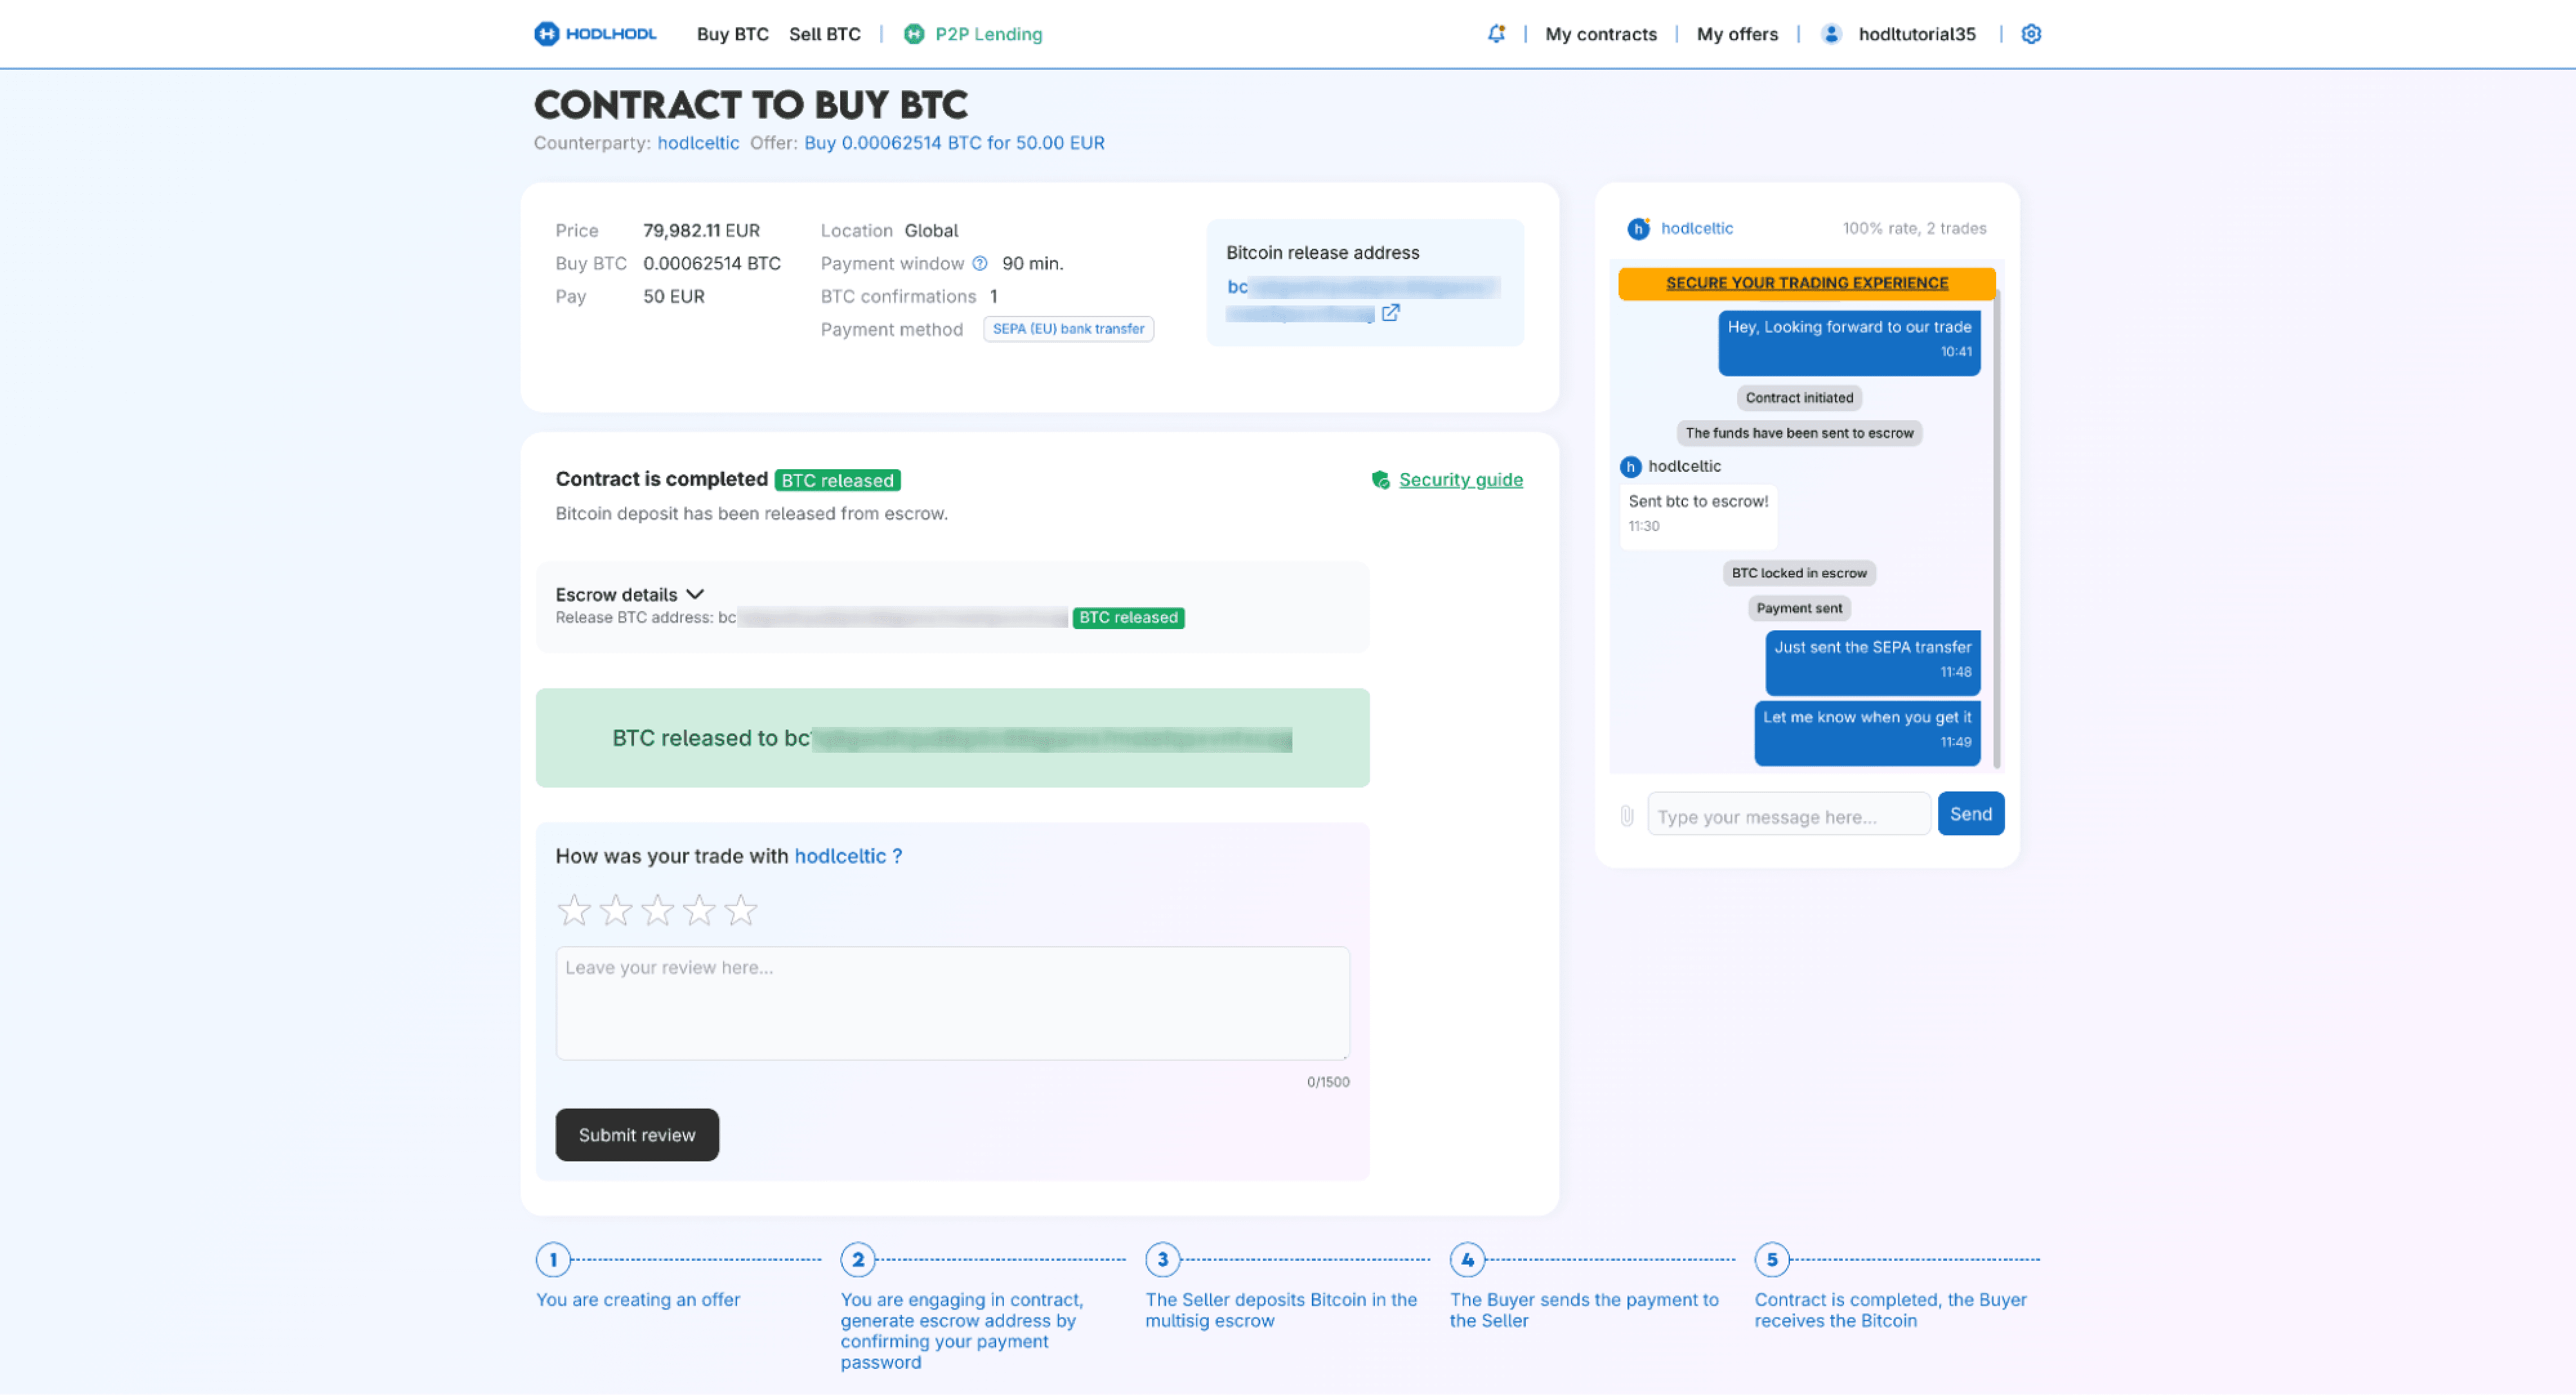
Step 7: Contract completed
- You can leave feedback for the seller at this final stage.
SELLING
Find the Buyer
- Find the buyer on offers page and engage with buyer:
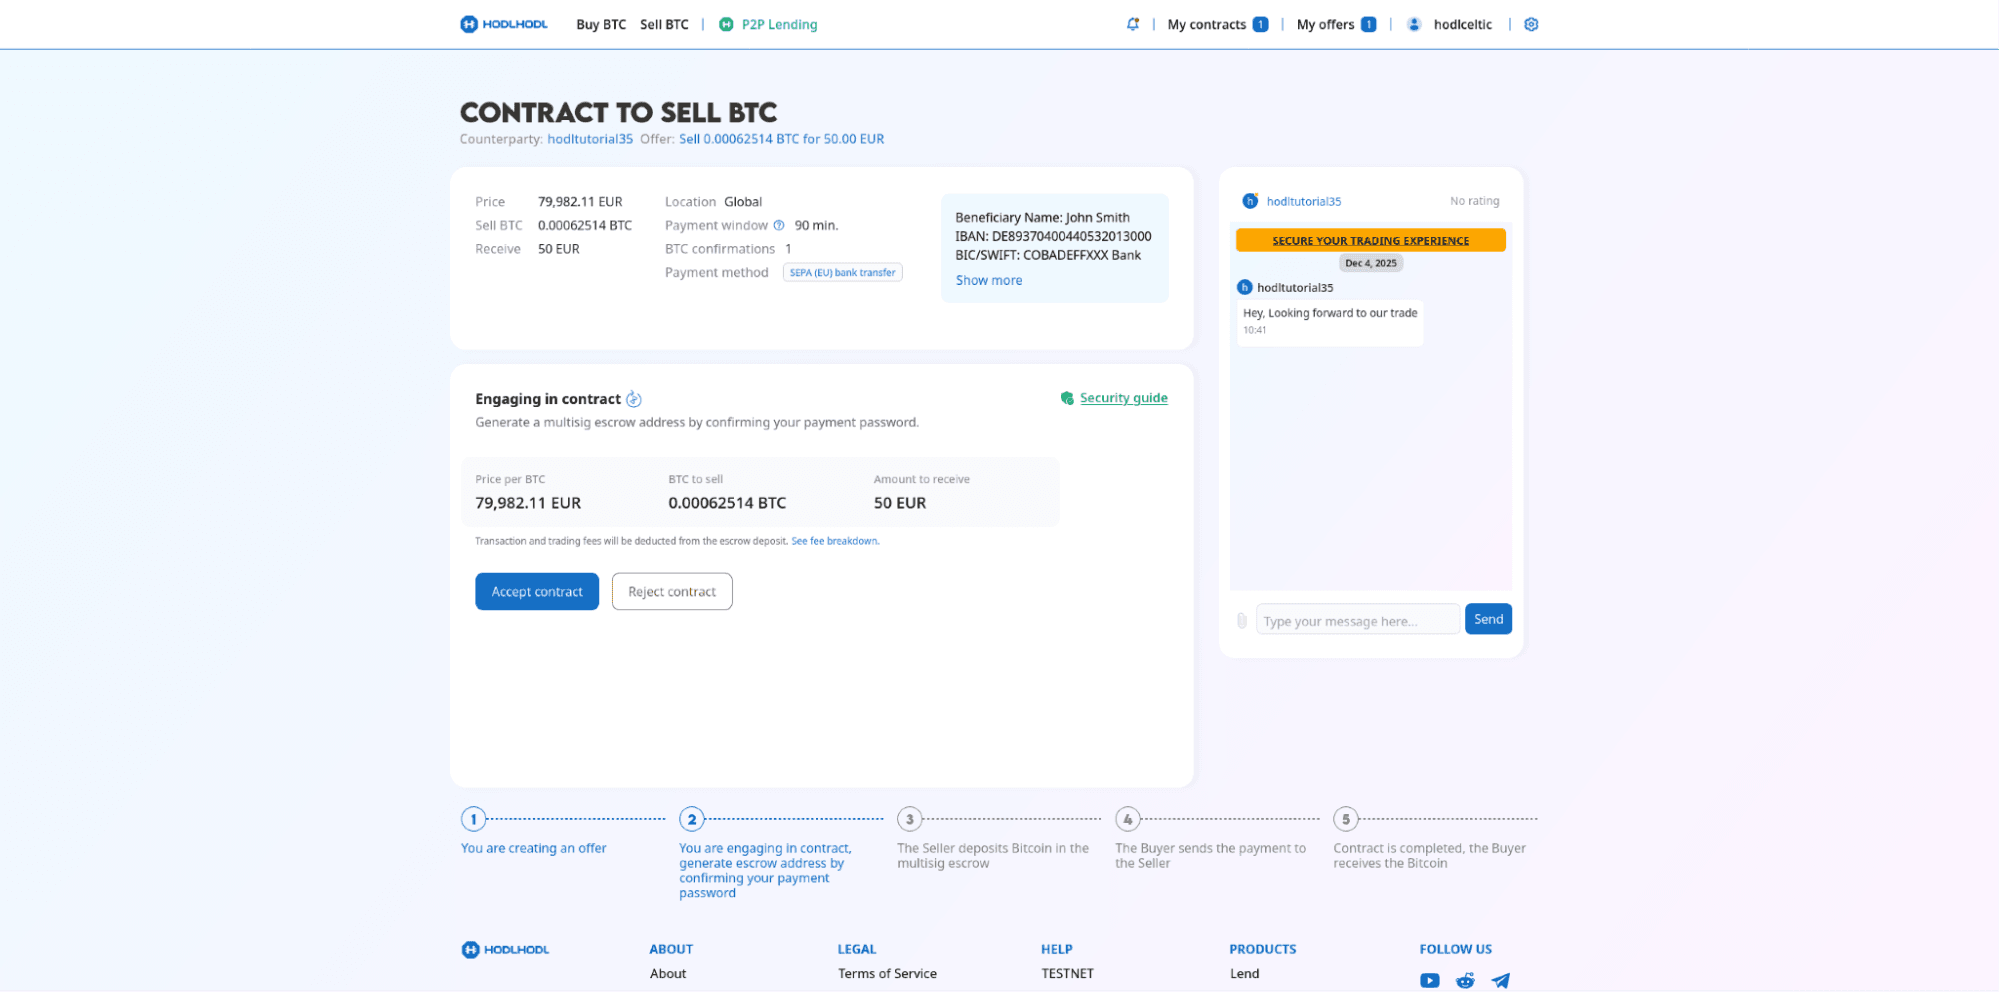
Escrow Workflow: Selling BTC
Step 1: Accept offer
(This step is exactly the same as step 1 in the buying BTC section)
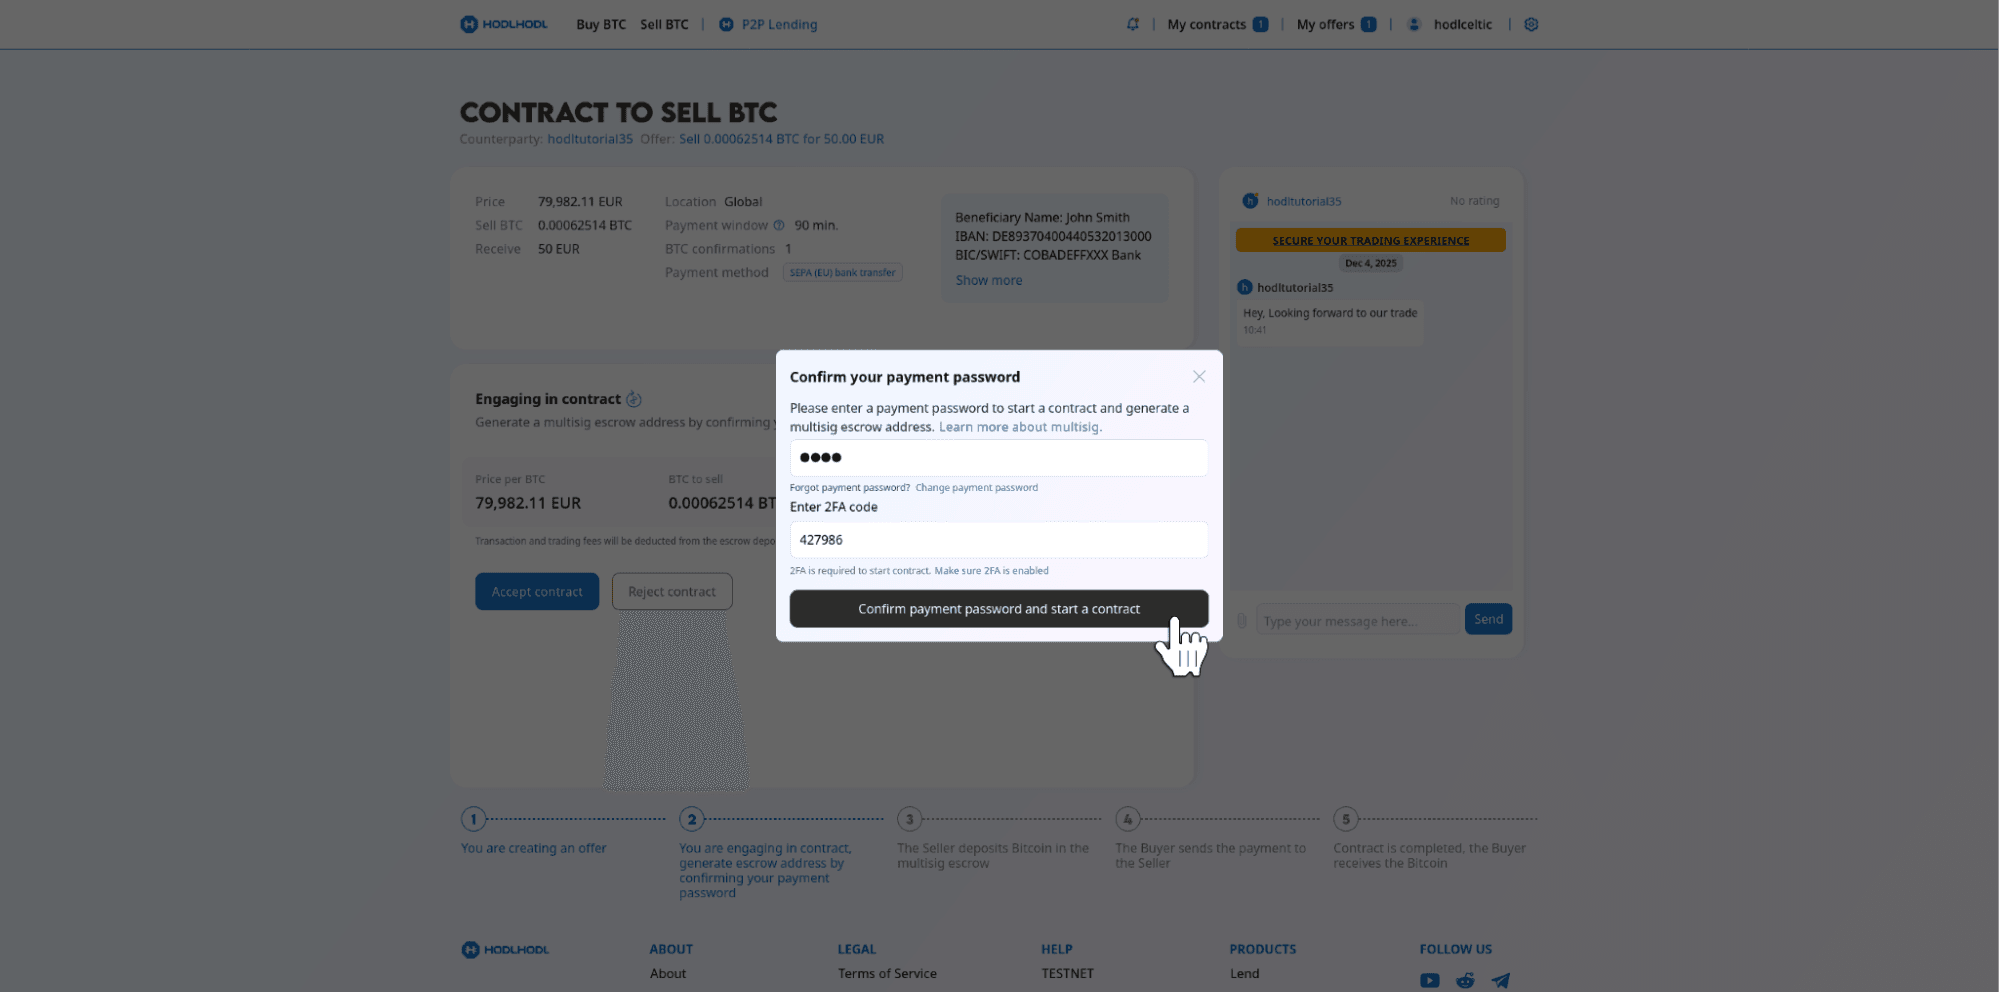
Step 2: Engaging in contract
- To generate the escrow address and start the contract, you will be required to confirm your payment password.
- Fill in the following fields and click the Confirm payment password and start contract button.
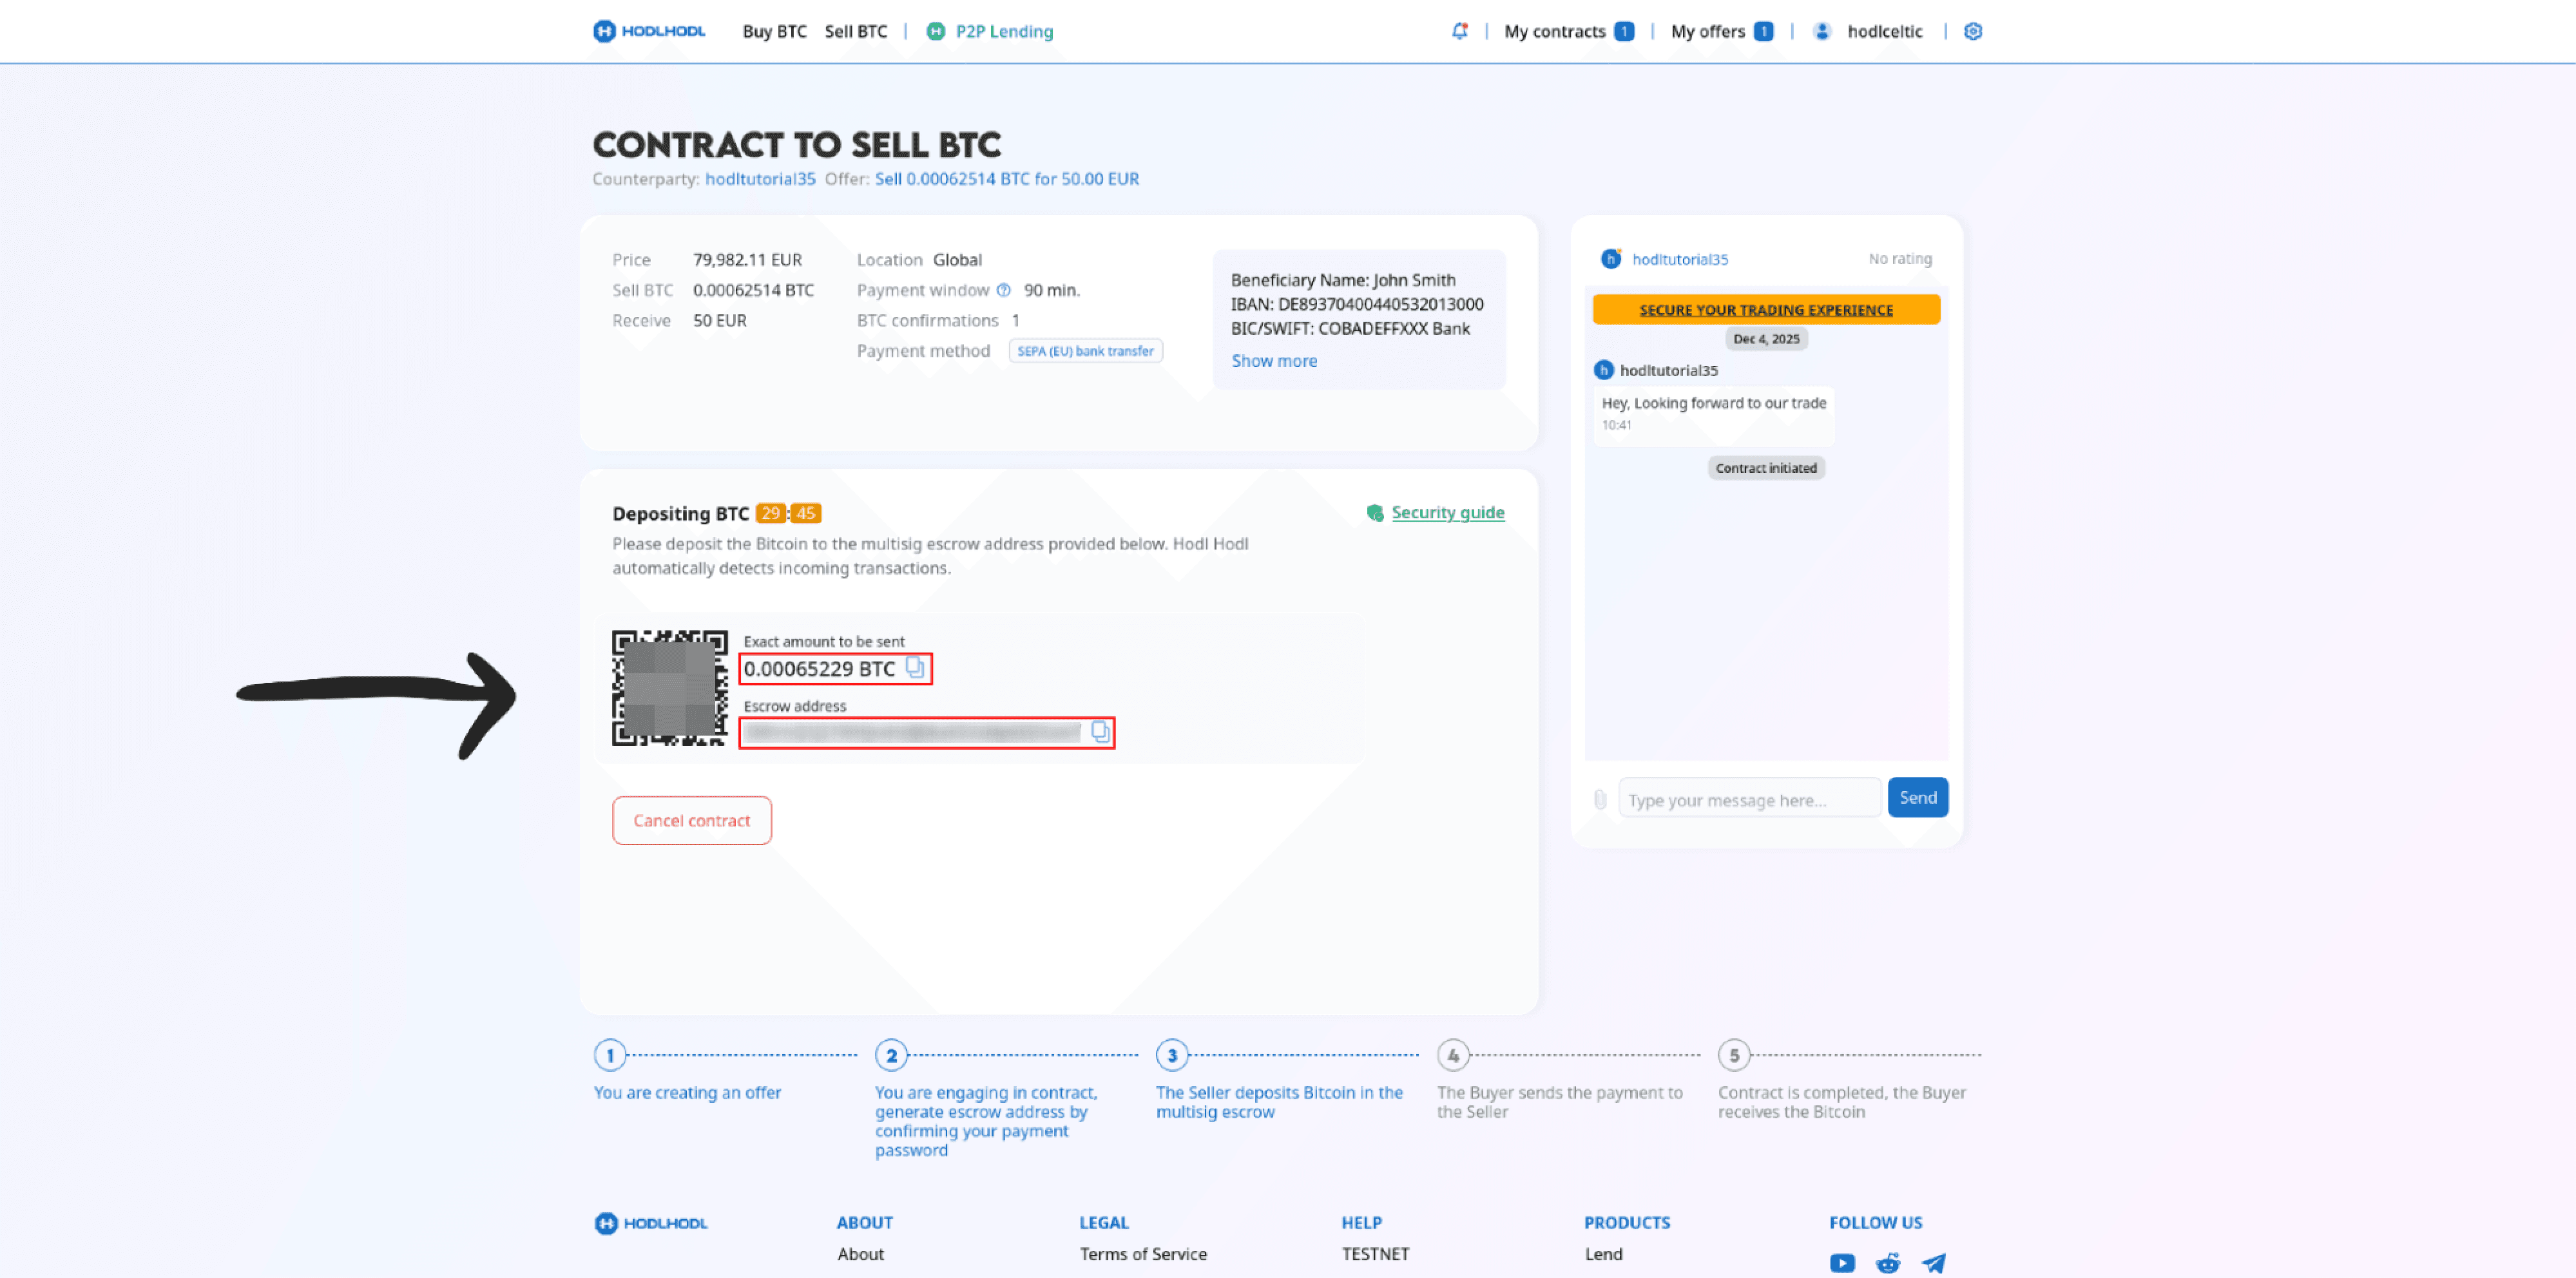
Step 3: BTC deposit
- Next, you will be asked to deposit Bitcoin to the provided escrow address:
- Verify the exact amount and address, then make the transfer.
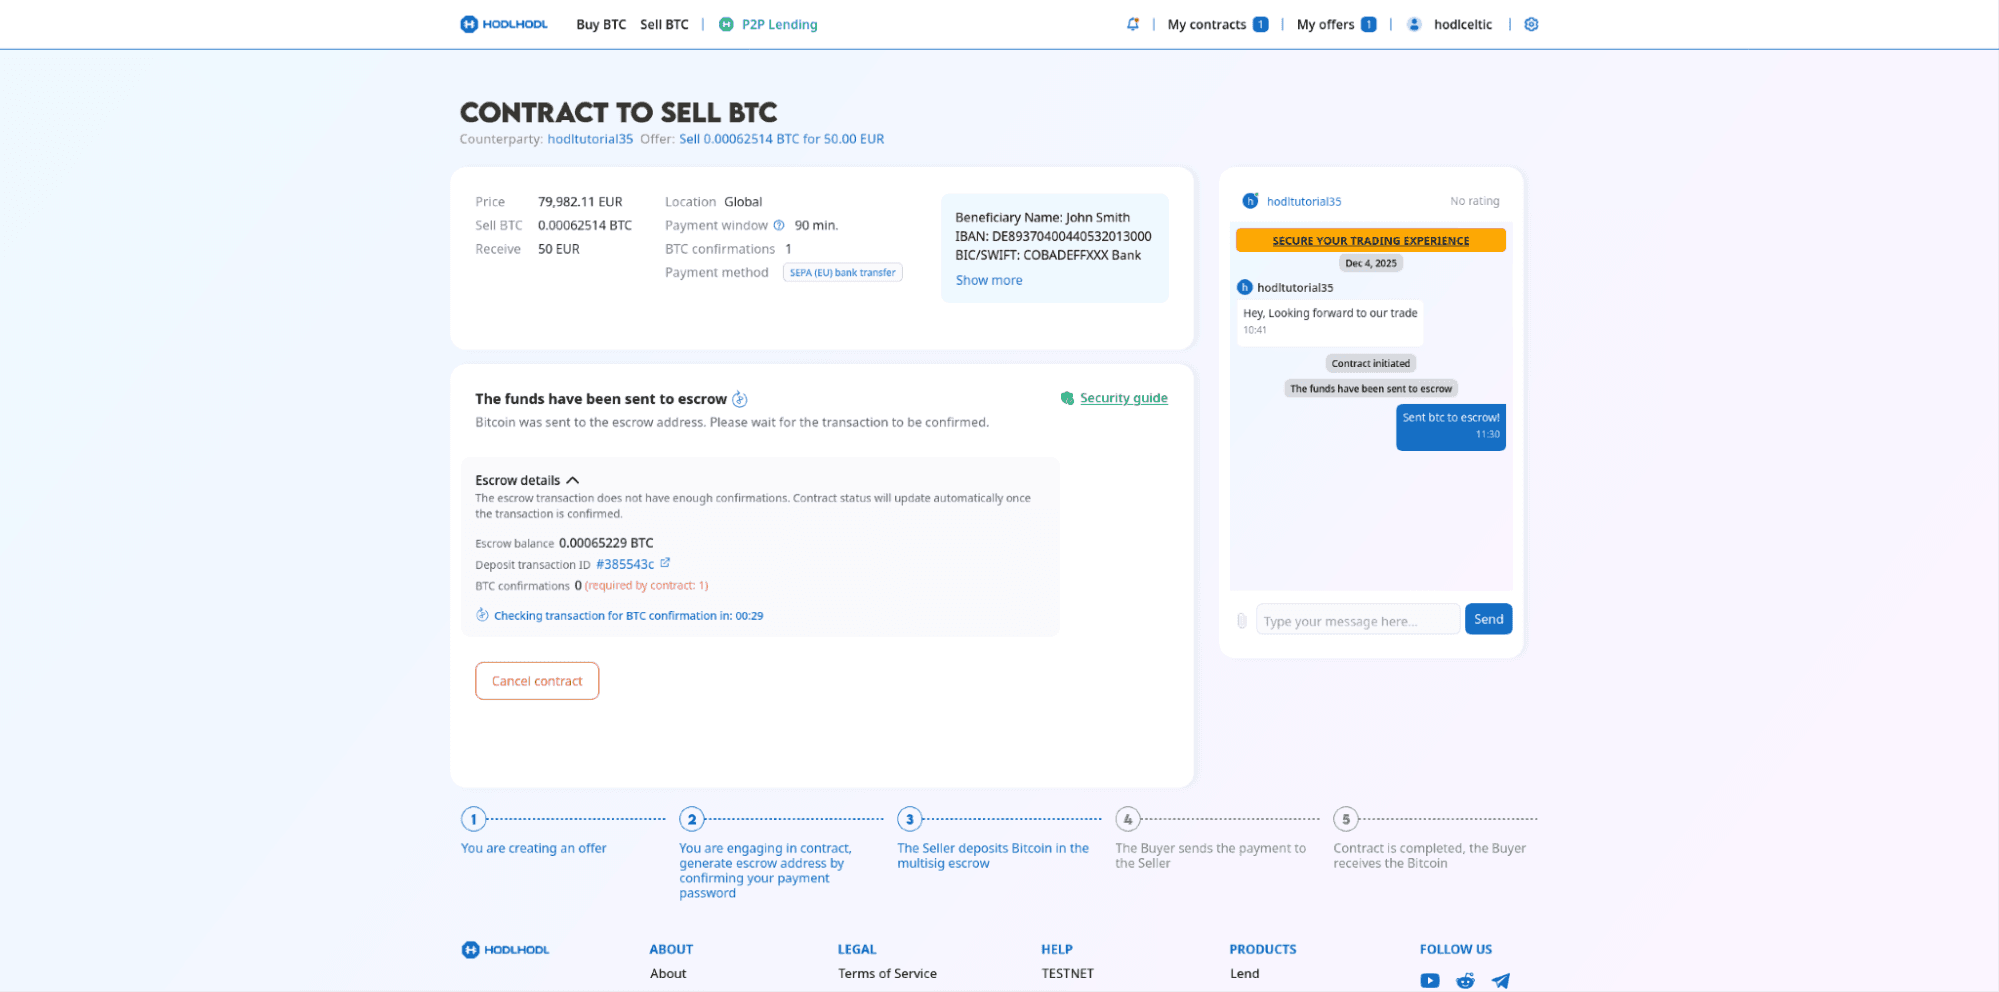
- Once you send the Bitcoin to escrow, you will need to wait for the transaction confirmation.
Step 4: Payment transfer
- The buyer will receive your payment details you provided.
- The buyer will then send the fiat payment to you using the agreed payment method.
- Await confirmation from the buyer that the payment has been sent.
Step 5: Payment confirmation
- Verify that you have received the payment in your account.
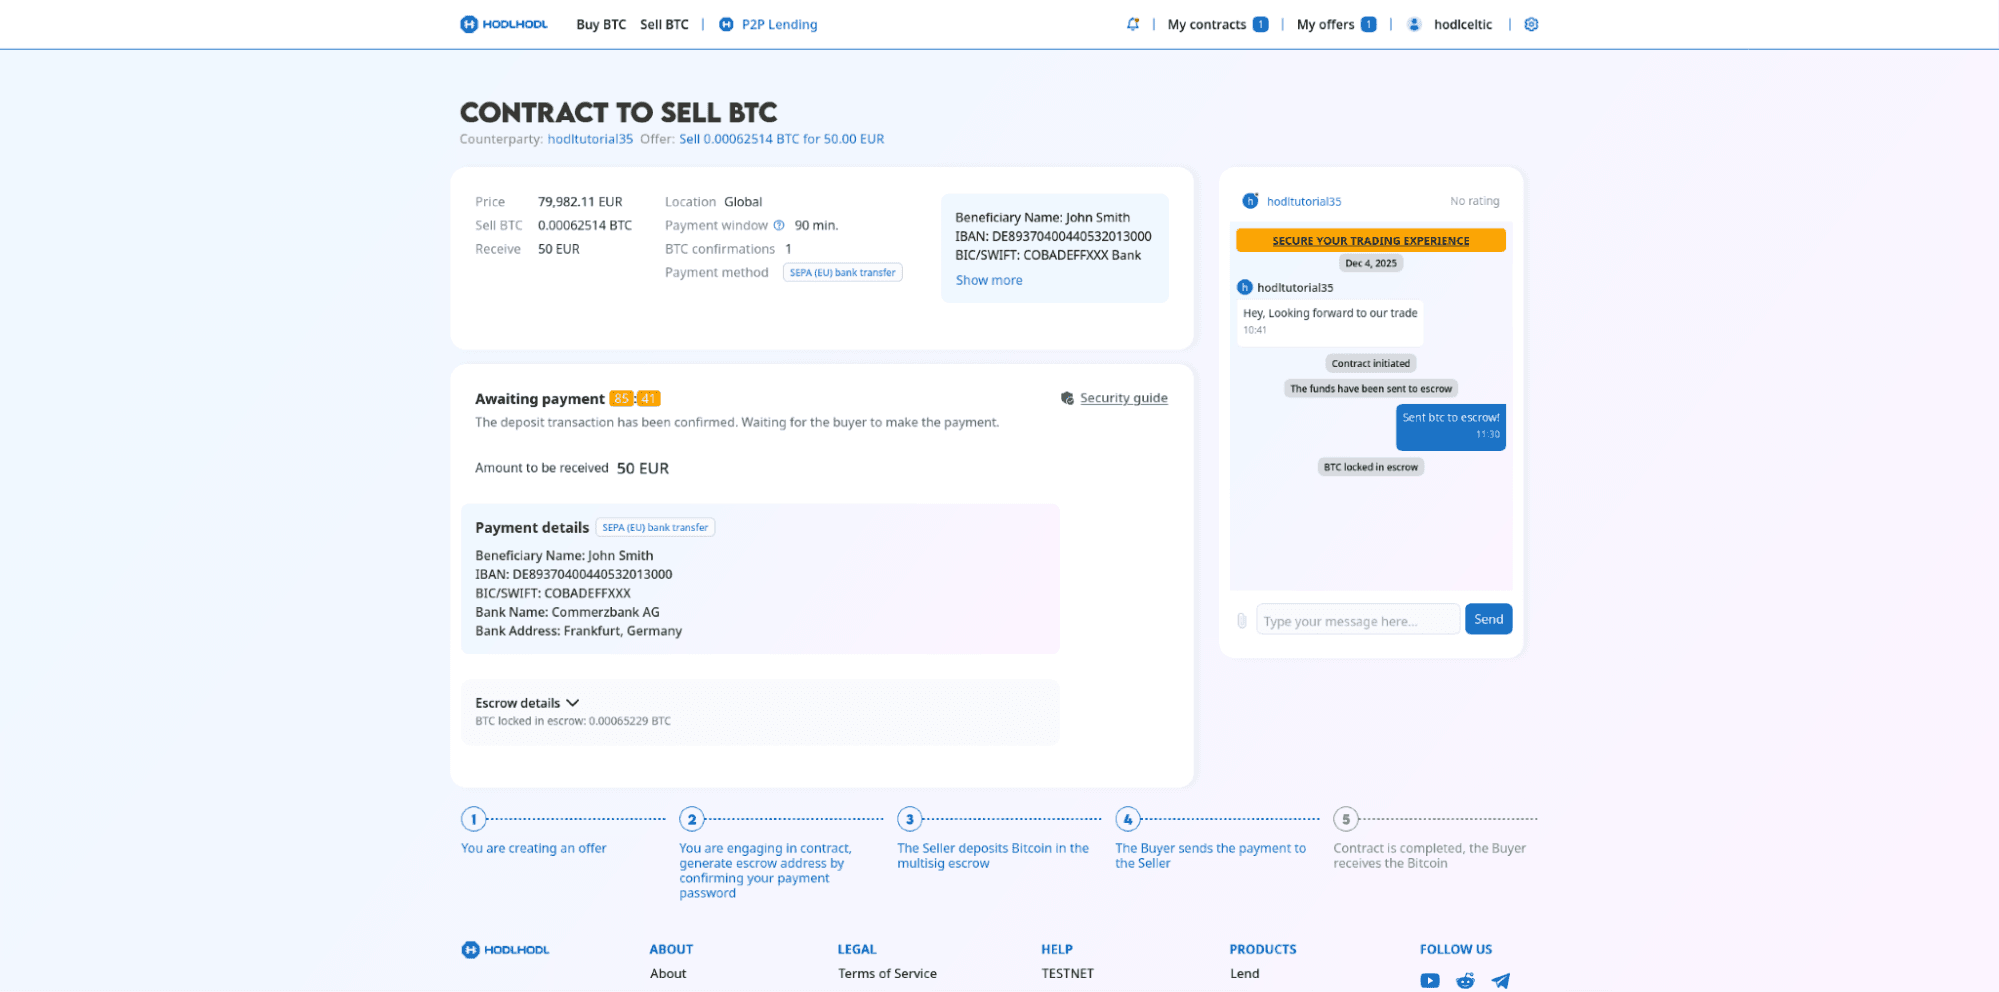
Step 6: Release escrow
- Once you confirm you received the payment, click the Release BTC button.
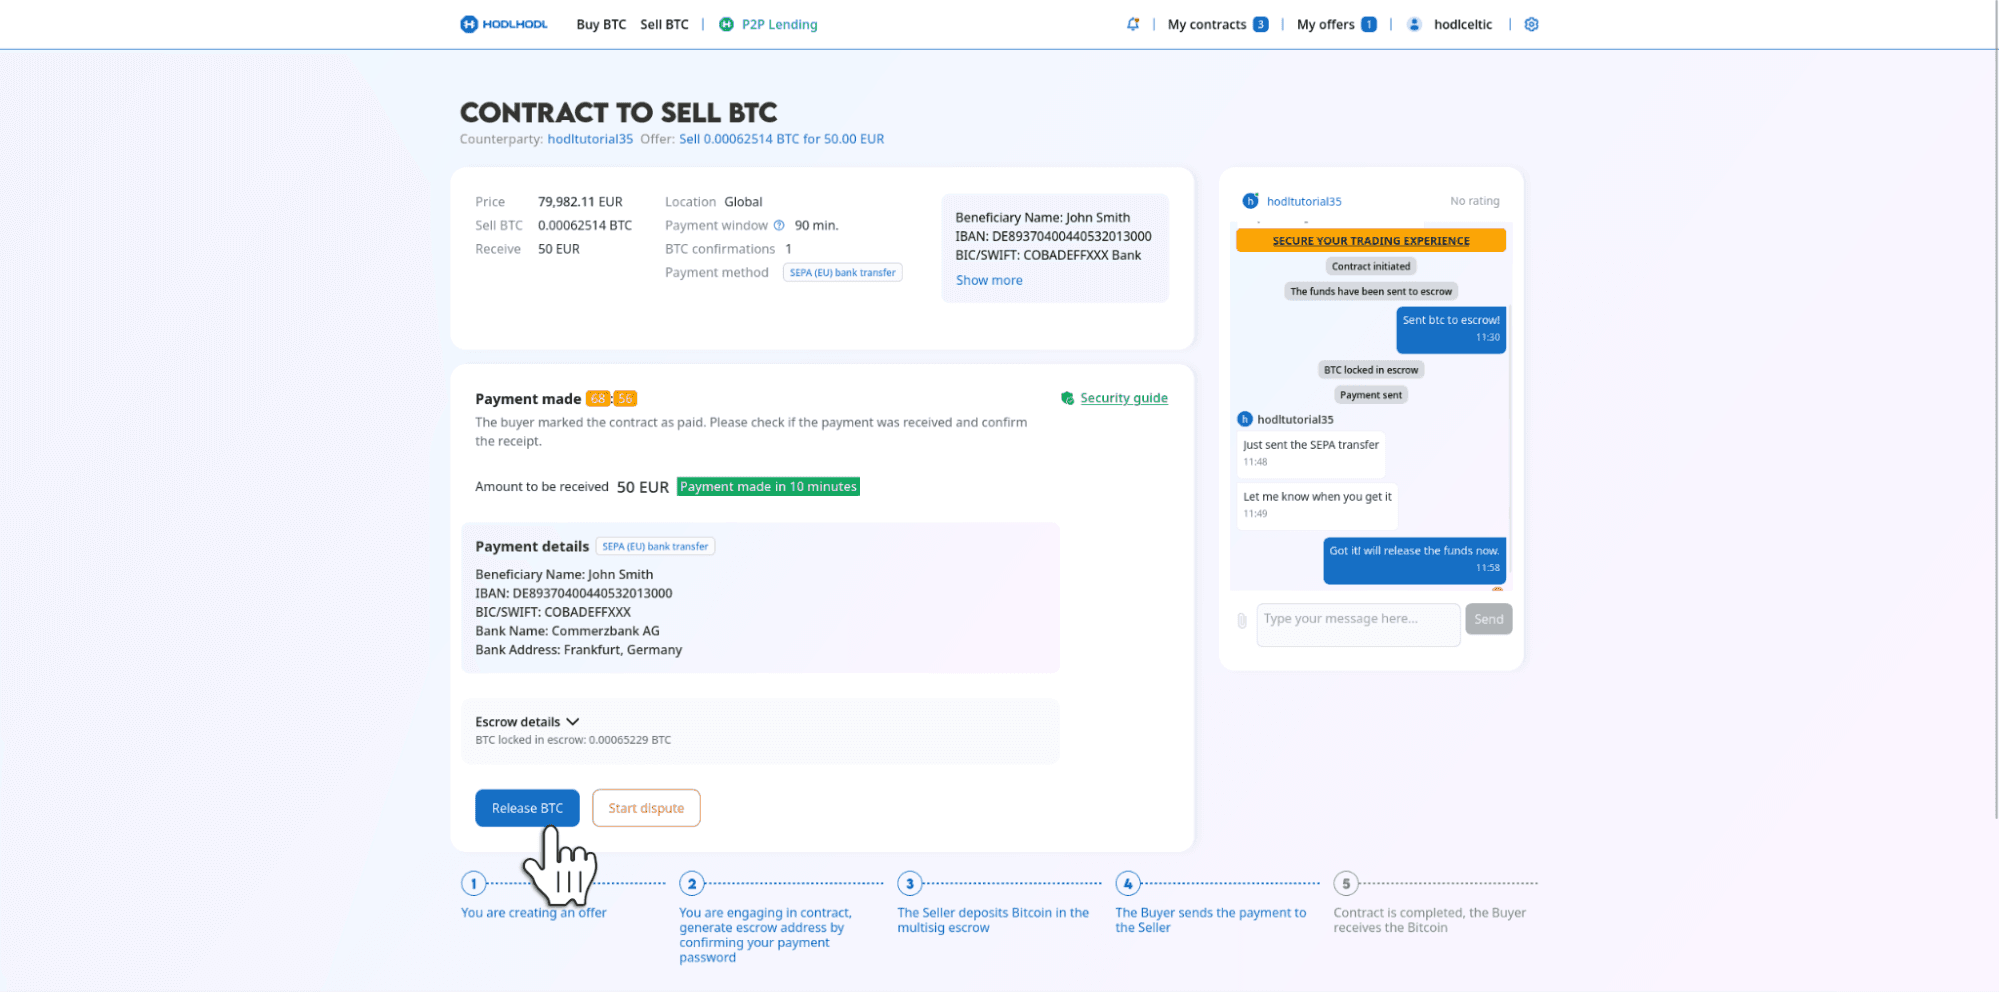
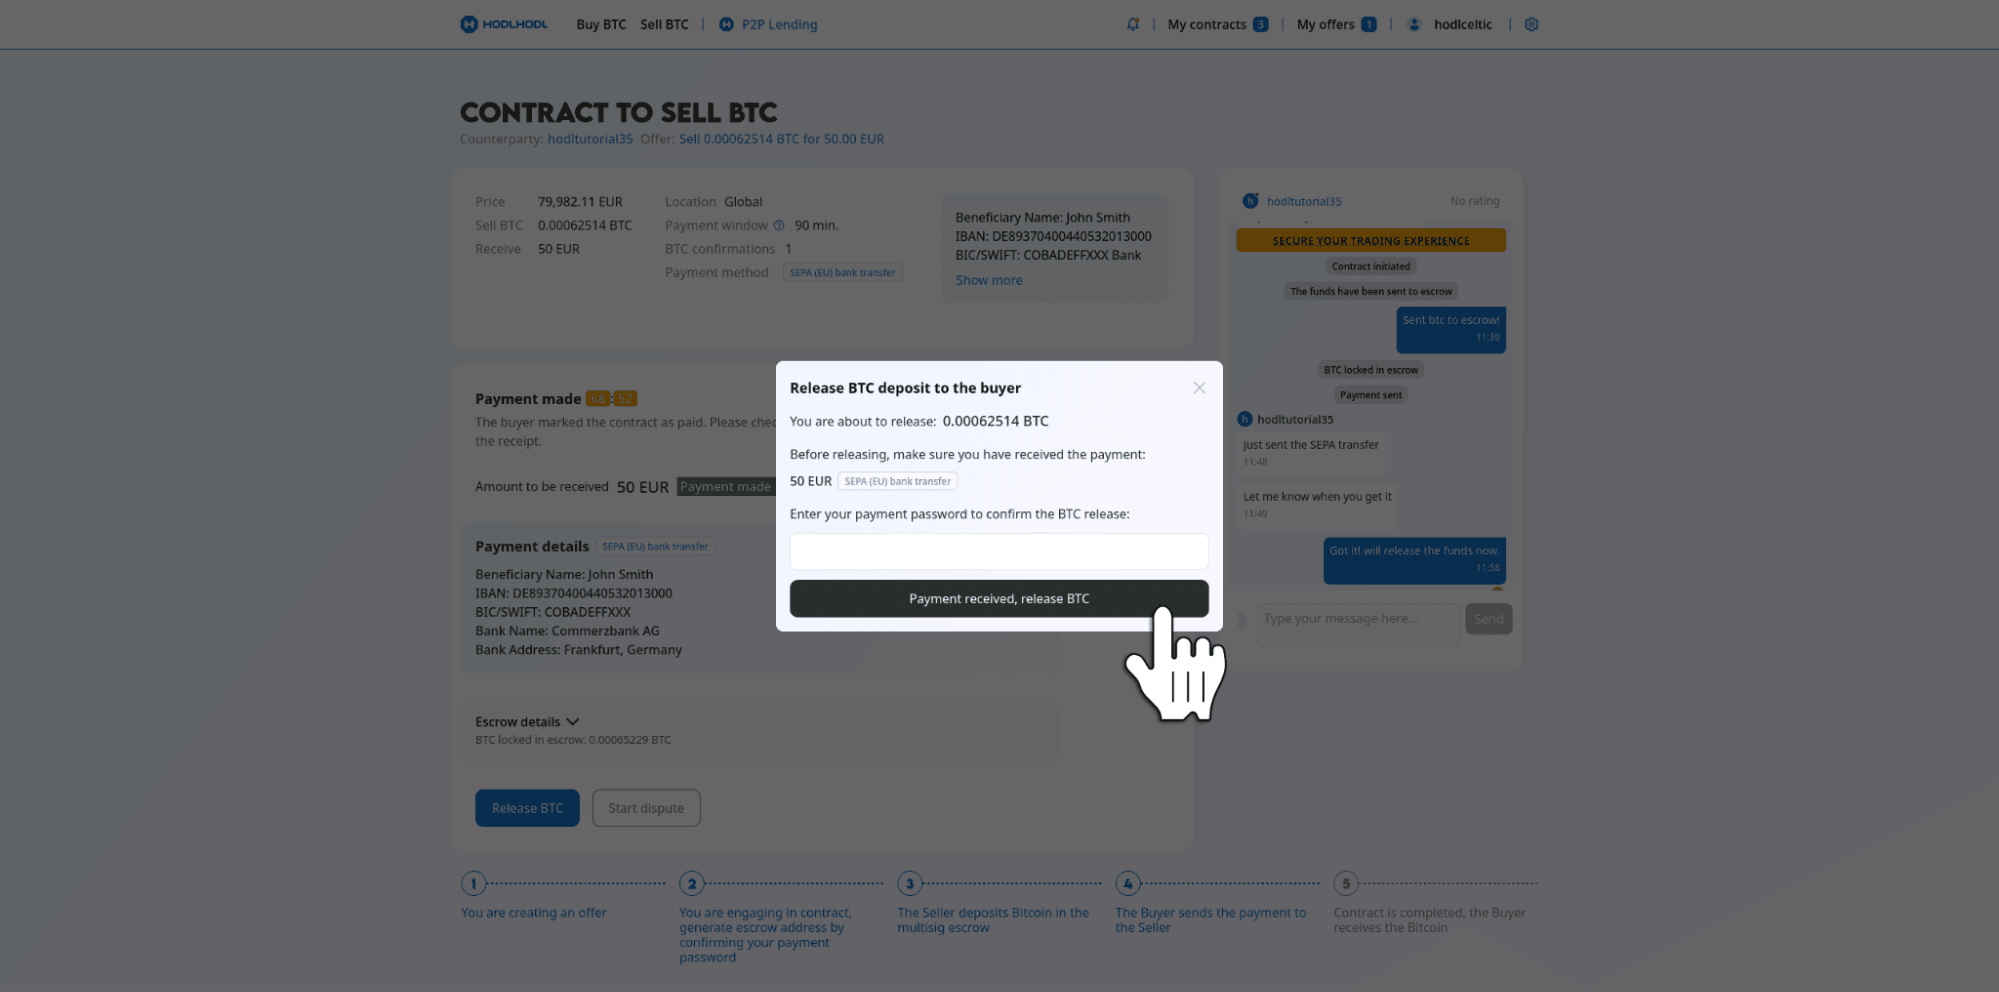
- Fill in your payment password to confirm the release.
Step 7: Contract completed
- The contract is completed.
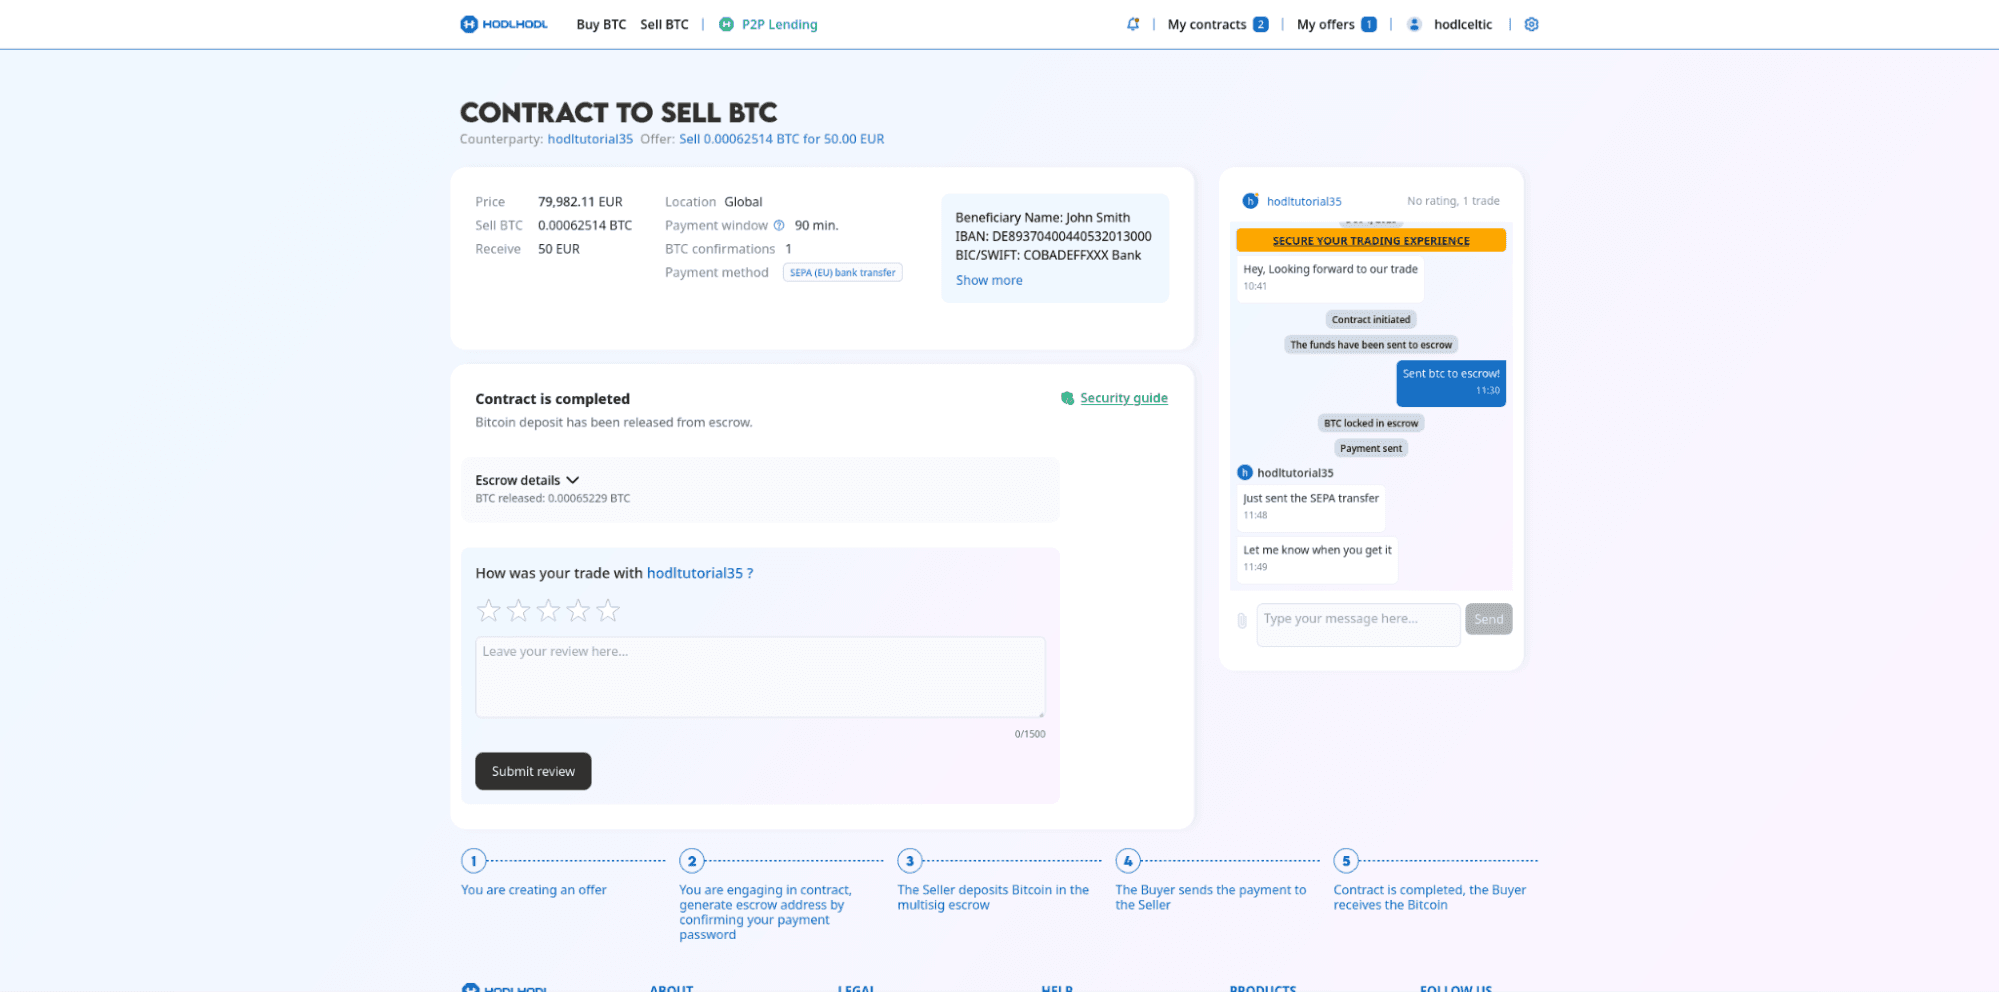
- You can leave feedback for the buyer at this final stage.
How can I create my own offer?
- To create your offer, you can click the “Create your offer” button located above the offer list, as well as on the “My Offers” page. To enable an offer, you need to check the “Enabled” checkbox at the bottom of the offer creation / editing page.
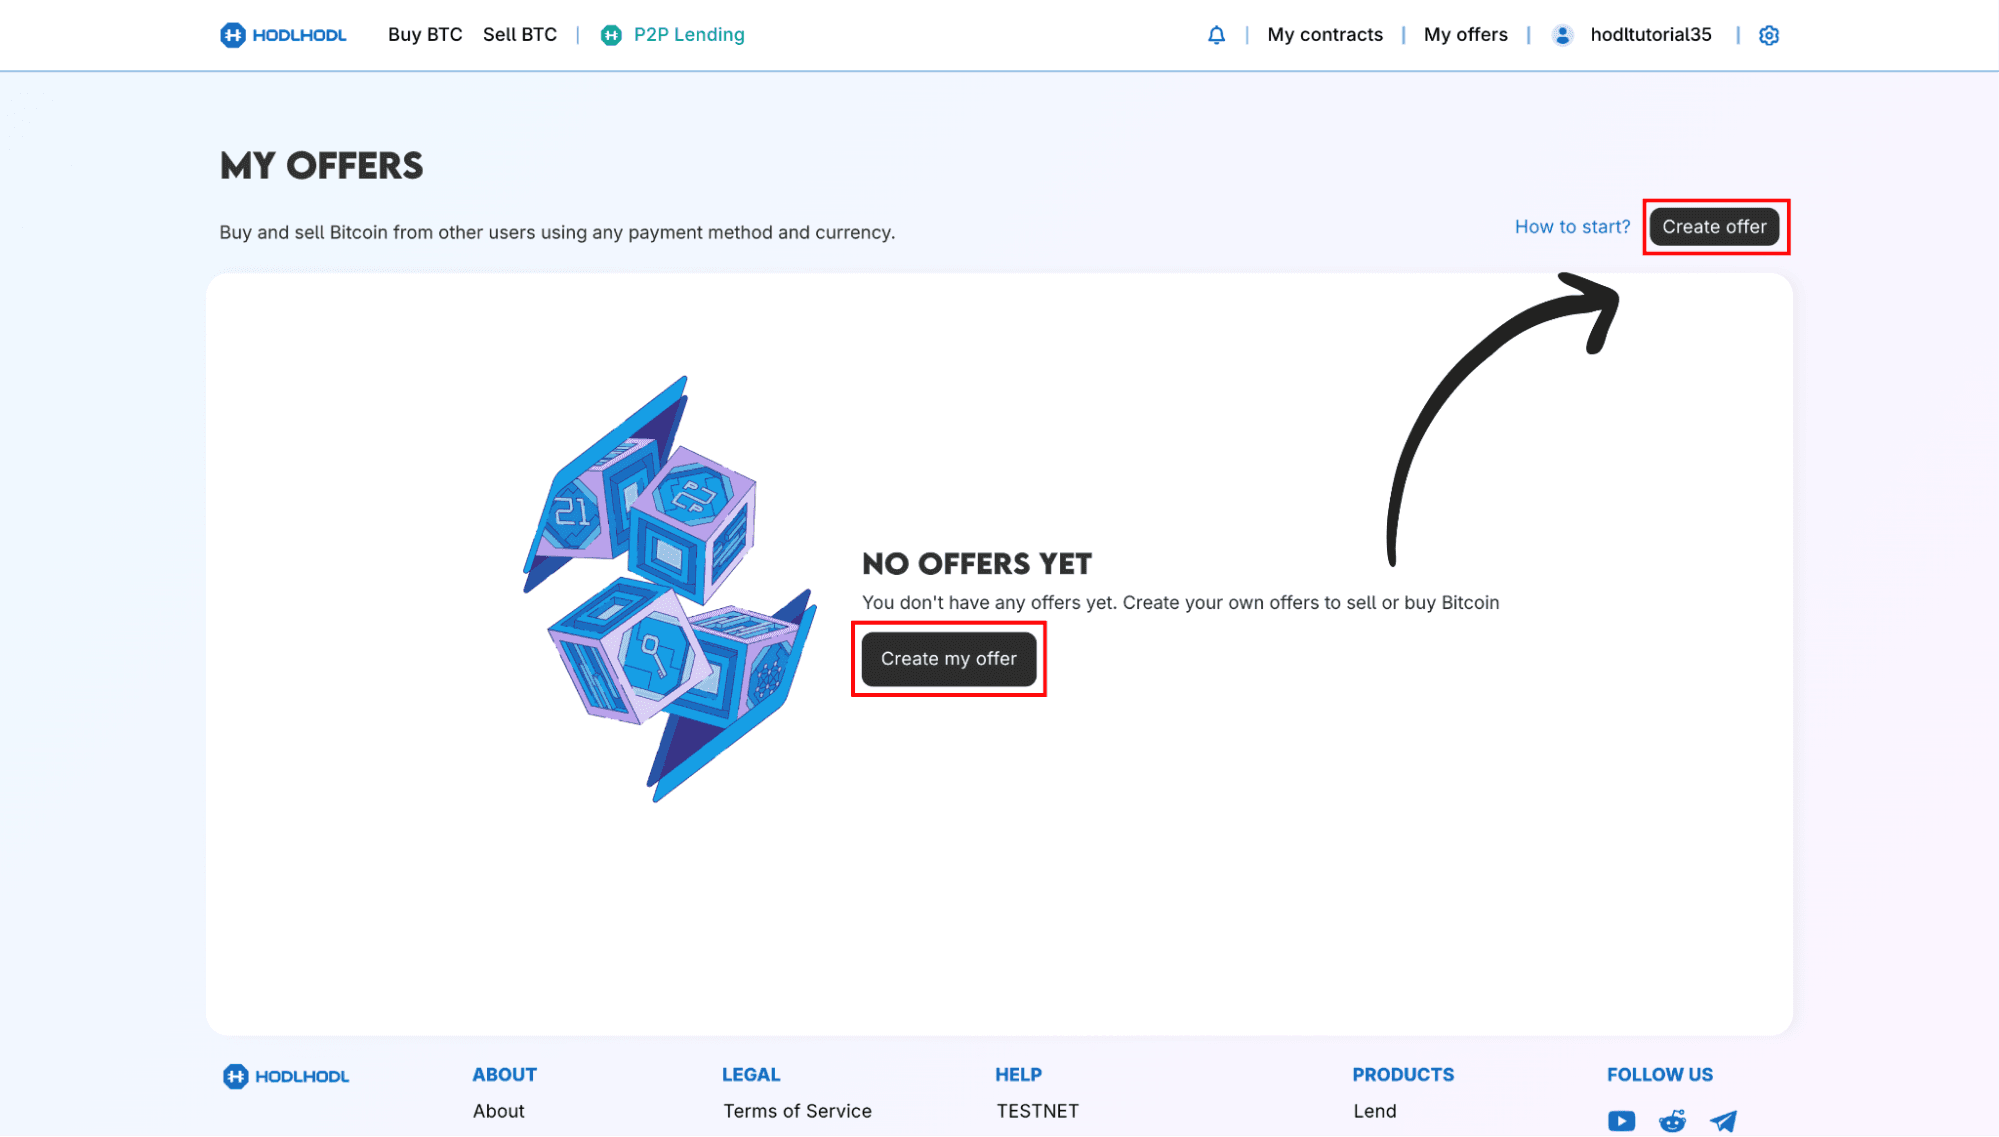
- You will see the offer creation screen:
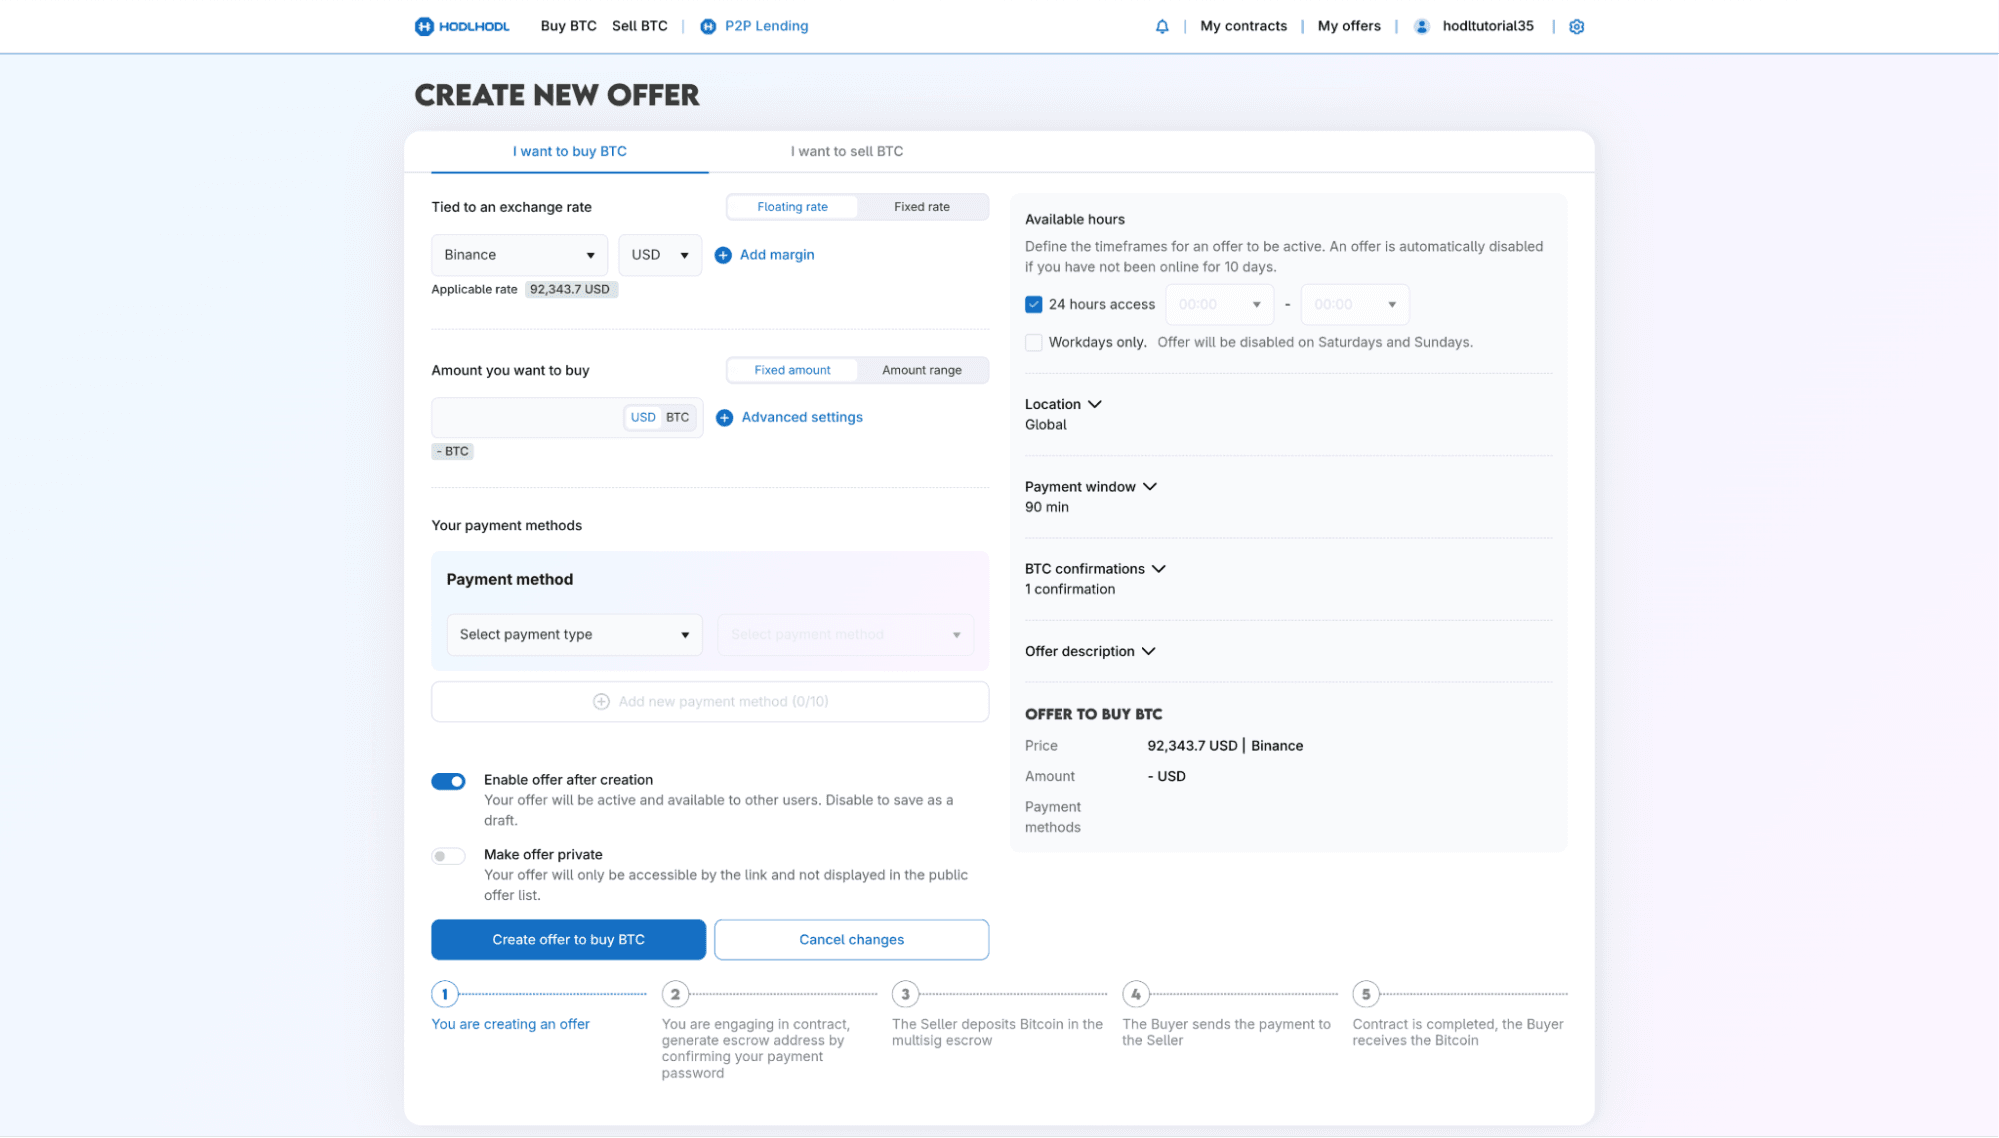
Step 1: Choose Your Offer Type & Network
-
Direction: At the top of the screen, select whether you want to Buy BTC or Sell BTC by clicking the corresponding tab.
-
Network: Under the Bitcoin network options, click either On-chain or Lightning network button.
Step 2: Set Your Price
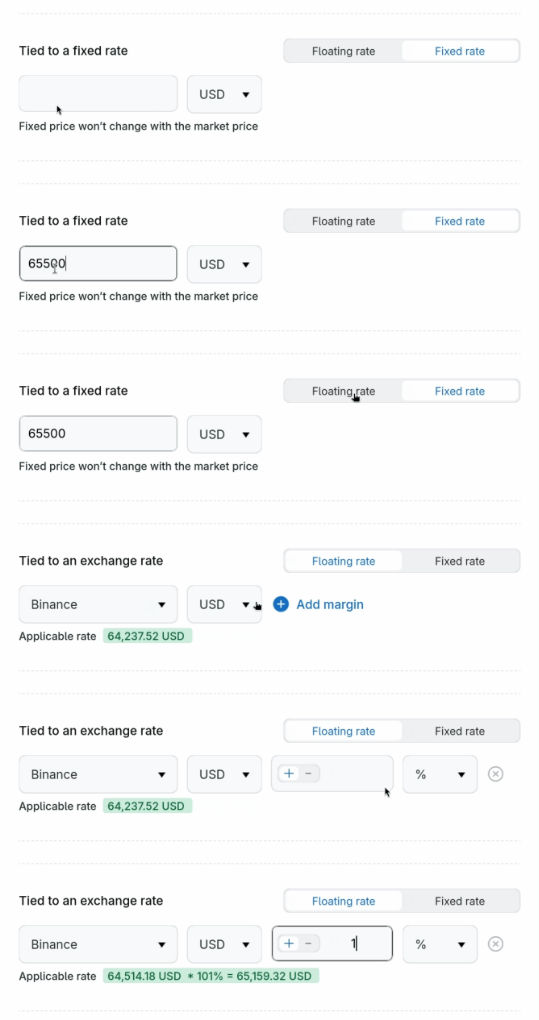
Choose how your trade price will be calculated:
-
Floating rate: The price automatically adjusts based on a global exchange rate. Select your preferred exchange (e.g., Binance) and fiat currency (e.g., USD) from the dropdowns.
-
Fixed rate: Set a specific, unchanging price for your trade.
-
Add margin: Click this option to add a percentage premium above or discount below the market rate.
-
Applicable rate: Displays the real-time final price based on your settings.
Step 3: Set the Trade Amount
Choose how much Bitcoin you want to trade:
-
Fixed amount: Set an exact, static amount for the trade.
-
Amount range: Define the minimum and maximum limits for a trade.
-
Use the toggle switch to input your desired amounts in either USD or BTC.
-
Click Advanced settings for additional options.
Step 4: Select Payment Methods
-
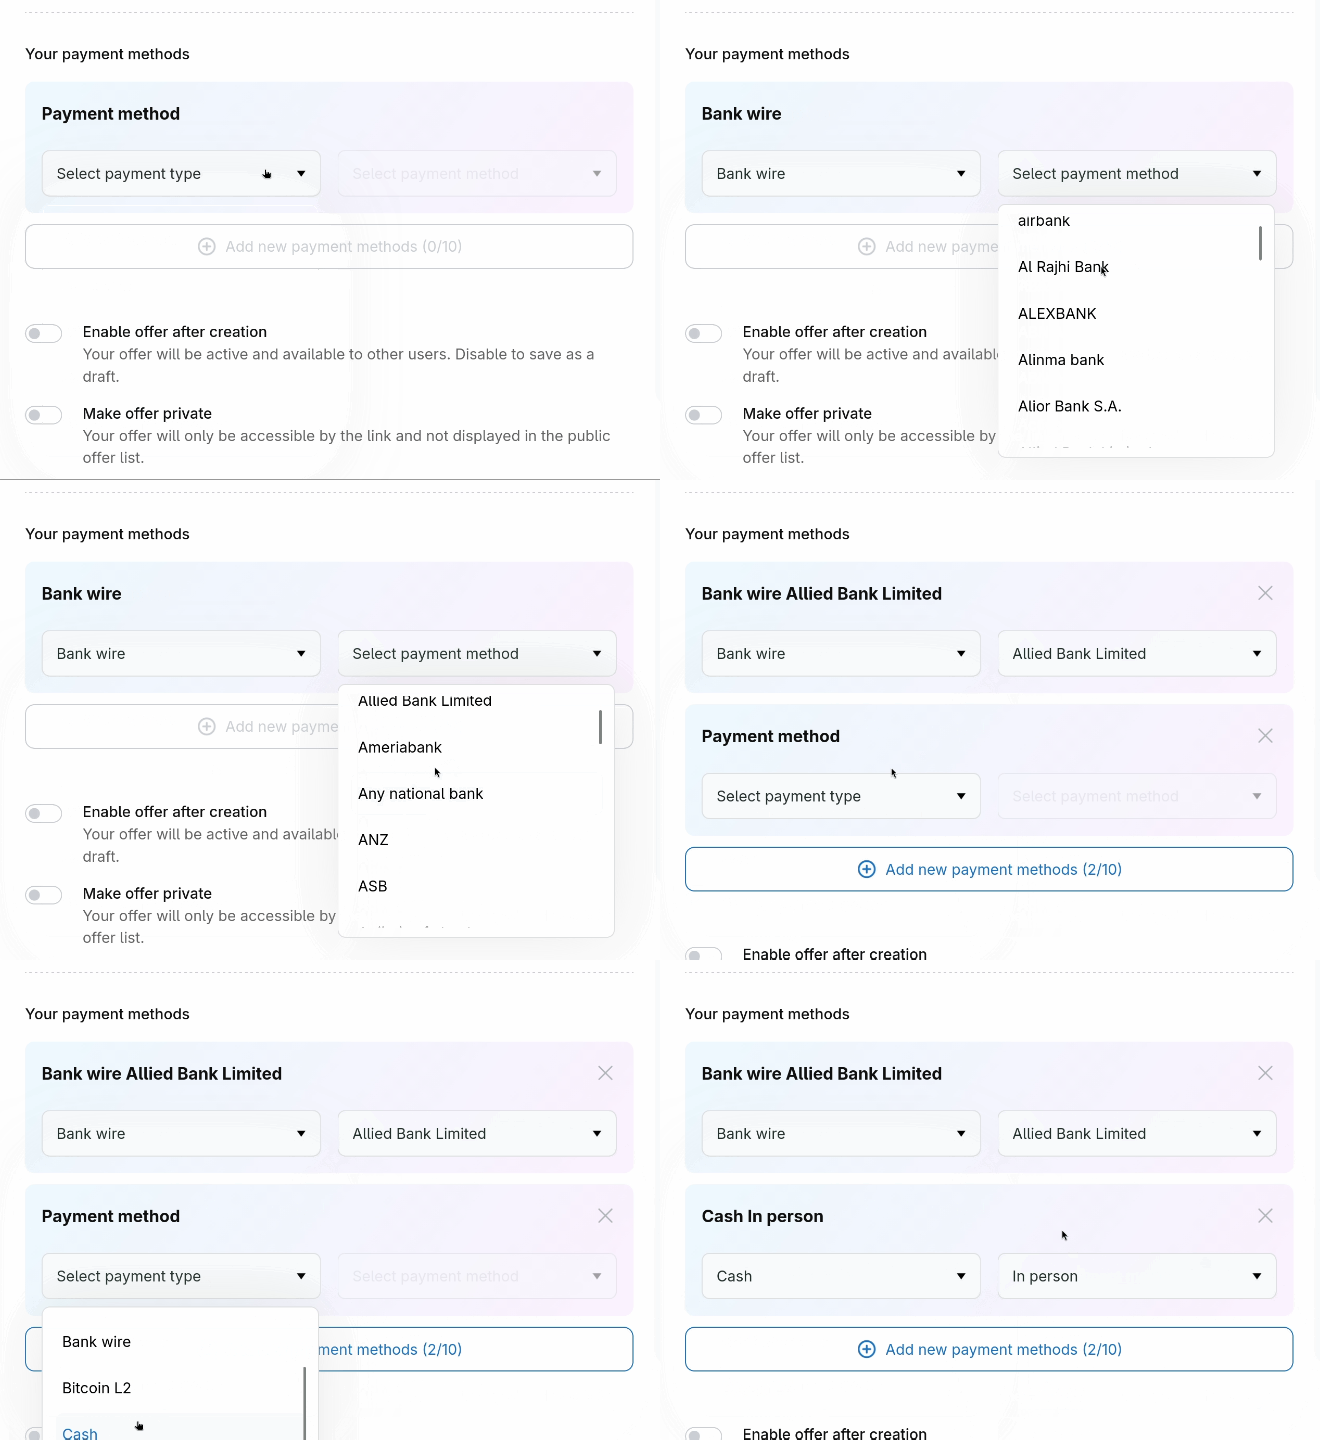
Select payment methods – Configure how you want to send or receive payment:
-
Click "Select payment type" drop-down
-
Choose a payment method from the available options
-
Click "Add new payment method" to include additional options (up to 10)
-
💡 Tip: Adding multiple payment methods increases your chances of finding a trading partner.
Step 5: Configure Offer Settings (Right Panel)
Available hours – Define when your offer is active:
-
Check "24 hours access" for round-the-clock availability
-
Check "Workdays only" to disable the offer on Saturdays and Sundays
-
Set specific time windows if needed
⚠️ Note: An offer is automatically disabled if you have not been online for 10 days.
Location – Select "Global" or choose specific countries where your offer will be visible.
Payment window – Set the time limit for the buyer to complete payment (e.g., 90 min).
Offer description – Add details about your offer terms, conditions, or instructions for traders.
Step 6: Final Options & Review
-
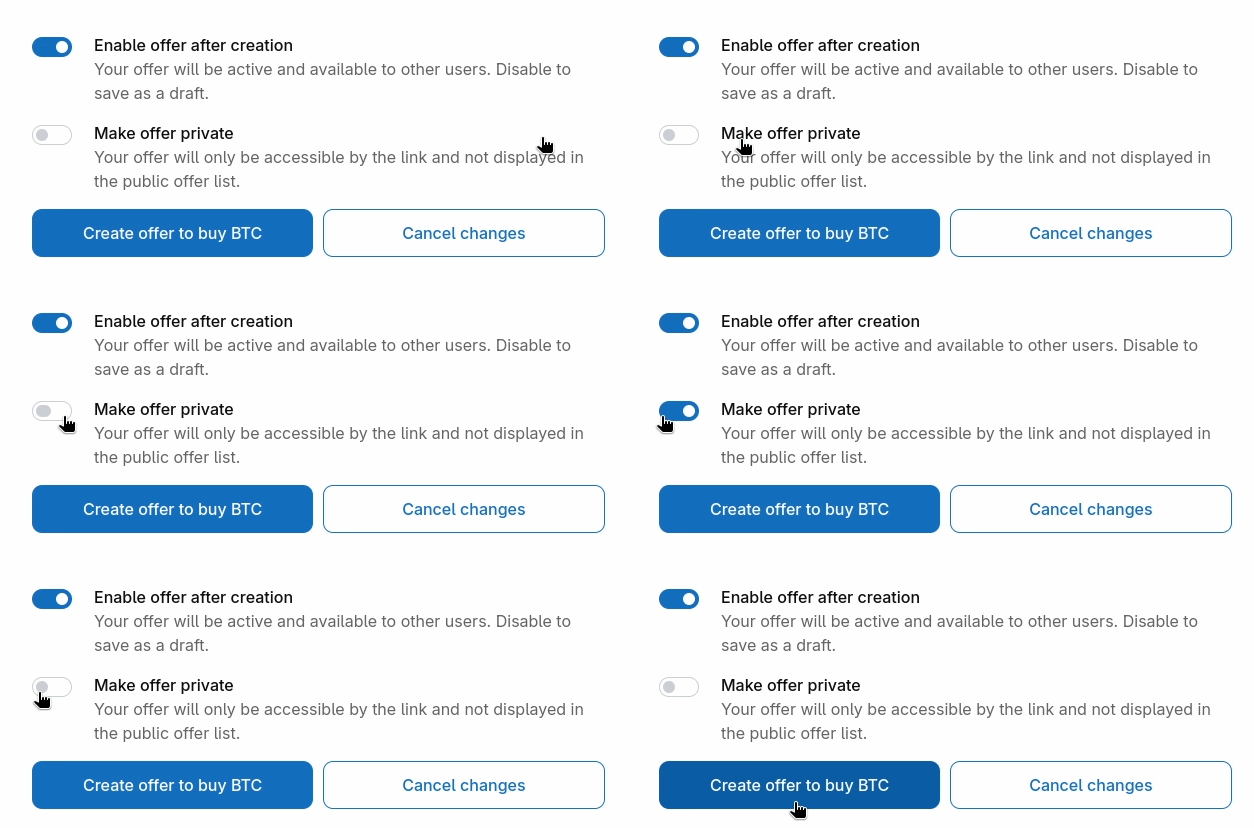
Enable offer after creation: Toggle ON to make your offer immediately active and public (or check the "Enabled" box at the bottom). Toggle OFF to save it as a draft.
-
Make offer private: Toggle ON if you only want this offer accessible via a direct link (hidden from the public offer list).
Review the Summary Box (Right Side): Verify your Price, Amount, and Payment methods.
-
Click Create offer to buy/sell BTC to publish.
-
Click Cancel changes to discard.